
Introduction
Here’s an explanation from the Mayo Clinic about sores caused by pressure on the skin (https://www.mayoclinic.org/diseases-conditions/bed-sores/symptoms-causes/syc-20355893):
“Bedsores are injuries to the skin and the tissue below the skin that are due to pressure on the skin for a long time. Bedsores most often arise on skin that covers bony areas of the body, such as the heels, ankles, hips and tailbone. Bedsores also are called pressure ulcers, pressure injuries and decubitus ulcers.
“The people who are most at risk of bedsores have medical conditions that keep them from changing positions or moving. Or they spend most of their time in a bed or a chair.
Bedsores can arise over hours or days. Most sores heal with treatment, but some never heal completely. You can take steps to put a stop to bedsores and help them heal.
“Bedsores are injuries to the skin and the tissue below the skin that are due to pressure on the skin for a long time. Bedsores most often arise on skin that covers bony areas of the body, such as the heels, ankles, hips and tailbone. Bedsores also are called pressure ulcers, pressure injuries and decubitus ulcers.
“The people who are most at risk of bedsores have medical conditions that keep them from changing positions or moving. Or they spend most of their time in a bed or a chair.
Bedsores can arise over hours or days. Most sores heal with treatment, but some never heal completely. You can take steps to put a stop to bedsores and help them heal.
Symptoms of bedsores are:
- Changes in skin color or texture.
- Swelling.
- Pus-like draining.
- An area of skin that feels cooler or warmer to the touch than other areas.
- Sore areas.
“Bedsores fall into one of several stages based on their depth, how serious they are and other features. The degree of skin and tissue damage ranges from inflamed, unbroken skin to a deep injury involving muscle and bone.
Common sites of pressure ulcers
For people who use wheelchairs, bedsores often occur on skin over these areas:
- Tailbone or buttocks.
- Shoulder blades and spine.
- Backs of arms and legs where they rest against a chair.
For people who need to stay in bed, bedsores may happen on the:
- Back or sides of the head.
- Shoulder blades.
- Hip, lower back or tailbone.
- Heels, ankles and skin behind the knees.
Causes
- Pressure. Constant pressure on any part of the body can lessen the blood flow to tissues. Blood flow is essential to deliver oxygen and other nutrients to tissues. Without these key nutrients, skin and nearby tissues are damaged and might die over time. Limited movement can make skin prone to the damage that the pressure causes. For people with limited mobility, pressure tends to happen in areas that aren’t well padded with muscle or fat and that lie over a bone. These areas include the spine, tailbone, shoulder blades, hips, heels and elbows.
- Friction. Friction occurs when the skin rubs against clothing or bedding. It can make fragile skin more vulnerable to injury, especially if the skin also is moist.
- Shear. Shear occurs when two surfaces move in the opposite direction. For example, when a bed is raised at the head, a person can slide down in bed. As the tailbone moves down, the skin over the bone might stay in place, pulling in the opposite direction.”
Pressure sores are also called “bed sores” or “pressure ulcers”. Pressure sores are rated according to how deep they go. The most severe is when bone is visible. You basically have a hole right through your skin and muscle.
Memory foam mattress toppers
In my opinion, sores also can form if the skin cannot breathe or air cannot get to it. My wife and I had bought a memory foam mattress topper years ago and quickly began sweating on whatever skin areas were against the topper during the night, even though there was a bed sheet on the topper. The topper was just rubber. We dumped the mattress topper. (Likewise, we had found that any blankets and sheets made of synthetics that we covered ourselves with, caused sweating).
Alternating inflatable air mattress toppers
Likewise, our son had bought one of those inflatable 2-circuit alternating inflatable air mattress toppers with a pump that made him sweat. It was basically a plastic inflatable raft. It was difficult to put a fitted sheet on the mattress with the inflatable mattress in place. He had bought this “raft” while he was still using forearm braces and before we had a ceiling lift for him. The “raft” added about 2 inches of height to his bed, so he had trouble getting onto and off of the bed. The mattresses used on hospital beds (and probably nursing home beds and other institutions with public use of beds) are encased in plastic- or soft rubber shells to keep bodily fluids from soaking in. Beside pressure, lying against plastic or rubber causes sweating, and probably buildup of bacteria in the sweat. No air can get to the skin. Pressure sores and infection are highly likely.
Our son’s own experience with pressure sores
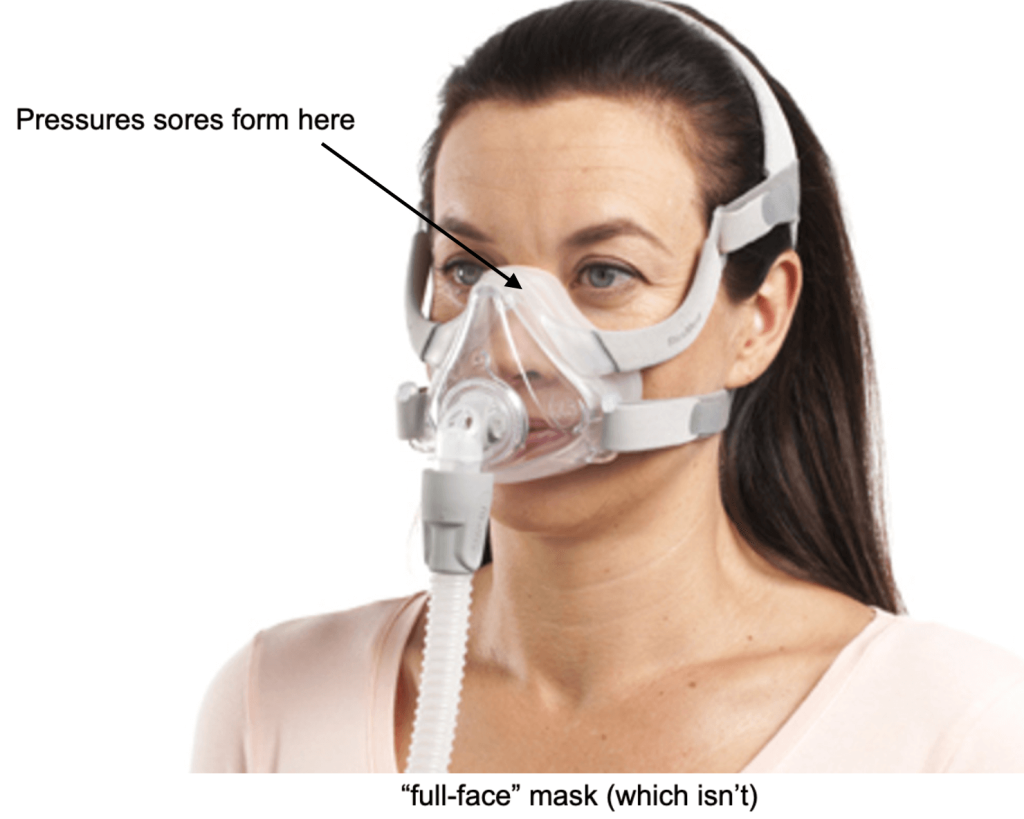
On the bridge of the nose
Our son got a pressure sore on the bridge of his nose very soon after getting his first “full face” mask for his ventilator, because the mask pressed and rubbed the skin raw there. See photo below. You can read more about face masks in my “Breathing Equipment” entry in this guide at: https://guidetoals.com/breathing-equipment/. (In that entry, you will see what a real full-face mask looks like versus what the medical mask manufacturers call a “full-face” mask.) Sores on the nose can be completely avoided by getting a mask that doesn’t rest on the bridge of the nose. The prescribing doctors keep prescribing masks that cause pressure sores on the nose. They have yet to learn what works.
On the spine
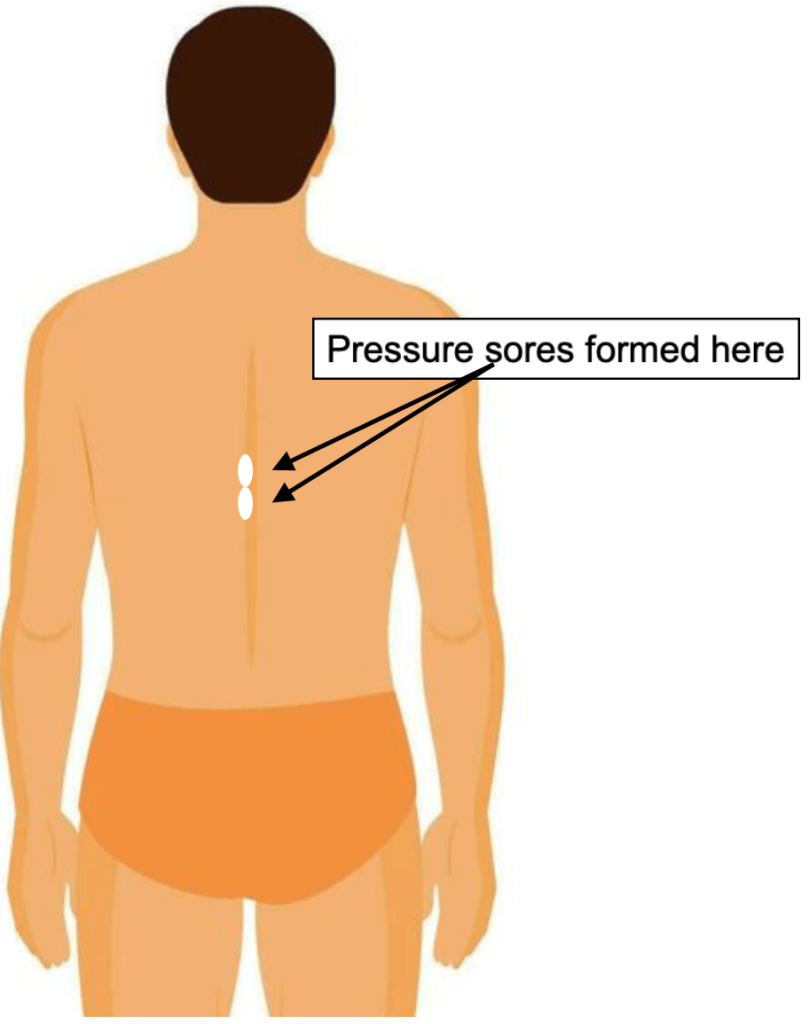
Because our son sat in his powerchair all day long, he got two pressure sores slightly to the left of his spine and about halfway up his back. (See image below). Surrounding the sores was some very rough (but not open) skin. The open sores and rough skin were caused by his own body’s weight sweating, pressing, sliding, and rubbing against his power wheelchair backrest. His sores started out looking like pimples, but they quickly became elongated and ugly open wounds. No bone was yet visible, so we had time to deal with the sores before infection set in.
On the ribs on both sides of the torso
When our son wanted to go to bed, we tried to avoid pressure directly on these sores. Because of breathing difficulties, he slept practically sitting up, as high as his mechanical bed could be raised, exactly like in the photo below with mattress omitted.
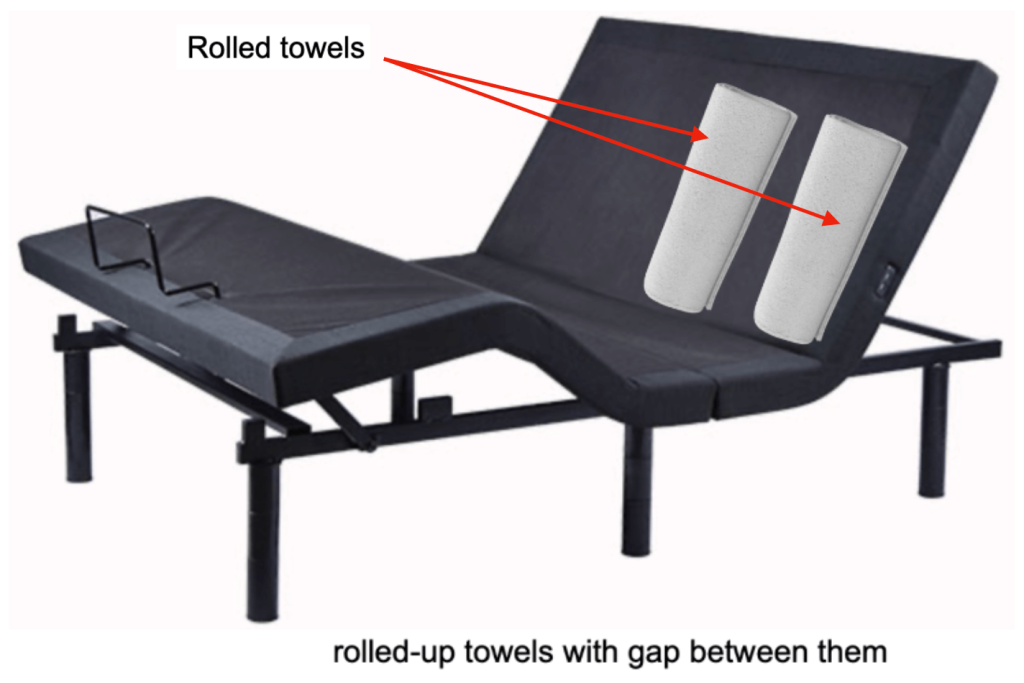
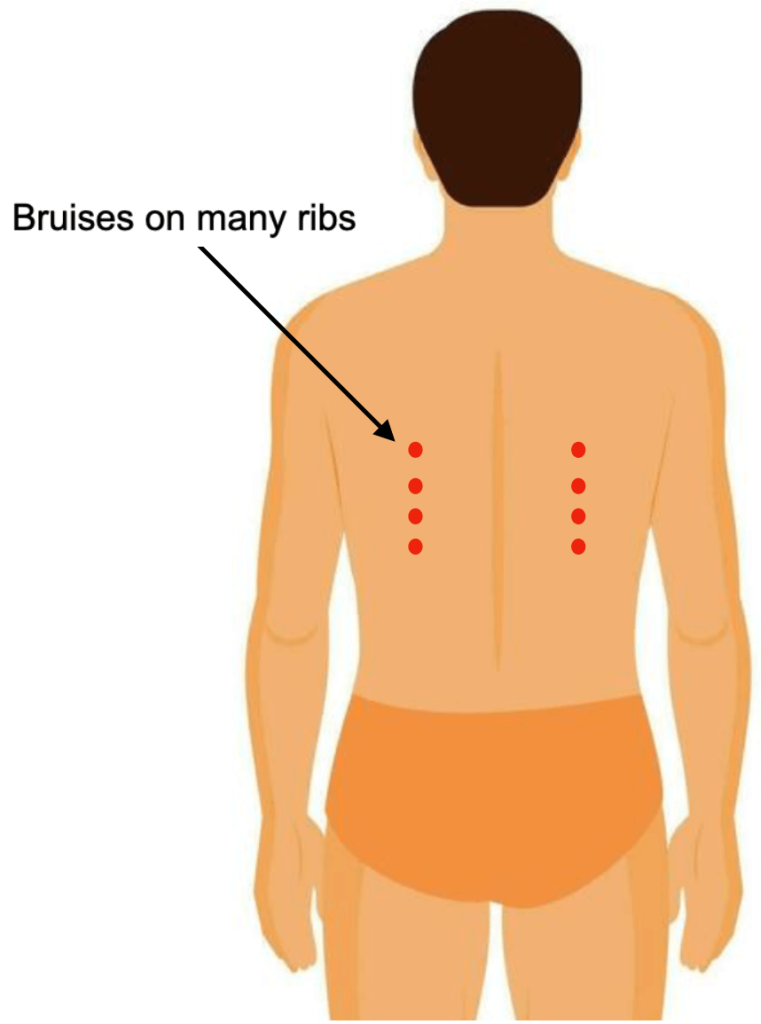
To alleviate pressure on his spine, I first tried two rolled up towels on the inclined part of his bed like in the photo above so his spine would not touch anything when we placed him in bed. The two towel rolls didn’t stay in place well. I also cut pieces from a ¼” thick gym mat and rolled them up to replace the rolled-up towels. These two arrangements bombed completely. Yes, his spine didn’t touch anything as intended because it nestled in the “valley” that was formed from the two towels and two mats. However, both rolls were uncomfortable, they didn’t allow his head to rest on this pillow correctly, and the worst part: multiple reddened sores formed on almost all his ribs about 4” to both the left and right of his spine! See image below. They would have changed to pressure sores if I did not quit this idea. All I succeeded in doing was moving the pressure away from his spine and onto a different area of his back.
We also tried making a valley from two pieces of simple 1” thick foam rubber, but it squashed too easily, and when he was uncomfortable and wanted the foam removed, it tore to shreds when we tried to pull it out from under the dead weight of his body.
On the collarbones
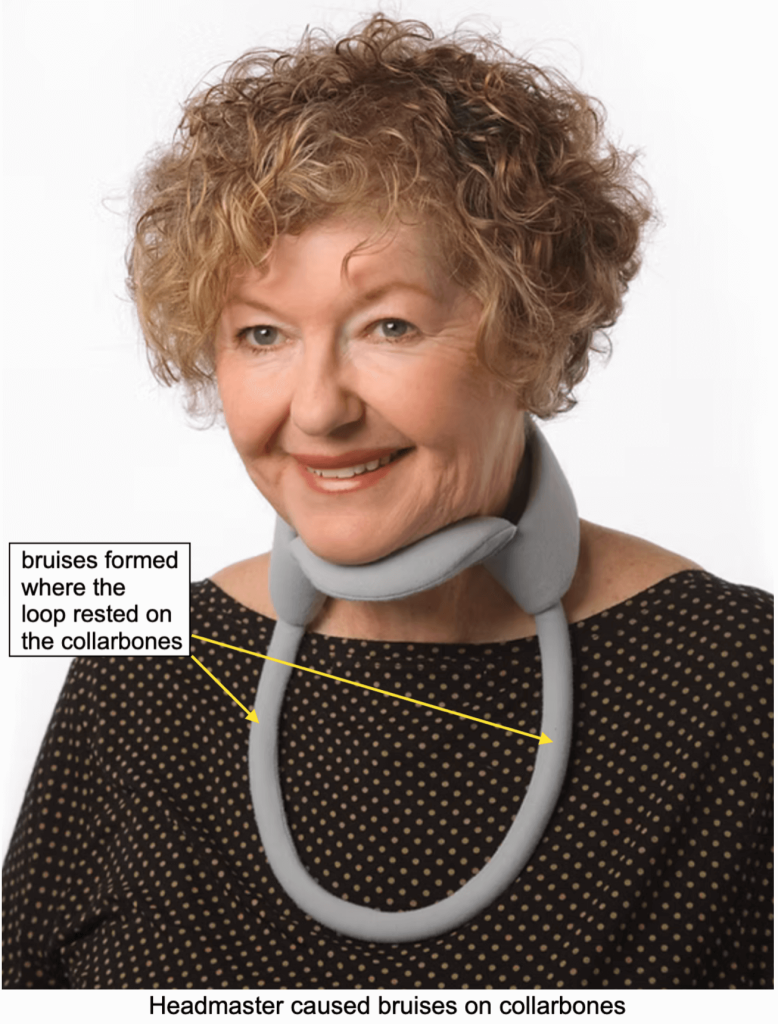
Our son had purchased a Headmaster (https://www.necksolutions.com/product/headmaster-collar/) to try to deal with head-drop. This device is essentially a thick coat hanger with cloth padding. We quickly observed sores forming on both of his collarbones because almost the entire weight of his head pressed down on the chin support, which then transferred all that weight to the loop of wire resting on the collarbones. The padding wasn’t sufficient to cushion him. We threw out the Headmaster for a number of reasons. You can read about our dealing with the Headmaster and other useless head supports in my article entitled “Head and Neck Support” at https://guidetoals.com/head-and-neck-support/.
Go to a wound clinic!!!
From our son’s experience: We had taken our son to his primary care doctor for the open sores on his spine (he hadn’t gotten the sores on his ribs yet). The idiot doctor was confidant they weren’t pressure sores because they were not exactly on our son’s spine. However, we were not satisfied with this diagnosis, so we took our son to a wound clinic at a nearby hospital. The highly trained staff easily identified the wounds as pressure sores, and showed us what to do.
If you develop pressures sores, I strongly urge you to go or be taken to a wound clinic, NOT a primary care doctor, nor even to one of those walk-in urgent care clinics in some strip mall unless you know they’re good. From our experience, if the doctor doesn’t know how to recognize or treat a pressure sore, it will only get worse. Primary care doctors are only good for cuts and bruises, period. Pressure sores are serious injuries.
Treatment for pressure sores
The wound clinic taught us about antimicrobial silver-impregnated (i.e., medicated) dressings for open wounds. The bandage packaging will say “silver”, or it will probably have “Ag” (the chemical symbol for silver) on the packaging. As of the time when our son was using these bandages, I saw two kinds of silver-based dressings:
Some bandages have silver-impregnated dressings (the padded, absorbent sections). All we had to do was open the wrapper and put the bandage on the wound.
Some dressings are only rolls of silver-impregnated cloth (they are not bandages with adhesive backings). We just cut a piece from the roll, placed it directly on the wound, then covered the cloth piece with a non-medicated bandage or medical tape (preferably perforated to allow air in) to hold the small strip of cloth against the skin.
Both of these silver-impregnated dressings and bandages completely prevented infection on our son’s back while the pressure sores were still open. The wounds healed nicely, but the healed area was wrinkled and rough like sandpaper and the skin was thin, so the sores reopened easily because he sat still all day. Some of the bandages were very expensive because of the silver.
Bandages and dressings
Some bandage brands are just plain crappy. Some won’t stick well. Some I couldn’t get the bandage out of its own wrapper because the bandage’s adhesive had glued the bandage inside the wrapper. Some adhesives gave our son allergic reactions. I couldn’t peel part of the wrapper off one brand so the bandage was applied with some of the torn wrapper still on it. On one bandage, the dressing itself was not centered on the bandage and the dressing was crookedly mounted on the adhesive backing, (see the Dimora bandage in the photo below).
Wound size and shape vs bandage orientation
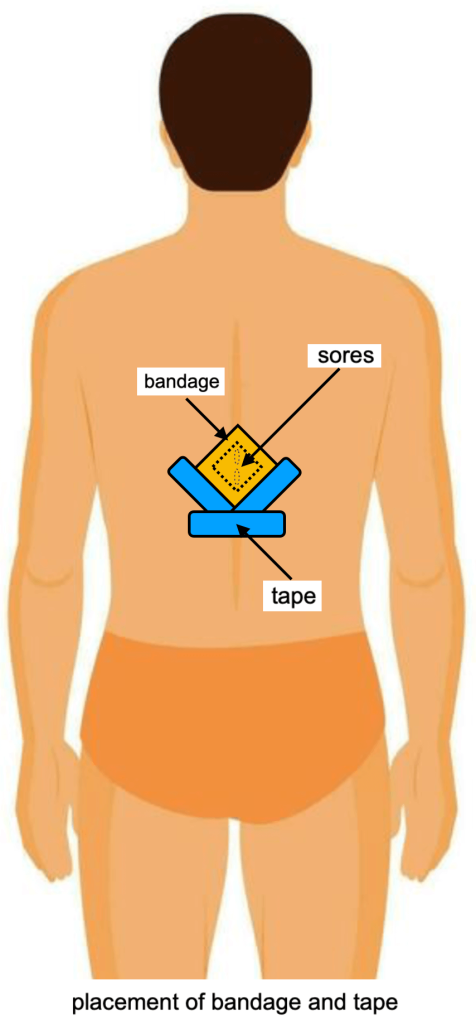
Because our son’s pressure sores were elongated, like in the image several pages back, I wanted to place the bandage in a “diamond” orientation, like in the image below, so the diagonal of the dressing (the longest part) would cover the wound. I didn’t want to place the square bandages horizontally for two reasons: the dressings obviously wouldn’t completely cover the wounds, and also, because our son was always sliding downwards in both his powerchair and his bed, the lower edge of the bandage would probably allow the bandage to be sheared off more easily than if placed in a “diamond” orientation.
Regular bandages like Band-Aids would not cover the pressure sore, unless I applied several of them horizontally side-by-side on the wound, but that was not a good way. It’s better to have the wound or sore surrounded by the adhesive (sticky) part, so the bandage is more resistant to shear if the patient slides against it. The image shows that the diagonal covers the complete pressure sore. After placing the bandage, I used medical tape (represented as the blue parts in the image below) to try to hold down the bottom edge of the tape and protect against rubbing, shearing, and sliding.
Bandage sizes and dressing sizes
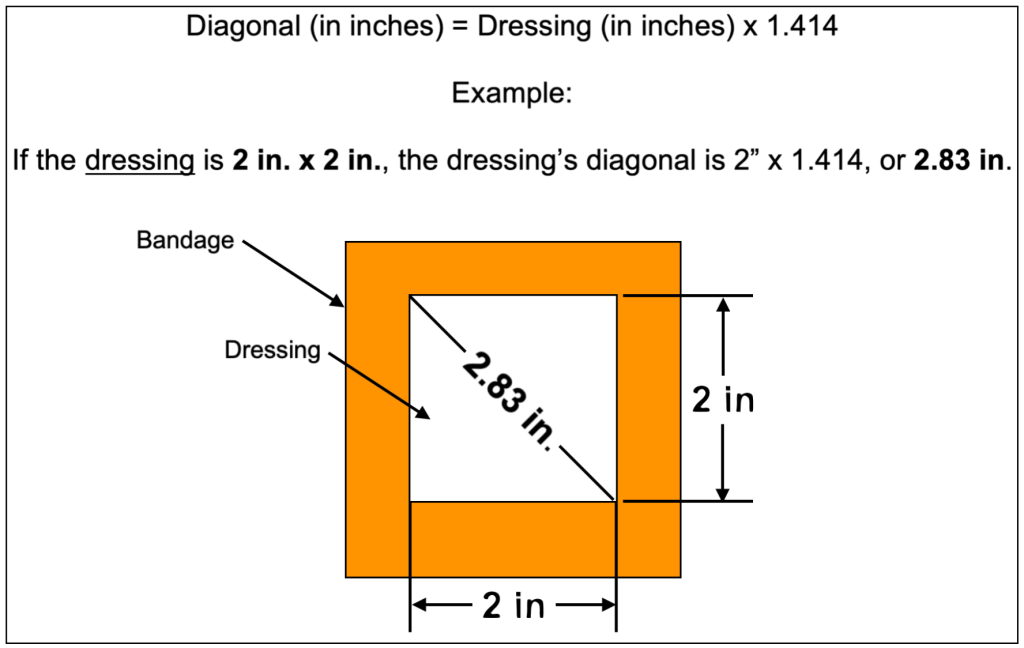
The bandage is the whole thing you apply to a wound, while the dressing is the absorbent cloth or pad itself. Alternatively, you can buy the dressing itself (like a stack of small square cloths), apply medication if necessary, lay it on the wound, then secure it in place with medical tape.
Do you know the actual size of the dressing you’re getting in a bandage? Is the actual dressing big enough to cover the wound area? It’s not easy sometimes to answer these questions by looking at online ads.
I believe the first bandage brand we bought to cover our son’s pressure sores only stated the bandage size (3” x 3”), not the dressing size. We bought some and subsequently discovered that the dressing wasn’t big enough to cover our son’s pressure sores completely. Lesson: Make sure the dressing dimensions are on the packaging before you buy.
Here’s a simple formula to help you figure out the dressing’s diagonal length if you know the dressing dimension:
Some of the bandages we bought had overly wide adhesive areas with ridiculously small dressings. The dressing is the important part of the bandage.
The photos below show five different brands of bandages we had bought on the web to cover our son’s pressure sores. After the pressures sores had closed, we still applied ointment, such as zinc oxide, then a bandage to cushion the skin and protect against the sores returning and re-opening.
In the photos below, I measured the dressings and wrote the actual sizes on the bandages. I found that there was no correlation between the bandage size and the dressing size. This meant that not all 4” x 4” bandage brands had the size dressings. Lesson: If the package does not state the dressing size, DO NOT buy that brand unless you’ve already bought them and are satisfied; otherwise, the dressing might not be big enough or it’s diagonal not long enough to cover the wound or sore. Also, if the bandage’s dimensions on the package are given as some simple metric numbers like “10 cm x 10 cm”, then the corresponding English dimensions (4” x 4”) are not correct. More about this down below.

We found some unexpected things with the square bandages we bought online (2019 – 2021):
- Some suppliers stated only the sizes of the bandages on the packages, NOT the actual sizes of the dressings (the important part) (like the brands JJ Care, Mediplus, and Dimora in the photos above).
- Not all 4” x 4” bandages had the same size dressings! Some brands had larger dressings and some brands had smaller dressings.
- I actually measured all the dressings of the bandages in the photos above and discovered that some of the dressing sizes stated on the packages were incorrect.
- A bandage size of 10 cm x 10 cm was really 3.94 inches x 3.94 inches, not 4 inches x 4 inches. It didn’t matter to me that 3.94 inches was “almost” 4 inches. The conversion from metric to English was wrong. What was the true size of the bandage?
- A dressing size of 5 cm x 5 cm was really 1.97 inches x 1.97 inches, not 2 inches x 2 inches. It didn’t matter to me that 1.97 inches was “almost” 2 inches.
- Some bandages had sticky areas that were needlessly too large, which made it difficult to remove from our son’s sensitive and compromised skin.
Here’s an interesting discrepancy I found on the web regarding dimensions in two ads for the very same Mediplus MP1010PFCAG bandage (see below). The first one claims the dressing is 2.4” x 2.4” while the second one claims the same dressing is 2 ¼”. Someone couldn’t tell the difference between 2.4 and 2 ¼”! (Gee, aren’t all 4’s the same?) I’m not even sure which printed size was correct. In my photo of the bandages above, I wrote on the bandage that the actual dimension was 2 ¾ “, but that was measured with the protective film still in place. Was that dimension a quirk?
A 2.4” x 2.4” dressing:

A 2 ¼” x 2 ¼” dressing:

We continued to buy Dimora bandages because we found that their dressings had long diagonals. Even though their package didn’t state the dressing size, I found a link at https://www.amazon.com/Silicone-Dressing-Border-Adhesive-Waterproof/dp/B07MNV4CQJ that showed their dressings were 2.5” x 2.5”. And that’s what I actually measured in the photo above. This is a little bigger than either of the conflicting MediPlus dressing sizes I mentioned above.
Lesson: Do your homework to get the most dressing on the bandage! Caveat emptor.
One person replied to my bandage rant on Facebook about confusing dimensions on the ALS Facebook group with the following:
“I’m in the wound care field and to the industry’s defense, it’s fairly well known that if you are getting an “adherent” dressing, by definition, it has to have an adhesive border (or how else would it stick to your skin). Industry standards are a 1″ border on all sides, so basically take 2″ off the length and width to know your actual pad size. Also, just an FYI, if a nurse measures a wound, it is always measured in cm, but products are always sold in inches so be careful.
Hope this info helps !”
I replied to his note: “Thanks for the reply. Obviously, the bandage needs an adhesive. There is obviously no standardization in this business. The MediPlus example has a 3/4” border, and the JJ Care has a 1/2” border while two others have 1” borders (my measurements). They should be sold by the size of the pad, not the adhesive. This is just an example of what I’ve always called the “Girl Scout Cookie Box Syndrome”: a new box of cookies is filled with mostly air. The cookies flop around in little wells with big borders and the whole plastic insert has large borders. The box size is misleadingly large to give the impression that the buyer is getting a lot of cookies. Same with the bandages. I still say “caveat emptor””.
Skin barriers
Because our son kept getting hives or welts (I did not know what they actually were) from the bandage’s adhesive itself, we had to coat his skin around his wounds with a sticky liquid called a liquid “skin barrier” to prevent allergic reactions. The liquid came in two different forms: in small packets each containing the barrier soaked into a disposable cloth pad that you wiped on the skin area, or in a squeeze bottle. We applied the liquid around his sores. It was very messy and very sticky and dried very quickly, so we had to wear disposable gloves and apply it quickly. The end result was a flexible plastic coating on his skin.
There were two big problems with this coating. The coating prevented the bandages from adhering well to his skin! This was sort-of like trying to tape something to a very smooth surface – the tape wouldn’t stick well. Removing an older layer of dried coating was very difficult. Rubbing alcohol never worked well; I could never fully remove the coating. It was a no-win situation.
Applying and removing a bandage
Learning how to apply a bandage requires some practice. So does removing a bandage. We discovered to our horror that since our son’s skin where the sores had healed was compromised and fragile, we unintentionally peeled some of our son’s skin off while removing an old bandage.
When the sores closed, we didn’t use or need the silver-based bandages. We still wanted to protect our son’s back, so we coated the compromised areas with zinc oxide ointment, then put bandages over the areas.
Techniques to Prevent Pressure sores
We could not practice the usual techniques for preventing pressure sores, like constantly moving and repositioning. We could not reposition or roll our son in bed to either side because he could not breathe if he laid down. As I mentioned earlier, “memory foam” padding was a joke. An inflatable pad was a joke.
We also had bought and used a pillow with a vertical “valley” in it. He leaned against this when he sat in his powerchair. Some of the pressure was alleviated. However, this pillow was so thick that it shifted him forward in his powerchair maybe 3”, so he was not comfortable.
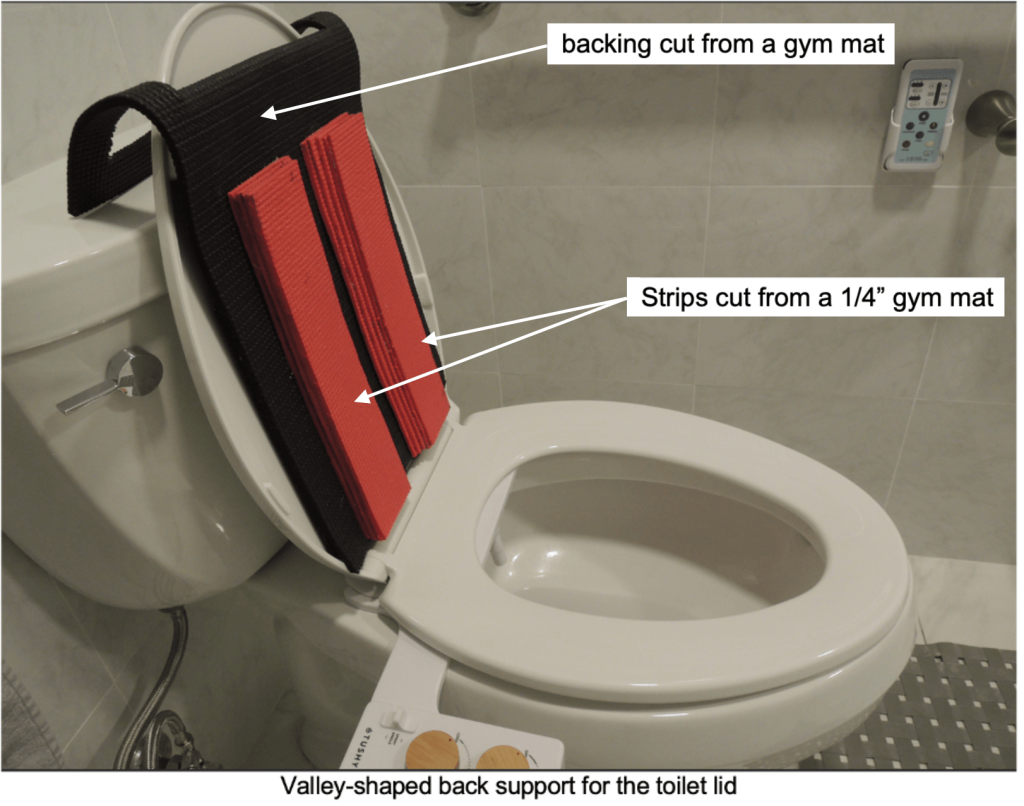
Initially, when our son had to sit on the toilet, we attached two rolled-up towels vertically on the lid with rubber bands to make a valley so his spine didn’t rub against the lid. Eventually, I replaced the towels with a cushioned device I made to protect our son’s back when he was on the toilet. See the photo below. Both the black piece and the red pieces were cut from ¼” thick gym mats and all the red pieces were glued onto the backing with contact cement. His spine fit into the valley and didn’t lean against the lid. He was not super-comfortable, but it helped.
Other OTC medications
Here are few OTC meds we also used while dealing with our son’s pressure sores:
Bacitracin in petroleum jelly ointment
Bacitracin + Neomycin + and Polymyxin + ingredient for pain in petroleum jelly ointment
Honey patches
were also good because the high sugar content prevented bacteria, but they were sticky and overpriced for, well, just honey-soaked bandages. Bacteria can’t grow in honey because of the high sugar content.
Zinc oxide ointment
which is just zinc oxide in petroleum jelly. (Vaseline is a brand of petroleum jelly). Zinc oxide is the stuff of legend for diaper rash. It is not very expensive. As with almost every other OTC (over the counter) med, there are fairly cheap generics (usually store brands) and also overpriced national brands. Besides a generic zinc oxide ointment, we also had a large plastic jar of Balmex, which is the same stuff, but higher-priced. Calmoseptine was another brand that is just plain old zinc oxide ointment with some menthol for a nice odor and a cooling effect and is more expensive. I don’t care what anyone says, but plain zinc oxide ointment, regardless of the manufacturer NEVER goes bad, unless they put other fancy ingredients in it that might spoil, so we never worried about expiration dates. Note: people have posted on the ALS Facebook group that they put zinc oxide ointment or other petroleum-based products around the stoma (hole in the stomach) of patients with feeding tubes, but the feeding tube manufacturer of our son’s feeding tube advised against this because petroleum jelly can soak into the plastic and weaken it.
