
Introduction
This article on my website has two main parts:
- a general discussion of both our son’s and our own experiences handling marijuana and the associated equipment to help him cope with his ALS needs, and
- very technical information for the science-minded that you can skip if you wish.
Our history with weed
Because our son experienced pain, anxiety, and depression from ALS beginning in 2018, he got a doctor’s prescription to buy medical marijuana in NJ, where we lived. The NJ URL for the medical marijuana program is: https://www.nj.gov/cannabis/medicinalcannabis/medicinal/. Medical marijuana (meaning weed containing THCA) usage requires a prescription. You don’t need a prescription for marijuana products containing CBD.
Because our son was immobile due to ALS, he could go pick up a marijuana order from a dispensary. Therefore, I got the corresponding NJ caregiver ID card so I could go into any dispensary and choose, buy, or pick up whatever our son had ordered online. My ID card was “pegged” to his ID card: I had to provide his ID number when applying for mine so they knew I was a caregiver. I had to be fingerprinted, photographed, and vetted before NJ would issue me the card. The card had to be renewed yearly. The price was $100 in 2018, but if the applicant caregiver was a veteran (me), a senior citizen (me) or the user was receiving government assistance, the fee was only $20. The NJ state’s web page for the caregiver program is: https://newjerseystatecannabis.org/caregiver-information. If you’re not a NJ resident, please check your own state’s official website to see if there are patient- and caregiver programs.
I never smoked marijuana (or even tobacco products) until our son moved into our house and needed it. I tried using our son’s various weed pens, but I did not like the smoke going into my lungs because it burned and made me cough.
Getting the desired effect from weed depends on:
- the quality (assay) of the weed,
- the amounts of THC and/or CBD you take in,
- the correct temperature setting of the weed pen or vaping pen,
- use of edibles, weed extract cartridges, or crushing and smoking your own buds,
- the length of time you inhale on the pen,
- how deep the smoke goes,
- how long you hold the smoke in your lungs, etc.
There’s an entire glossary for weed, weed usage, weed equipment, etc., but I never learned any terms, and it wasn’t important to me. It’s amazing that tobacco use and alcohol use don’t require prescriptions, fingerprinting, and background vetting, but are more harmful to both the user and to society than weed is. Go figure.
Simple explanation of weed
Because of ALS, our son had to stop working and went on disability on December 31, 2018. I retired after 40 years in the chemical industry on the same day as our son stopped working to help care for him. I myself have a Ph.D. in organic chemistry, so for those who are interested in the detailed chemistry of weed, I’ll get into the really technical stuff later in this document, but you can just skip that part if you’re not interested. Relax, there will be no quiz or final exam!!!
There are some important things for the novice to know to work with weed: There are two main types of marijuana: indica and sativa (see chart below). There are two important, but inactive ingredients in the raw or fresh marijuana: CBDA and THCA. If you just eat a marijuana bud, besides tasting pretty badly, nothing will probably happen (it’s like trying to eat a mouthful of oregano flakes, or leaves that have fallen in you back yard).
In order for the CBDA and/or THCA in the weed to cause any physiological responses in a person, they both have to be heated first. This heating step is called “activation”, while the chemical term is “decarboxylation.” The heating converts the two inactive ingredients to CBD and THC, respectively. That’s why brownies made with raw marijuana (containing CBDA and/or THCA) are potent: the brownies were baked, in a hot oven, so the two inactive ingredients were converted to the two active ones. Sativa has predominantly THCA in it and Indica has predominantly CBDA in it. You can choose which to use, depending on the effect you want. You can buy strains that are very high in one or the other, or strains that have both, or make your own mixtures, with both ingredients present.
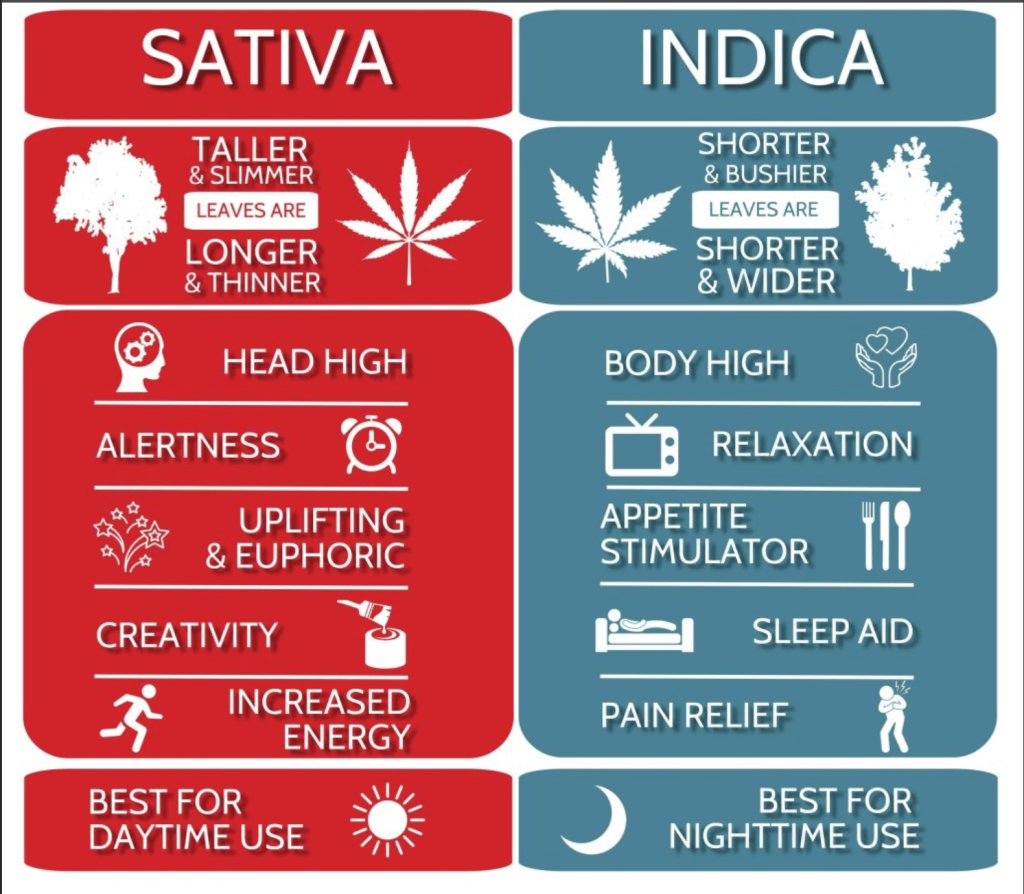
https://www.crescolabs.com/indica-vs-sativa/
Bongs
A bong (or water pipe) is a filtration device generally used for smoking cannabis, tobacco, or other herbal substances. I bought a small one for our son to try, but he could not draw out the smoke because of failed lung muscles. I had gone to several sellers in our area, asking if there were any bongs that had some sort of rubber squeeze bulbs on them so I could push out the smoke, but there were none.
Vape pens and extracts
A vape pen (or vaping pen) is an electronic, battery-operated device into which a cartridge filled with a weed extract (not the weed itself) is placed. The pen is heated electronically, thereby vaporizing the components of the weed extract so they can be inhaled. Some of the pens we tried required rocket-science-level online-settings of the parameters through apps, like temperature and time. The ability to get a “hit” from the pens depended on how long our son inhaled on the pen, how deeply, how long he held the smoke in his lungs, etc.
Early in our son’s ALS misery, he used vaping pens. After a short while he could no longer physically grasp the pens, nor seal his lips to the pens, nor inhale because ALS destroyed all his muscles all over his body. We usually held the pen to his mouth, but even then, he could not seal his lips, nor inhale. But he even struggled doing that until eventually he couldn’t. The extracts and cartridges were messy, some leaked, some were defective, and some dried up if they weren’t used in a reasonable time.
I believe the first vaping pen our son had bought was the “PAX Era” (see photo below). It was easy to use (no programming): just charge it until the 4-leaf indicator light glowed the correct colors and then it was ready. He liked this one but after a while, he could no longer hold it because it was too skinny to grasp. We held it to his mouth early in his ALS stages while he could still inhale. I believe the “PAX Era” pen has been replaced with the “PAX Era Go” pen.
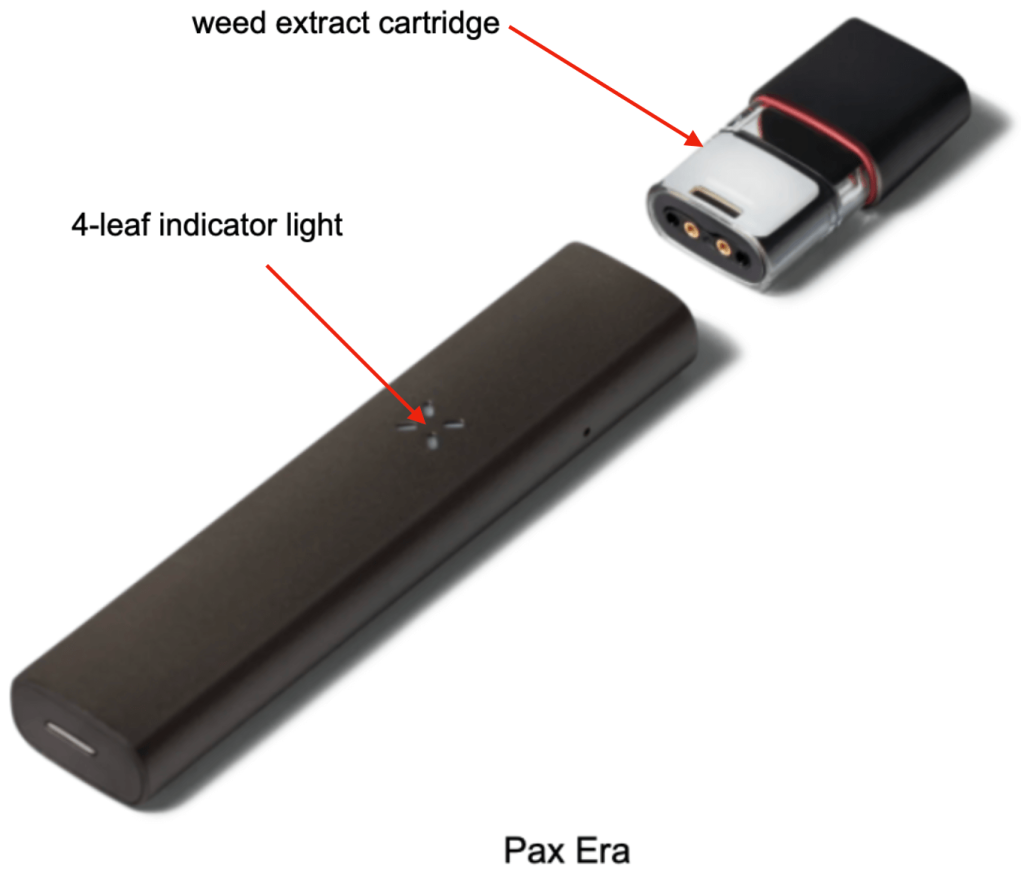
https://www.pax.com/vapes/pax-era-go
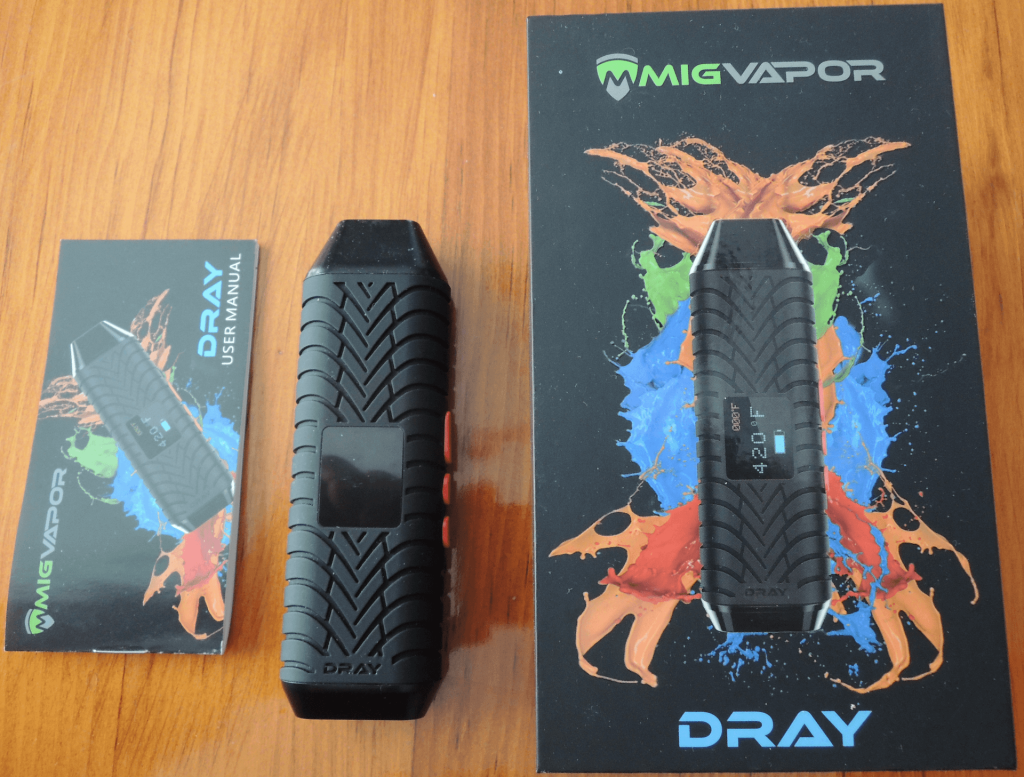
Our son then bought a Dray vaping pen (see photo below) because it was “fatter” and he hoped it would be easier to hold. However, he could not hold this in his hands either, so it was tossed into a drawer and never used again.
Our son had also bought a third even “fatter” vaping pen for the oil extracts (I don’t remember the brand), but we could not figure out how to operate it. It would not stay on. It was bulkier than the Dray above, but it was very short, so he couldn’t grasp it, either. Another one was tossed into the drawer.
Flower vaping pens and flower buds
A flower vaping pen holds a small amount of the actual marijuana flower bud after it’s been ground up, not the extract. Some of these pens and larger devices are described below.
PAX Mini Vaporizer
Our son bought the PAX Mini Vaporizer and kit (see photo of his below). It was messy, it easily plugged up with burned, sticky resin, and it was very difficult to clean. When he couldn’t hold it or inhale from it any longer, we held it in his mouth and tried blowing into the bottom of it, but that was very difficult, too.
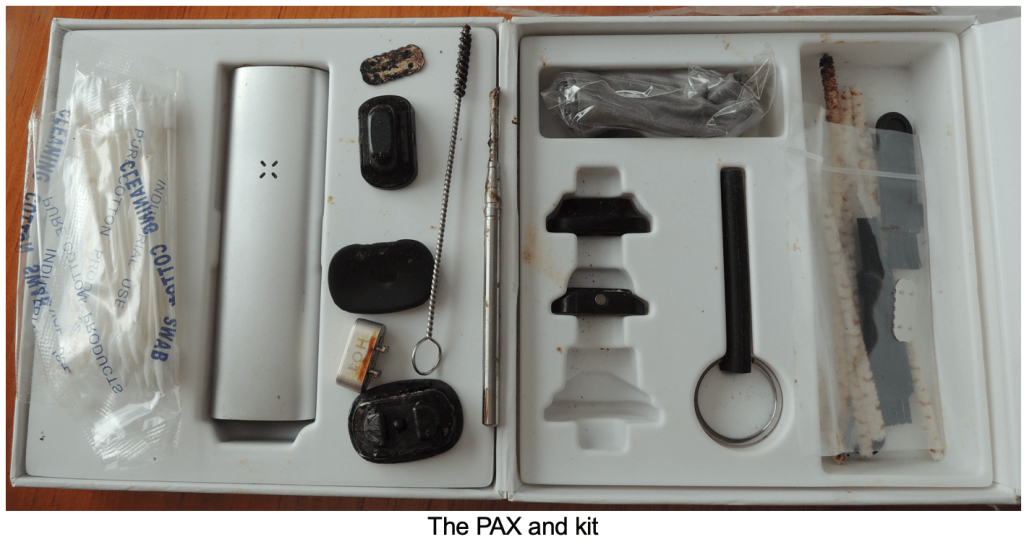
https://www.vapor.com/collections/pax-vaporizers/products/pax-mini-vaporizer
The Arizer V-Tower Vaporizer
Our son also had bought the Arizer, a volcano-shaped vaporizer for smoking the actual flower buds (see photo below). He tried to use it, but we all found it too complicated to operate, and, because of his ALS weaknesses, we had to operate it for him and hold it to his mouth. The ground weed was put into a glass chamber on the top of the device, a second glass adapter with a long flexible tube and glass mouthpiece were added on top of the first piece, and the heat and fan were turned on. We could never figure out how to control the device. The heat was always on, and the fan always blew, so even when our son was between puffs, valuable smoke was just blowing out of the mouthpiece and into the room. He depended on us to set it up because he couldn’t, but we could never get it right. It was a mess to clean out the glass pieces. Because his ALS triggered involuntary biting, clenching, and grinding of the teeth, there was a constant risk of our son biting down on the glass mouthpiece and shattering it in his mouth. From my 40 years of professional laboratory experience, putting a glass piece on the end of a rubber hose, like in the photo below, was a disaster waiting to happen: whenever the attached glass mouthpiece was put down on a table, the coiled tension in the hose would whip it wherever it wanted to go and knock it against something. The chance of breakage was very great. We gave up using this, too, so it went out with the trash.
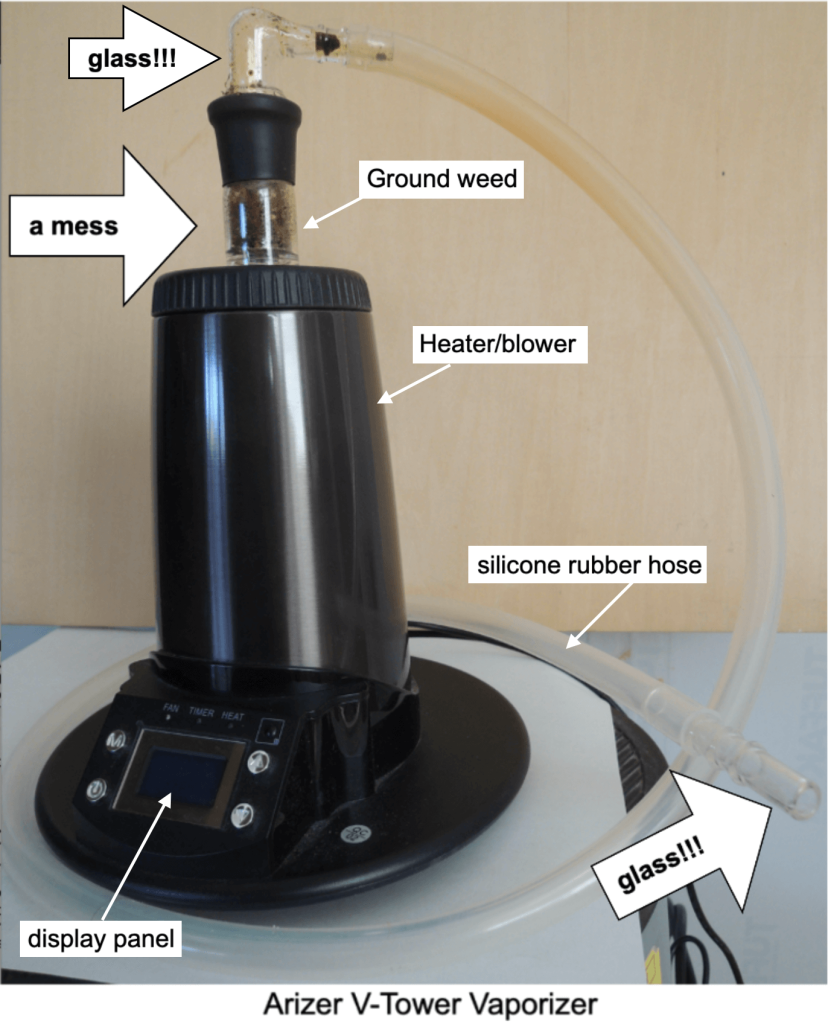
https://ca.planetofthevapes.com/products/arizer-v-tower-vaporizer
Edibles
THC (not THCA) is delivered in various oral forms: gummies, chewables, chocolates, brownies, cookies, etc.). THC consumed in edibles takes a while to kick in because the active component has to get from your stomach to your brain. One of the big mistakes first-time users of edibles make (our son included) is not waiting long enough for the tiny piece they eat to take effect. They misinterpret the lack of an instant high to mean they didn’t have enough, so they consume more. Then the high hits them really hard. Our son got quite sick the first time he tried edibles.
CBD rub
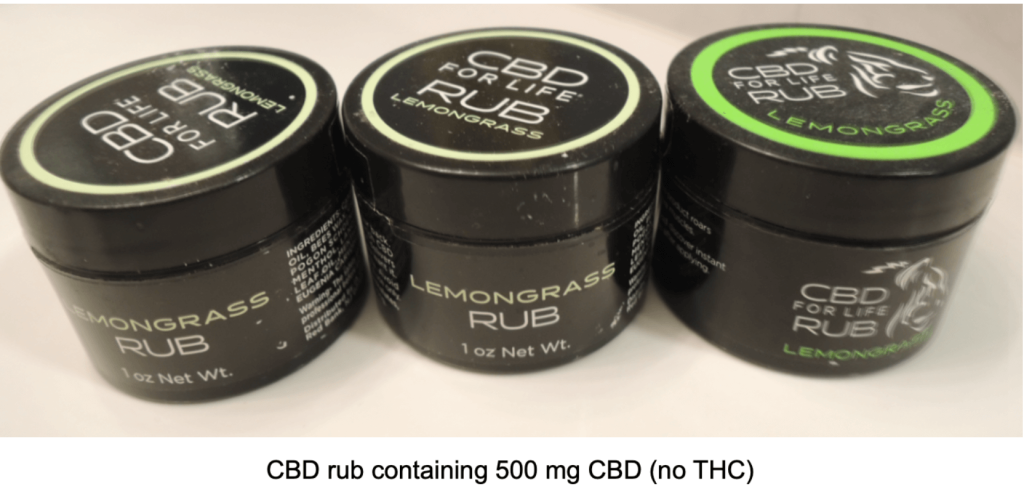
We applied a lot of a CBD rub made by CBD for Life, (see photo below) on our son for aching muscles and joints. I myself have used it. You don’t need a prescription because the rub only contains CBD (no THC). The rub provided some relief but didn’t last long. It’s very greasy and had a very strong lemongrass odor. The odor lingered for a very long time after application. I wish they made an odorless version. Wear disposable gloves when applying.
Jeremy’s patent
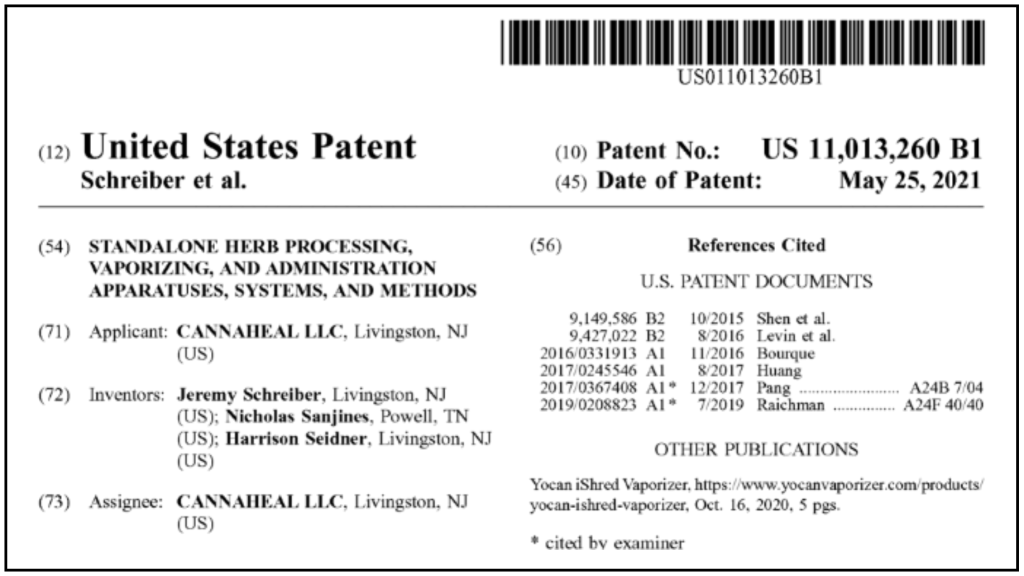
Our son quickly realized that weed devices were not made for the handicapped. He searched the web for an “accessible” vaporizer, but found none. He therefore invented one, then founded his own company, Cannaheal, LLC., with two other partners (a biomedical engineer and an IT whiz), and the three of them built a working prototype. They were awarded United States Patent US11013260 B1 on May 25, 2021. https://ppubs.uspto.gov/dirsearch-public/print/downloadBasicPdf/11013260. See the top of the front page of his patent in the image below. (Displayed here by his proud parents).
The device could be operated by computer, cellphone, eye-gaze technology, etc. It operated without human contact, except someone had to but a marijuana bud in the top. After that, it ground the bud, moved the grounds into a heated chamber, then the smoke was drawn into a storage balloon. The device could then clean out the ashes and remove them. Because the US government wanted to avoid the bad connotation of the word “marijuana”, the title of the patent is “STANDALONE HERB PROCESSING, VAPORIZING, AND ADMINISTRATION APPARATUSES, SYSTEMS, AND METHODS”. Herb? Of course, everyone wants to smoke oregano, right?
Unfortunately, our son passed away before his device could be commercialized. The technology has since advanced. Without our son present, any and all attempts at marketing it stopped.
Basement Laboratory
Our son desperately wanted marijuana to relax and alleviate pain, but his ability to inhale vapors and to swallow edibles was no longer possible.
Because of my professional chemistry background, it was easy to set up a small chemistry laboratory in my basement. I first activated the weed in our kitchen, then I extracted the THC (not THCA) into MCT oil. Separately I extracted the CBD (not CBDA) into MCT oil. MCT oil is a vegetable oil made from coconut oil. MCT oil has no color and it doesn’t smell like coconut-scented sunscreen lotion. “MCT” means “mid-chain triglycerides”.
I could mix the THC- and CBD extracts, or not, as needed, depending on what our kind of effects son wanted. While our son was still able to swallow, we put some of the MCT oil extracts under his tongue. This was the fastest route into his body.
When our son could no longer take anything orally, we put the required number of drops of extract into his feeding tube, then pushed it in with a little pureed food. Just like the old expression “Water and oil don’t mix” I knew that water and any other liquids made of mostly water (juice, coffee, tea, Gatorade, etc.) would not rinse the extract out of his feeding tube and into his stomach. The extract would just sit there coating the inside of the feeding tube as an oily film. The pureed food from www.RealFoodBlends.com that we fed our son had oils from the meat, chicken, and fish present, so there would be no problems pushing the extracts in.
Giving THC and/or CBD enterally (through a feeding tube) obviously took longer to take effect, but we had no choice. I know my THC extracts helped him relax because many times he began laughing.
Very technical stuff
I had no knowledge of the chemistry of weed, but found plenty of information on the web. I first had to learn how to get the THC and CBD out of the marijuana. I found many procedures on YouTube for making extracts by the “Rick Simpson Method”, so anything made by that method is usually called “Rick Simpson Oil” (RSO). Many of the YouTube videos I saw demonstrating this method showed unsafe procedures, or used dangerous solvents, or both. It was obvious to me, an organic chemist, that many of the people on YouTube videos had no idea of the chemistry, nor of safety procedures. They could probably explain physically what they were doing, period.
I learned the basics, then applied my chemical training. The Rick Simpson method extracts more than just the THC and CBD. It also extracts everything else including terpenes, waxes, and coloring matter from the buds, so the extract is dark, hazy, colored and smells somewhat like grass (the stuff that grows in your yard, not marijuana). Terpenes are chemicals that give many plants, spices, and herbs their odors, like oregano, caraway seeds, mint, fenugreek, etc. Some users claim that the terpenes actually helped the THC and CBD work better (a synergistic effect). Our son had actually bought some of the Rick Simpson Oils from dispensaries before I began making them; they were very dark, dirty-looking, foul-smelling, foul-tasting, and with sediment, all due to the way the extractions were done. Since the extracts eventually went into our son’s feeding tube, none of these issues mattered. At least I knew what my own extracts were going to look, taste, and smell like.
There are other very sophisticated physical- and chemical methods to obtain CBD and THC from marijuana, but they all required expensive equipment which I didn’t own and more complicated procedures which I didn’t have the time or need to do. I chose the Rick Simpson method because it was the quickest for us, the easiest for me, and it worked for our son.
I already owned a real laboratory bench with a soapstone benchtop mounted on a sheetmetal cabinet. I had acquired this when one of my previous employers was remodeling its labs and tossed everything. I purchased the required laboratory glassware and other equipment (see illustrations below). I observed safe laboratory procedures and only worked with one solvent (food grade 95% ethanol, which is a rectified spirit and is sold in liquor stores with the name Everclear). The Everclear obviously was for human consumption, so I didn’t have to worry about introducing toxic impurities, as would have happened if I had used other solvents, or even non-food grade ethanol.
Steps in producing THC and/or CBD in MCT oil
Here are the four main steps in my process for making Rick Simpson Oil so you will understand where the two pictures below fit.
Step 1: Decarboxylation or Activation
There’s no photo or illustration needed for Step 1 because this step was done in my kitchen oven. I simply spread the buds on a sheet of aluminum foil on a cookie tin and baked it in my oven. Our son said I “hotboxed” the whole house!! After the buds cooled, I crushed them and stuffed them into special tea bags. The tea bags could be opened, filled with tea (or marijuana), then closed with its drawstring.
Step 2: Extraction of Actives into Everclear
I do not have a photo of my own laboratory extraction setup. However, I found on the Web the illustration below, which very closely resembled my own equipment. (I used a hot oil bath instead of a heating mantle (called an electric heating set in the photo)). The fancy-looking equipment is just a glass version of a coffee percolator. A percolator takes (i.e., extracts) the flavors, the odors, and the brown color out of coffee grounds and gives you brewed coffee. The tea bags with the baked weed were put into the device called a Soxhlet Extractor (in the diagram below). Everclear was added to the round-bottomed flask (also called the extraction flask), then the heater was turned on. Just like what happens in a coffee percolator with hot water and coffee grounds, the Everclear boiled up into the Soxhlet Extractor and took all the actives, colors, odors, and other components out of the weed and collected them in the round-bottomed flask.
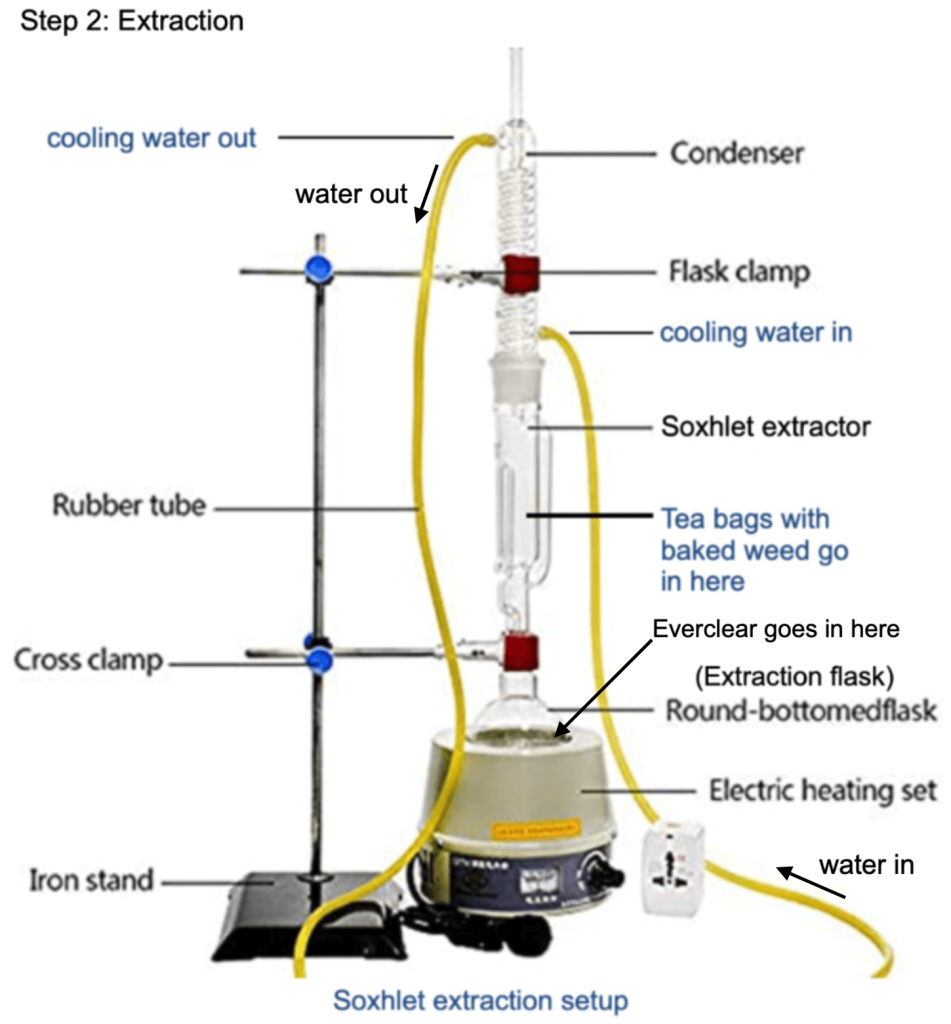
https://www.amazon.com/Experimental-Extractor-Meandering-extractors-Electric/dp/B096ZCX7HQ
Step 3: Distillation or Stripping of Ethyl Alcohol
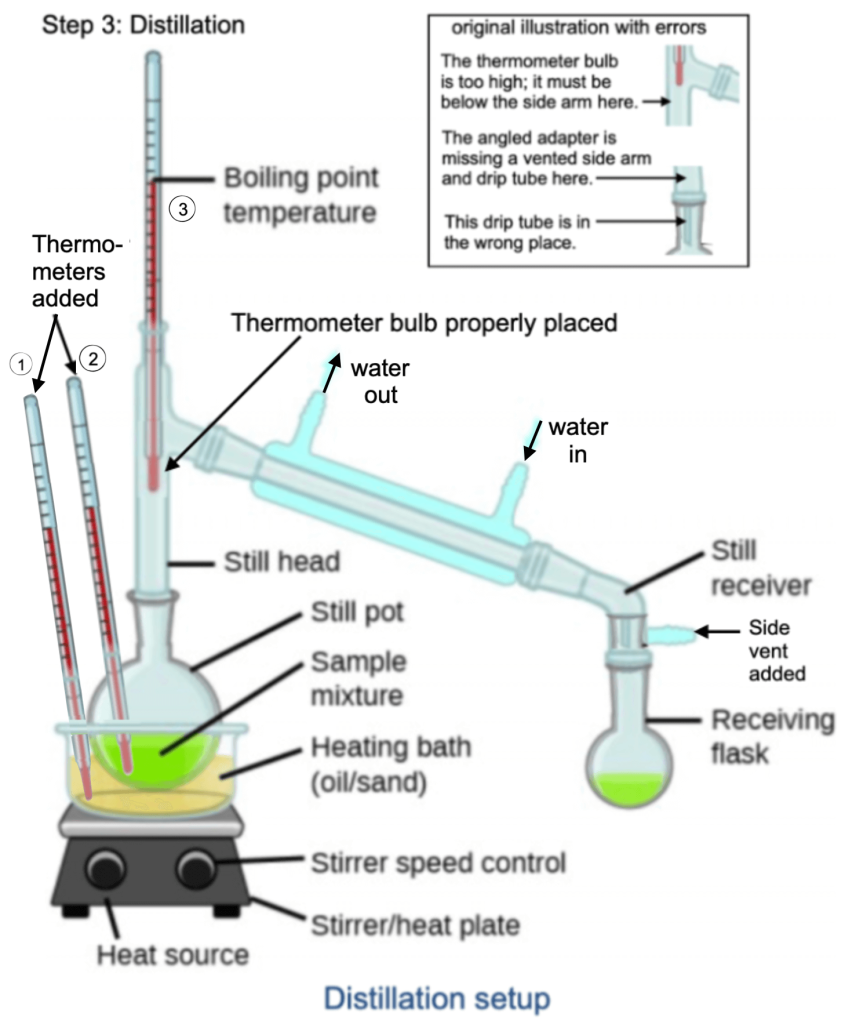
I do not have a photo of my own laboratory distillation (stripping) setup. However, I found on the Web the illustration below, which very closely resembled my own equipment. There were some errors in the Web image, which I corrected in my version of it. Thermometer 1 tells the temperature of the bath, 2 tells the temperature in the flask, and 3 tells the boiling point. These are all very important temperature measurements. The end result of the stripping was a dark, greenish mud containing the actives.
https://nigerianscholars.com/tutorials/solutions-and-colloids/distillation-of-solutions/
Step 4: Addition of MCT oil
There’s no photo or illustration for Step 4 because all I do is add MCT oil after the distillation is finished, then pour it into small dropping bottles.
The chemistry of weed
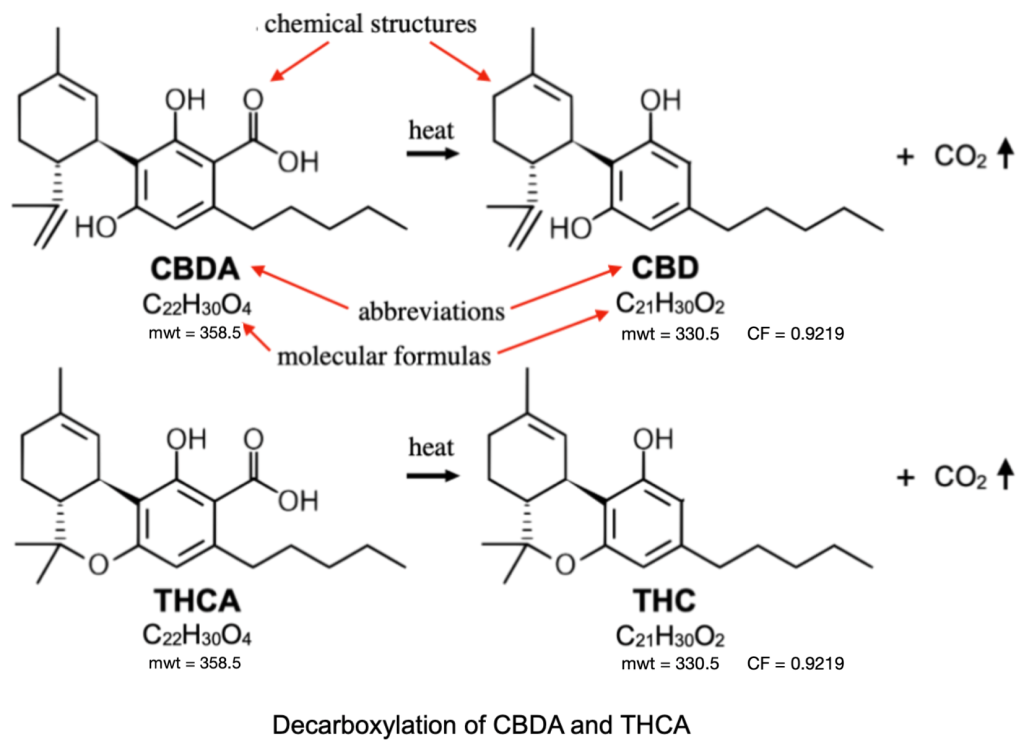
There was plenty of information about the chemistry of weed on the web. Weed (marijuana) contains predominantly the inactives THCA and/or CBDA. Weed contains only very tiny amounts of THC and/or CBD, if any at all. The “A” stands for “acid”. Weed must be heated to activate or decarboxylate THCA to THC and CBDA to CBD. The heating breaks off parts of both molecules as carbon dioxide. (One marijuana dispensary employee demonstrated his ignorance of weed terminology by telling me that weed undergoes “decarboxylizing”). There’s no such term.
Explanation of the chemical diagram:
The two chemical equations below show the chemical conversions of CBDA to CBD and THCA to THC. What you also see in the diagram are:
- the chemical structures (how the moleculse are built)
- the abbreviations (in bold) (shorthand for very long names)
- the molecular formulas (letters with numbered subscripts) (what elements are present and how many of them)
- the molecular weights (mwt) (how much the complete molecules weigh)
- the conversion factors (“CF”; meaning how much you put in versus on how much you make). In these two cases below, 1.000 gram of CBDA gives you 0.9219 gram CBD. Likewise, 1.000 gram of THCA gives 0.9219 gram THC. The lost weight is carbon dioxide, CO2.
Delta-9-THC vs Delta-8-THC
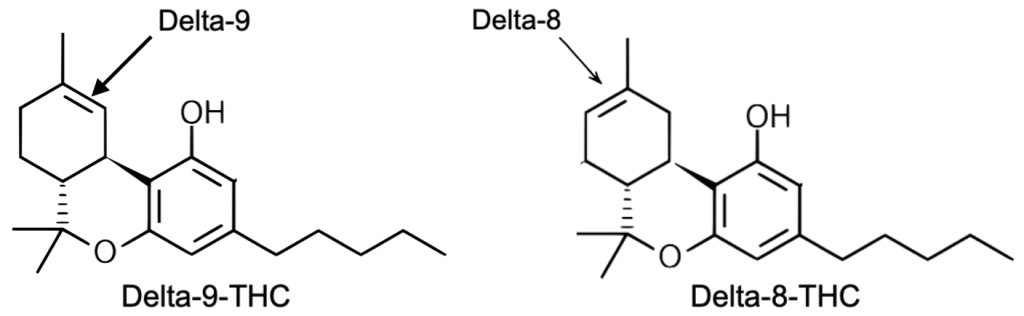
There is more than one version of THC. Each version is called an “isomer”. See below. The two isomers of THC that are of interest here are distinguished from one another by calling them the “Delta-8” isomer and “Delta-9” isomer. The arrows in the diagrams point to “double bonds”. You can see that the double bonds in the two structures are NOT in the same places. The THC that gives well-known highs is called “delta-9-THC”. The other form is called “delta-8-THC” and is less active. I never worked with the delta-8 isomer. You can see the very slight difference between the two below. The weed we bought contained delta-9-THC. People can skirt the law by using the Delta-8 version.
Weed assays
All the weed my son bought was medical grade from Garden State Dispensary (one branch in Woodbridge, NJ and one branch in Union, NJ). Depending on what effect our son wanted to feel, he knew which kind of weed to buy. The lot numbers of weed we bought had accurate state-analyzed assays of all the identifiable components, (see table below, minor components omitted), so I knew exactly how much THC and CBD to expect after decarboxylation, assuming a thorough extraction and no losses. I didn’t care about minor components. You can see that THCA was the major component of OG Kush, whereas CBDA was the major component of OTTO. My goal for every finished batch of THC extract was the same concentration of THC every time. Likewise, my goal for every finished batch of CBD extract was the same concentration of CBD every time.

Step 1 required an accurate weight of the buds for decarboxylation. With NJ-mandated accurate analyses I could calculate the following:
- the weights of the inactives in the buds before decarboxylation
- the weights of the actives expected in the buds after decarboxylation
- the weights of the actives in the concentrates after the ethyl alcohol distillations
- the weight of MCT oil needed to achieve my target concentration in the finished product.
Obviously, the higher the assay of THCA in the flower buds, for instance, the more MCT oil I could add later on to achieve the same THC concentration in the finished product, so I ended up with a larger weight of finished product.
Take a look at the table below. Let’s say you want to make a 1% THC-MCT extract. Ten grams of a low-grade THCA bud (blue row) with 5% THCA in it will give 46.1 grams of 1% THC-MCT extract (column 8). Ten grams of a high-grade bud (orange row) with 25% THCA in it will give 230.5 grams of the same 1% THC-MCT extract (column 8). For the same 10 grams, that’s 5 times more extract from the high-grade buds!!! It pays to get higher grade buds for extraction if you’re aiming for a certain concentration. That also means the batch from high-grade buds will take 5 times longer to use up.

The laboratory equipment
Since I didn’t have any way of analyzing my finished products (the MCT oil extracts) for concentrations, I wanted all steps to be as quantitative and as repeatable as possible. Knowing that if I could be consistent in all the steps, I could always give the same number of drops to our son, regardless of which batch I had made. I used a very small analytical balance (max weight 50 gm) that weighed to 4 decimal places (maybe a bit of overkill) so I could accurately weigh the weed before and after decarboxylation, before and after extraction, after stripping the Everclear extraction solvent, and also for adding the calculated amount of MCT oil. My goal was to obtain the same concentration of THC in every batch at the end, and the same concentration of CBD in every batch at the end.
Step 1: Decarboxylation or Activation
For this step, I needed a sheet of aluminum foil, a cookie sheet, a kitchen oven, and a timer. (Don’t use a microwave for this!)
Step 2: Extraction of Actives
The illustration above for Step 2 shows almost exactly the same setup I used for my extraction step. (I used mineral oil in a simple kitchen pot for a heating bath because I did not have the heating mantle and controller (called an “electric heating set”) like in the picture. Also, I wrapped both the upper exposed portion of the extraction flask and the entire Soxhlet extractor in aluminum foil. I knew from 40 years of lab experience that extractions worked faster and better if they were insulated in cold and drafty rooms.
Step 3: Distillation or Stripping
The picture above for Step 3 shows the exact equipment and setup I used. Note: I modified some parts of the original picture (shown in the inset) because those parts were drawn incorrectly. Also, I wrapped both the upper exposed portion of the stripping flask and the upper exposed portion of the side arm in aluminum foil. I knew from 40 years of lab experience that distillations worked faster and better if they were insulated in cold and drafty rooms. There should be a thermometer in the heating bath.
Step 4: Addition of MCT oil
After stripping all the Everclear I could, I weighed the contents of the flask, then calculated the weight of MCT oil to give me the desired concentration of the active.
Storage
After adding the calculated amount of MCT to a concentrate, I mixed the contents thoroughly and then poured the finished product into 2 oz. (two-ounce) brown glass dropping bottles. I labelled the bottles as either “THC” or “CBD” plus the batch numbers and kept them in our refrigerator.
Administering cannabis products through a feeding tube
My very first weed extracts that I made for our son were in olive oil because my wife and I used that in our kitchen for our own food preparations. I switched to MCT oil because it was colorless, odorless, more stable to oxidation, and didn’t solidify, even partially, when refrigerated. MCT oil is made from coconut oil, so MCT oil is still a vegetable oil. My MCT oil-based extracts (and also my initial vegetable oil-based extracts) were obviously oily or greasy. Adding them to his feeding tube left an oily coating inside the tube and it was difficult to clean afterwords. Also, he didn’t get the full dosage of the extract if any was left behind. Water, milk, juice, coffee, wine, Gatorade, and other water-based drinks couldn’t be used because water and oil don’t mix. (Just think of the two layers in Italian dressing: it’s oil + water; you shake and it quickly separates again!)
I solved the problem of getting oily extracts in thorough our son’s feeding tube by always administering the extracts just before we gave him his meals through his tube. His meals were from Realfoodblends.com, so they were real foods (not chemicals in cartons), including real vegetable oils, plus meat, chicken, and fish fats. The food pushed all the extracts into his stomach.
Someone posted a question on the ALS Facebook group “ALS – Patient and Caregiver tips for every day living” about a problem he or she was having while trying to get a THC-based tincture through the feeding tube.
“I am trying to take my thc tincture through my tube mixed with water. I don’t think taking it that way I’m getting all of it. The oil remains in the syringe. I don’t think getting the full effect. I used to take under my tongue but it causes to cough a lot. I don’t need anything that makes cough anymore. I just got home from hospital yesterday. Am I doing something wrong?”
First a definition: A tincture is a solution of medicine in alcohol. (If you mix a tincture with water, you will likely precipitate the medicine because the medicine doesn’t like water.)
Now my answer to this person’s question:
“To help you, first, I’d like to say that I’m a retired organic chemist with 40 years of industrial experience. What is the solvent? If it is a true tincture, it is in regular alcohol. The THC doesn’t like water, so when you added water to the tincture, the THC formed a mud or deposit just like you described and remained behind in the syringe. If you have any alcoholic beverage on hand (wine, or preferably stronger, but not beer or other things that are carbonated) those will be better to guarantee you will get everything into your tube. Also, use a little of the same wine or stronger to flush the tube into your stomach. It’s the old expression: “Like dissolved like.” This should help. Let me know if this helps. BTW, I had set up a small lab in my own basement and was making THC extracts in vegetable oil for our son RIP. We just mixed the dosage with his food.”
Then, Please add the following text below the new text above and give it number 21 in the TOC:
Reference book on Cannabis
The following is a very thorough reference book for those who wish to learn more about marijuana:
“The Cannabis Grow Bible”, 4th ed, Greg Green, Green Candy Press, 2025
ISBN 978-1-937866-78-5
