Call buttons
Call buttons and problems
Our son Jeremy had lost his ability to speak early in his diagnosis. Since he could not press a button with his hands, he needed some kind of signaling device to call for help. He originally used his Tobii Dynavox eye-gaze device (https://us.tobiidynavox.com) to prepare a Word document containing the word “help” about 100 times so he could open the file when needed and use it to call us, but his computer was not very loud and it was drowned out by other noises in the house. Home Depot only had complicated doorbells with typical doorbell buttons, not pressure-sensitive buttons. He obviously could not press any of those buttons. The web didn’t have simpler doorbells, at least under the search term “door bells”.
Buttons versus Switches
Our son found what we needed on the web. These devices were called “call buttons”, “capability buttons”, or “call switches” depending on the vendor. See photo below for examples. The devices our son needed were actually “buttons”, not “switches”. The word “switch” is incorrect, because just like a light switch, it remains in the position you’ve selected, where as a button returns to the initial setting because it’s spring loaded (a doorbell has a button, a keyboard key is a button, etc.). They come in different sizes.
The website https://enablingdevices.com has a large selection of devices for the disabled. They were however all very overpriced for being, well, just buttons with wiring.

Shop around before you buy
There are many websites that sell the exact same model of something and their prices are all over the place. I found an interesting way to shop. Amazon usually named its supplier right on the same page as the object you want to buy, so after I saw a device on Amazon I liked, I went to the named supplier’s web site and saw the same device cheaper. Another hint: my wife has an Amazon Prime account, but I don’t. I needed two new pairs of jeans, so my wife went to Amazon Prime and saw jeans for $75 each. I went on Amazon anonymously and saw the identical jeans for $25 a pair!!! I copied the link I had in my URL bar and emailed it to my wife. She pasted that link into her account and her price was also now $25. So she bought two pairs for $50, not $150. Lessons to be learned: shop around, and don’t trust Amazon Prime!
ALS Loan Closet
The ALS Loan Closet (https://www.als.org/dc-md-va/local-care-services/medical-equipment-loan-closet; log in required!) gave us a simple pressure-sensitive call button like the red one above that was supposed to lay on our son’s bed near him, but our son couldn’t even move his hand to press it. Another source of free equipment is Team Gleason, https://teamgleason.org , but we never used that one.
E-Z-Call-Universal-Quadriplegic-Nurse-Call-Switch-With-Cord
Read the fine print in the ads!
Our son had found the following tent-shaped call “switch” (actually a button) and alarm (photo below), which we bought from https://www.performancehealth.com/e-z-call-universal-quadriplegic-nurse-call-switch-with-cord (they call it a switch, not a button) but we discovered that we were hoodwinked.

The picture on that website (see ad below) was misleading. The wordy, catchy title “EZ Call Universal / Quadraplegic Nurse Call Switch with Cord” gave me the impression I was buying both the blue thing AND the white thing together. But when I received the box, it contained only the blue part; the white alarm was NOT in the box and NOT included in the price, so be careful when you’re ordering. You have to choose the correct option from the dropdown menu which wasn’t obvious.

I called the vendor about this misleading picture but he didn’t care. I had to buy the alarm after the fact and pay for more shipping.
Here’s a link to one website, https://www.amazon.com/32513-Universal-Quadriplegic-Nurse-Switch/dp/B07CX1QR41 that at least shows the two parts separately so you know they are sold separately, but the two cost $308 (as of December 2024)!

Problems with the E-Z Call Switch
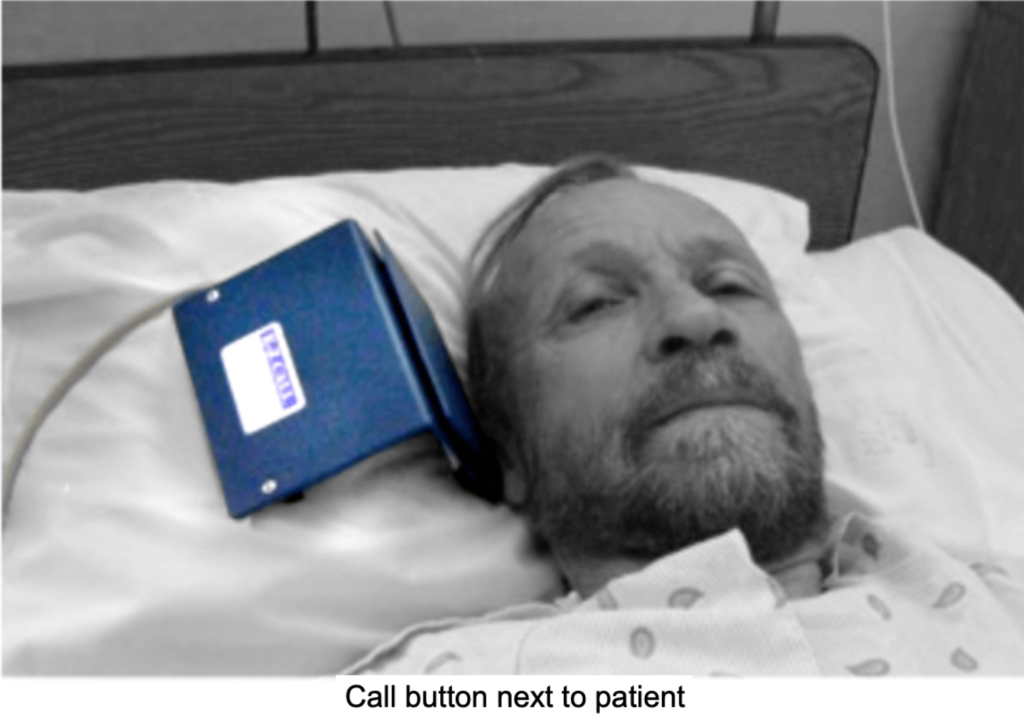
Problems quickly arose with this device: The actual alarm is more like an air-raid or police siren because it was so extremely loud and so unpleasant. The call button (excuse me, call switch) was supposed to stand on a pillow so a patient could roll his or her head towards it and press the large square plate with the head or cheek (see photo below). There were some simple alligator clips on the underside of the blue “tent” and a small Velcro loop to secure it to who-knows-what. The alligator clips didn’t hold the button still on our son’s pillowcase because the pillowcase allowed it to move around. The button kept moving away from him when he tried to press it with the side of his head. I had no idea what to do with the Velcro loop. Our son couldn’t easily roll his head over to the button to press it anyway. The switch (button) itself was reliable, so I repurposed as I will describe later in this article, although it was useless for our son.
Gumball Switch, Transmitter, Receiver, and Bell
Pros and Cons
Our son then found a different type of call button at https://enablingdevices.com called a Gumball or Head Switch (another mislabeled button) mounted on a flexible gooseneck at https://enablingdevices.com/product/gumball-switch-on-easy-flex-mount/. See photo below. The clamp that came with the device (see picture below) was very flimsy. I called the vendor, who was very helpful. He sent me a much stronger clamp (see the second photo below). The EnablingDevices website has a chart of clamp offerings at: https://enablingdevices.com/wp-content/uploads/2024/03/2024-Printing-Mounting-Chart.pdf. (I don’t remember if this chart was present when I was dealing with them.)
The gooseneck can be shortened or lengthened by removing or adding individual “beads”. If you do want to add or remove “beads”, wear good work gloves before you try to pop open the gooseneck. You can also buy a special tool to pop open the gooseneck. We had bought additional beads to make the gooseneck even longer to be able to reach our son. To open the neck without the tool, put on the work gloves, then bend the gooseneck as if you’re trying to break it. The beads are so tight that you won’t be able to pull the neck apart. Closing up the neck requires some brute force to engage the beads (wear work gloves).
The wiring from the button goes in through a hole in one of the beads at the top of the gooseneck, and comes out through a hole in one of the beads at the bottom of the gooseneck. If you have to lengthen drastically, you might have to cut the existing wiring, then insert a length of wiring, then solder and insulate it. The lower end of the wire is connected to a small battery-operated transmitter that will send a signal to a receiver that makes a door-bell sound, not an air-raid sound like the device mentioned earlier. Both parts needed batteries. The transmitter and the receiver can’t be more than about 10 feet apart, or else the doorbell wouldn’t sound. We had two of these complete sets and could have used a third: one for the bed, one for the bathroom, and one mounted on our son’s wheelchair. Because of the layout of our house, the transmitters were usually close to each other, so when our son pressed one of the call buttons, we never knew which bell rang, but it didn’t really matter.

The yellow button (other colors are available) is pressure-sensitive, meaning the slightest touch was supposed to make the bell ring, but it didn’t always work. It eventually became unreliable. Even I sometimes couldn’t make the bell ring when I pressed directly on the button. Every night when we put our son in bed, we placed the call button next to his head as closely as possible to minimize how far he had to move to press it with his cheek. It caused great concern that sometimes the button did not work, but we had no other devices. When the button didn’t work, our son was able to muster up enough strength to whisper loudly enough to summon us for help.
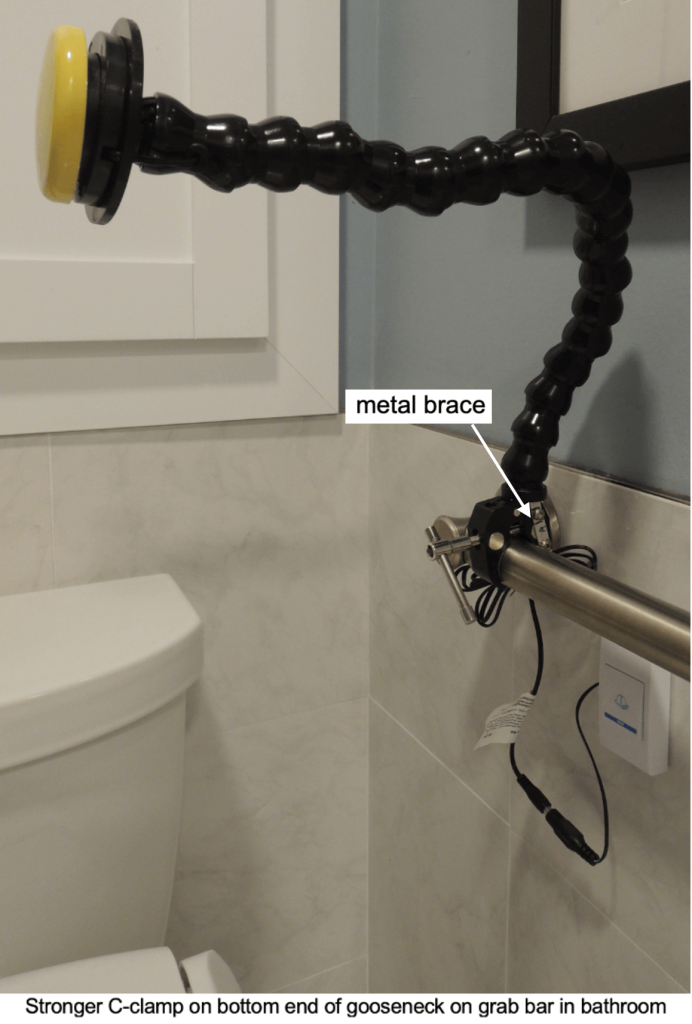
The original flimsy C-clamp (in the picture above) would not remain tightened against whatever we tried to clamp it to. I wanted to clamp the call button to the grab bar in the bathroom next to the toilet so our son could just lean over to the button to call us. However, the flimsy C-clamp kept loosening. It also wasn’t designed to grab a tube of that diameter or shape, so it kept flopping forward. The vendor took back one of the buttons, replaced the flimsy clamp with a stronger one (see photo below) at no extra cost that could hold onto the grab bar and he also replaced the button itself. (A crucial lock washer was missing from the stronger clamp he sent, but I didn’t know it at the time, so I had to add the metal brace you see.) See both pictures below. At least the gooseneck was reliable. (It looks like the strong clamp has been redesigned (2024) since I last bought something from EnablingDevices.)

How the Gumball works
There are 5 essential parts to this device (see diagram below): the call switch (actually a button), the gooseneck, the clamp, the transmitter, and the receiver/bell. When the yellow call button is pressed, the transmitter sends a wireless signal to the receiver, which also contains the bell. When our son was in bed or in the bathroom, the call button and transmitter were obviously next to his head, while the receiver/bell was easily within 10 feet. However, when he was in his powerchair, we mounted the works on his chair so there was never a worry about the receiver being more than 10 feet from the transmitter.

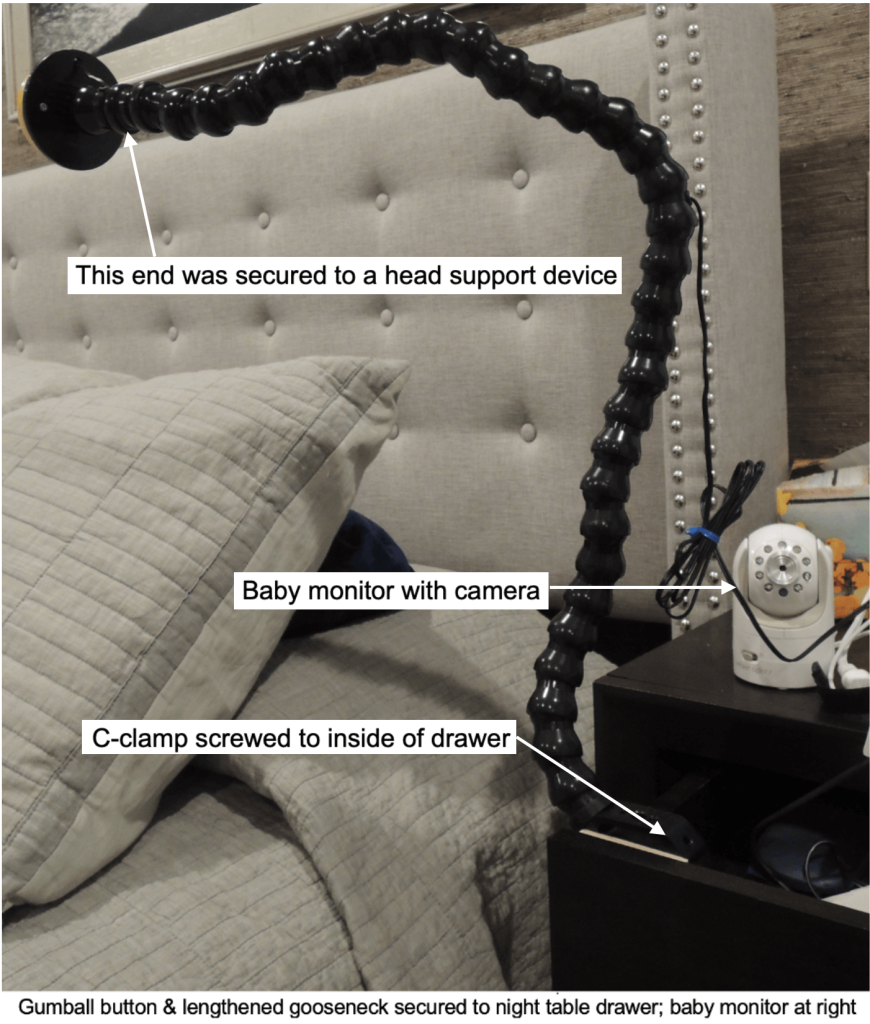
The bedroom Gumball call button also had problems: this one still had the original flimsy C-clamp, but I didn’t need a stronger clamp, just a secure mount to our son’s night table, so I drilled holes in the flimsy clamp body and then attached it with screws to the inside of our son’s night table drawer (see photo below). Also, the gooseneck was not long enough to reach the side of his head when he was in bed, so I bought extra lengths of the gooseneck and inserted them. The website for the gooseneck parts is: https://www.loc-line.com, but the parts had to be purchased through their distributor at: https://www.modularhose.com. There are competing brands of goosenecks and beads. Each brand is shaped differently. NOT ONE BRAND WILL CONNECT TO ANY COMPETING BRAND, so make sure you stick with one brand. Even with the brand I bought, there were different diameters of beads available (depending on needs), which obviously wouldn’t connect to one another, so make sure about the bead size.
The Gumball button near our son’s head near his bed also sometimes wouldn’t sound, so we also had a baby monitor with camera and sensitive microphone (see photo below) next to his bed to hear him. It came with a loudspeaker that we placed elsewhere in the house and used it at night. We could aim it by remote control from another room. Here’s a link to the brand we bought: https://www.watchfuldad.com/infant-optics-dxr-8-review/.
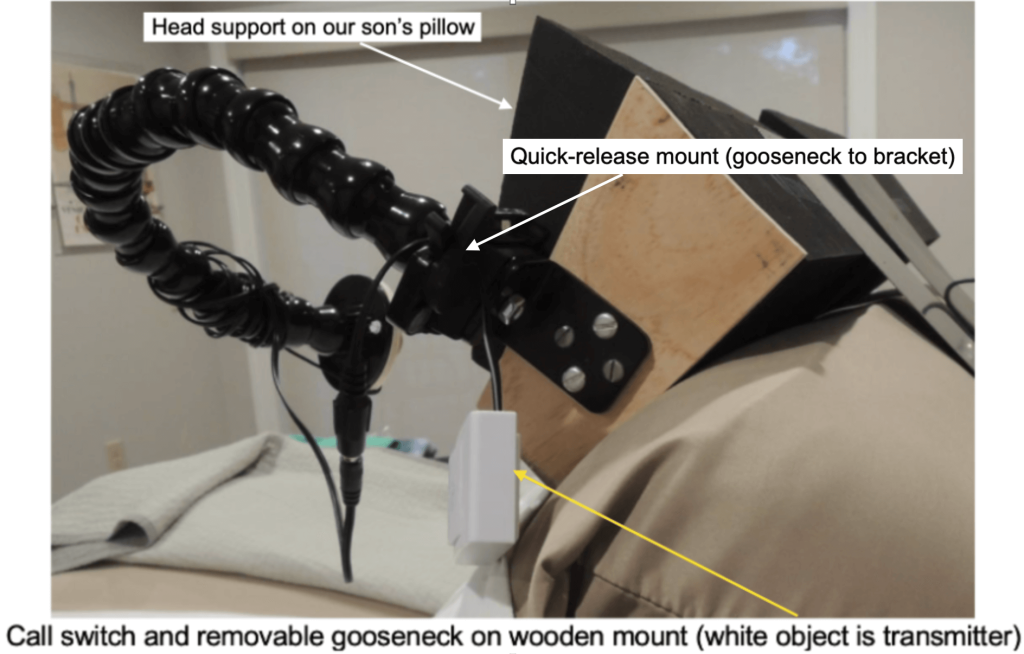
I finally gave up on the yellow Gumball call button that we kept near his bed because it was unreliable. I repurposed the blue tent-shaped call button I described above and attached it to the goose neck. (See photo below.) I needed a piece of wood to enable me to attach the button to the gooseneck’s plate.
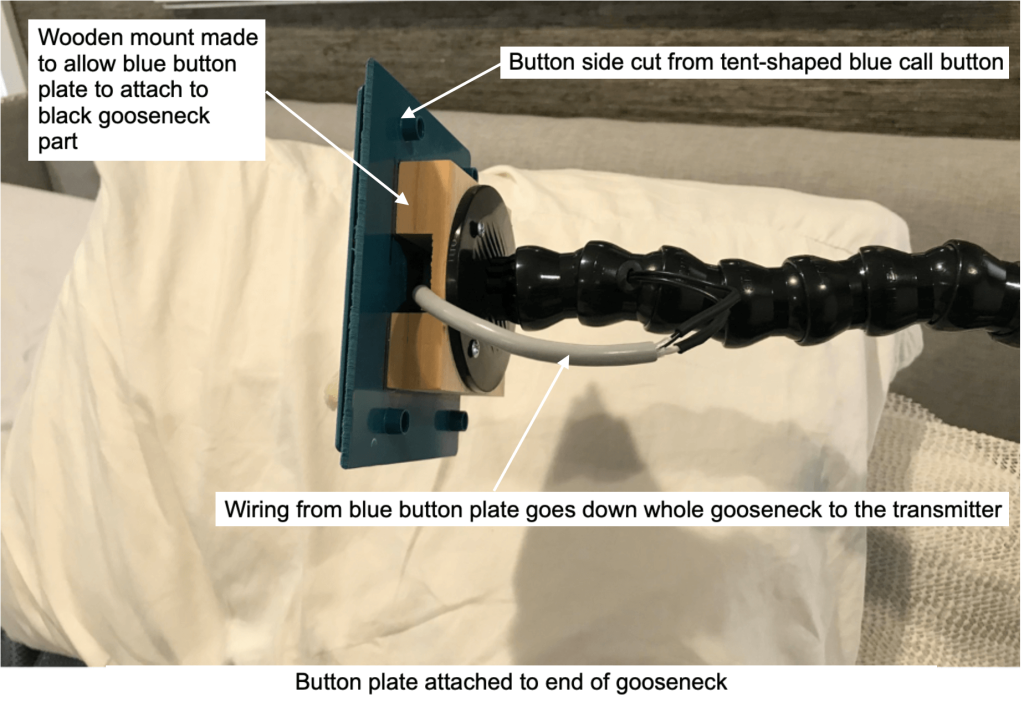
When our son could not use the bathroom Gumball call button anymore due to weakening muscles, I combined a number of the parts to build a device that clamped to his wheelchair. (See photo below.) Note: the homemade lateral head support in the picture was described in another entry in this guide: https://guidetoals.com/head-and-neck-support/. There was still the risk that the Gumball wouldn’t work, but we were always near him, so there was a good chance of hearing him.
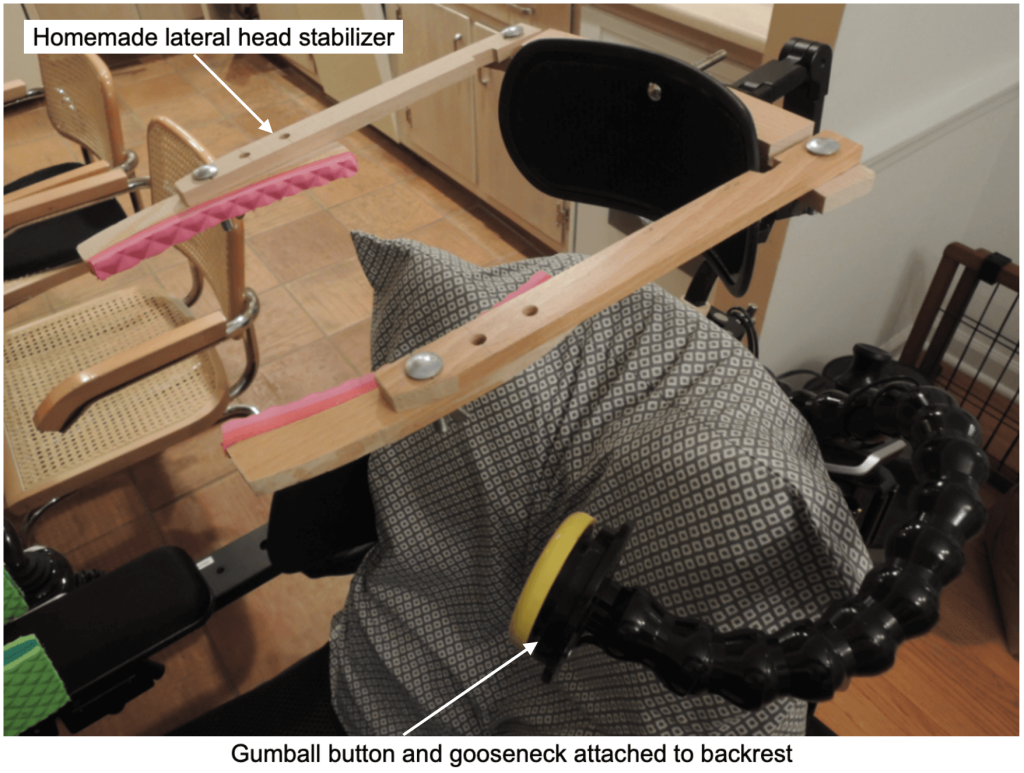
I also bought a quick-release mounting bracket and was able to attach the gooseneck to the side of a device I built to help deal with our son’s head drop. See the photo below plus a full description of this device in this guide at: https://guidetoals.com/head-and-neck-support/. Eventually, I replaced the unreliable bedside Gumball in the picture below with the repurposed blue button I described above.