
Our son Jeremy passed away on 10/29/21 from ALS. He suffered from numerous simultaneous symptoms beginning early in his diagnosis:
- Almost immobile
- Violent yawning
- Involuntary tight curling of his fingers
- Crossing his arms tightly across his chest when yawning
- Clenching of his hands when yawning
- Severe eye watering
No one knew what triggered his violent yawning episodes (some say it was the body’s way of bringing in a large quantity of air to help with breathing). When he was sitting relaxed, his hands were always closed (but not tightly), and his hands were always clammy. The involuntary hand-clenching occurred during his severe yawning episodes, as if his whole body were contracting into itself. Each yawn made his hands clench so tightly that his fingernails sometimes dug into his palms. In addition to clenching, each yawn made his forearms lift off his wheelchair’s arm rests and cross tightly against his chest, so after the yawning episode ended, we had to place his arms back onto his arm rests. He sometimes had as many as 10 yawns in one yawning episode. The yawning also made his eyes clamp shut and water severely, so we had to wipe his eyes the way he required after each and every yawn (he described this in his book “Never Say Invisible” (https://www.neversayinvisible.com/book/). I also described the eye-watering in my website (https://guidetoals.com ) in the entry at the following link: https://guidetoals.com/real-and-fake-medications-and-treatments/.
Devices worn on the hands and wrists
To help our son keep his hands open, we purchased and tried numerous devices to combat his hand problems. There seemed to be two kinds of devices available on the Web in 2018 through 2021 when I began searching for help:
Splints: Splints hold the hands and fingers clamped in rigid, tight positions and are hot and restrictive. There are many versions on the web.
Grips: Grips (my term) were held lightly or loosely, if possible. I only found a few versions on the Web. Grips allow some squeezing action while not being confining. A simple grip could be a tennis ball.
SoftPro
We bought the SoftPro splint (see photo below) as a first attempt to deal with our son’s curled hands and fingers. https://www.healthproductsforyou.com/p-ocsi-softpro-champ-resting.html. The SoftPro was very hot and didn’t allow any movement at all. The removable insert inside the cloth shell was hard plastic, so its shape couldn’t be changed. The Velcro straps were a pain to get in place because whatever one I was working with always managed to stick to another part of the SoftPro. The fingers and thumb were held in place with Velcro straps. The straps across the 4 fingers couldn’t really hold our son’s fingers flat; they curled anyway. Our son could not sleep with these splints on because they were restrictive and hot. This was a medieval torture device. There are some different models available at that website.

SAEBO
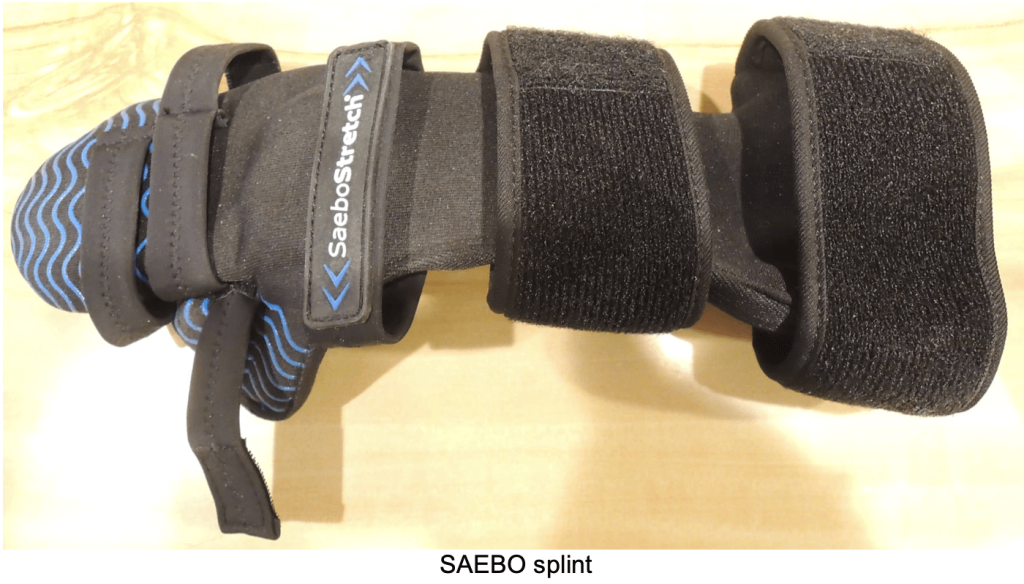
The SAEBO Stretch (https://www.saebo.com/collections/featured/products/saebostretch, see photo below) was more complicated. The metal insert could be removed for adjustments, such as bending at the wrist and moving the thumb in and out to fit the wearer’s hands. The thumb part could also be bent separately. The splint came with 3 metal inserts of varying stiffnesses so the wearer could choose flexibility. The fingers and thumb were held in place with Velcro straps. Our son could not sleep with these splints on because they were restrictive and hot. This was a medieval torture device, too. SAEBO also makes a complicated splint called the SAEBO Glove, which is highly confining, but we did not buy or try that one.
Robotic glove
Someone posted on Facebook in late 2025 a photo and link to a robotic glove (an assistive device) that he found on Amazon and ask if anyone has tried it:

https://www.amazon.com/dp/B0DBG7VQ2R
To answer this person, I thought about our son’s limitations and tried to imagine IF he had bought this glove. In the early stages of his ALS, he had arm and body mobility, but during the last year or so of his life, he was almost completely immobilized.
Here’s a thought experiment. Picture this: to use this glove, a user’s arm and torso have to work also. If the glove wearer wants to reach for a glass of water, the user still has to lean forward, extend and raise the arm, grab the glass, lift it off the table, lean back, bring it to his or her mouth, tilt the head back a little AND tilt the glass to drink from it or from a straw, then reverse all those steps to put the glass back on the table.
That’s when I realized that this device is only for those who can still move at least the arm and torso. If you have ALS and still have the capability to move your arm and torso, then you might benefit from this device, but it is a short-term fix. Our son’s fingers were curled inwards from the ALS, so trying to get his hand into the glove would have been difficult. As your ALS worsens, you would lose all the arm and body movements like our son did and this glove would no longer be useful. It’s your call.
Homemade devices
I decided to build devices that would prevent clenching but allow our son’s hands to remain open and relaxed and to allow air circulation. After wasting money on the two splints above, I realized that our son just needed something to grip, but with his muscles destroyed by ALS, he had no strength.
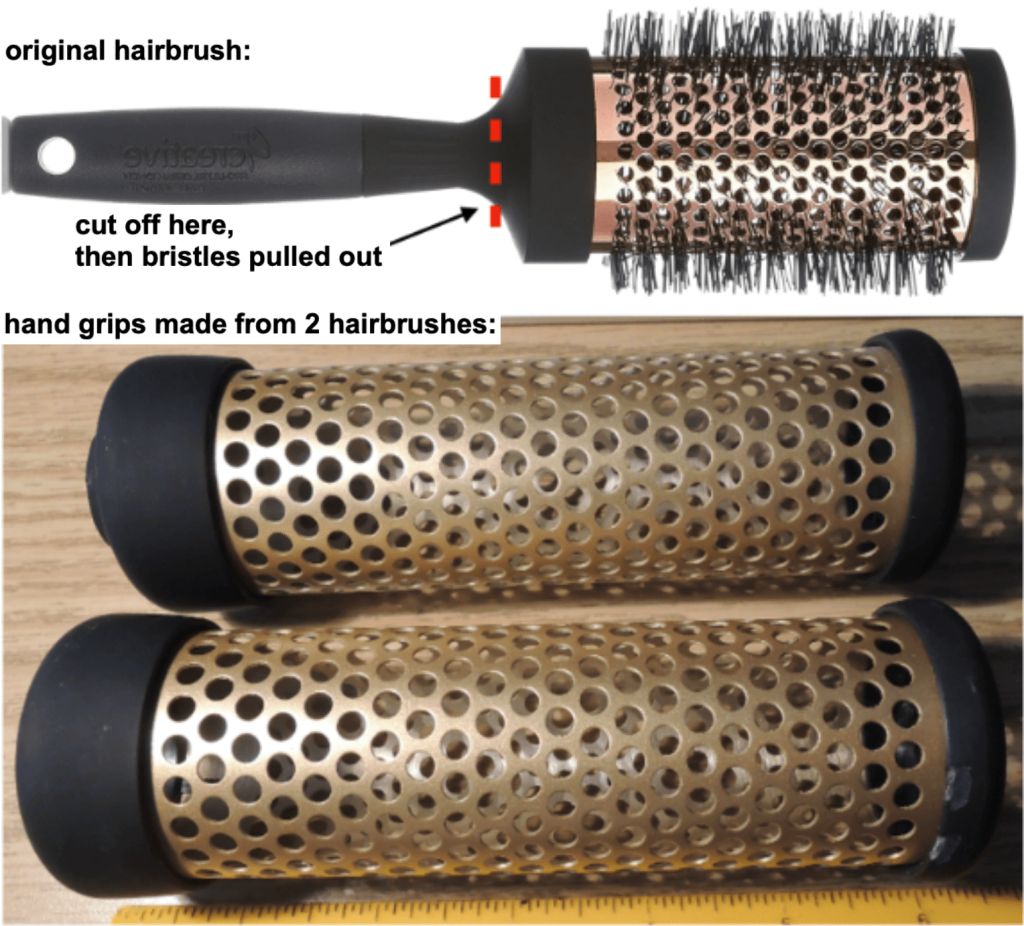
The grips I built started out as two hair brushes, (see the upper part of the photo below). I cut off the handle of each brush at the red dashed line (in the upper of the two photos below), and then discovered that inside each perforated cylinder was a simple bottle brush with the usual central metal spiral. I pulled each spiral out through the sawed hole and was left with perforated cylinders (see pair of cylinders in the lower photo below). The perforations allowed his hands to breathe and air to circulate. I even had a choice of larger diameter brushes if I wanted. Unfortunately, these worked for only a short while because his grip became so weak that he could not hold the two cylinders; they kept falling out of his hands, and I didn’t want to strap them onto his hands. I needed something better.
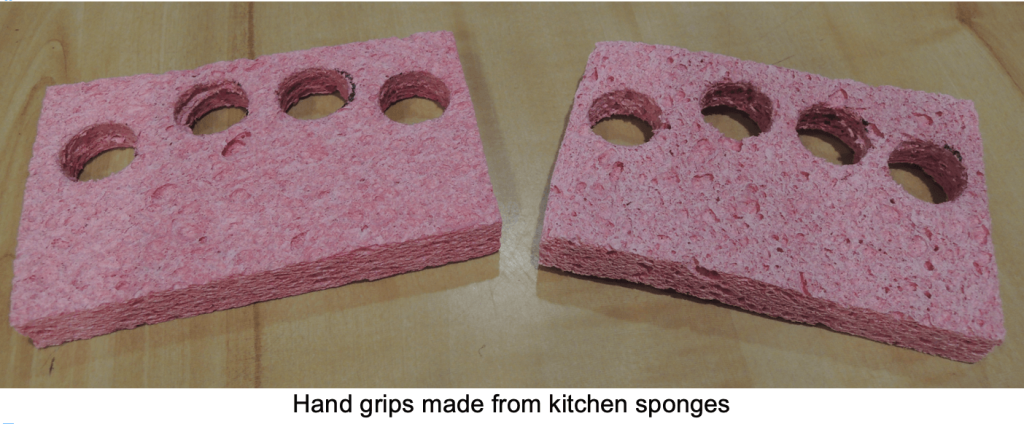
The second pair of grips I made from two kitchen sponges (see photo below).
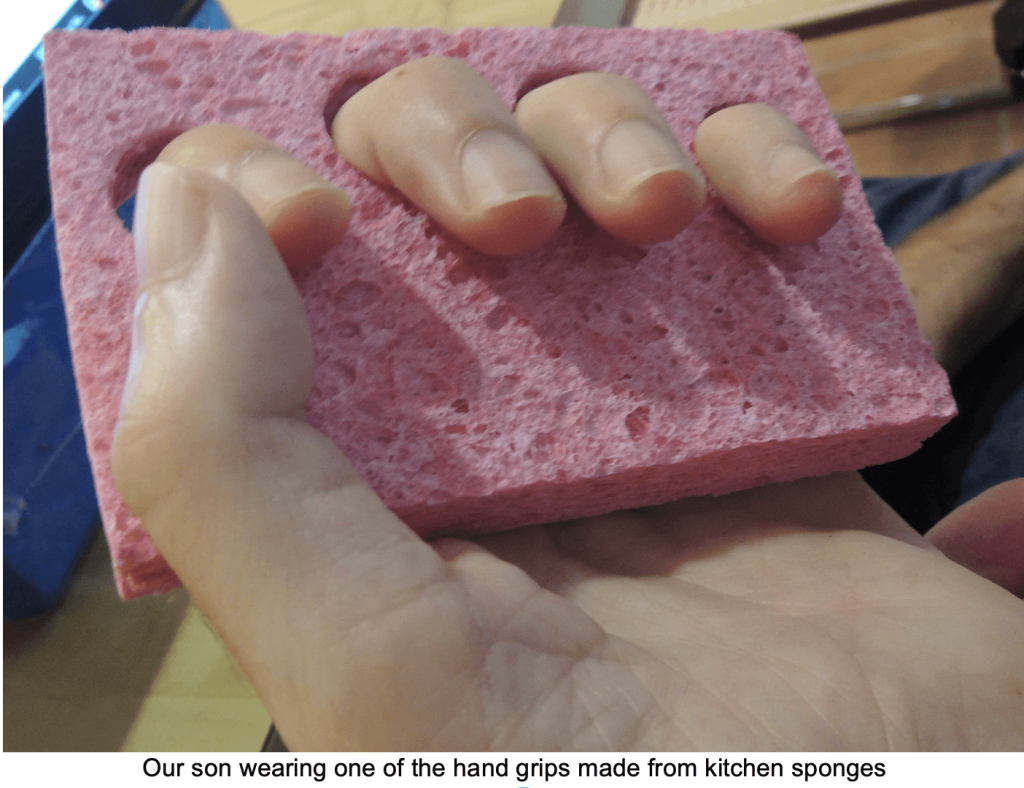
They were OK, but they were absorbent (they were sponges, after all) and the holes were tight on our son’s fingers. See photo below. There was no room to put bigger holes. I probably could have found bigger sponges, but the moisture absorbency killed that idea.
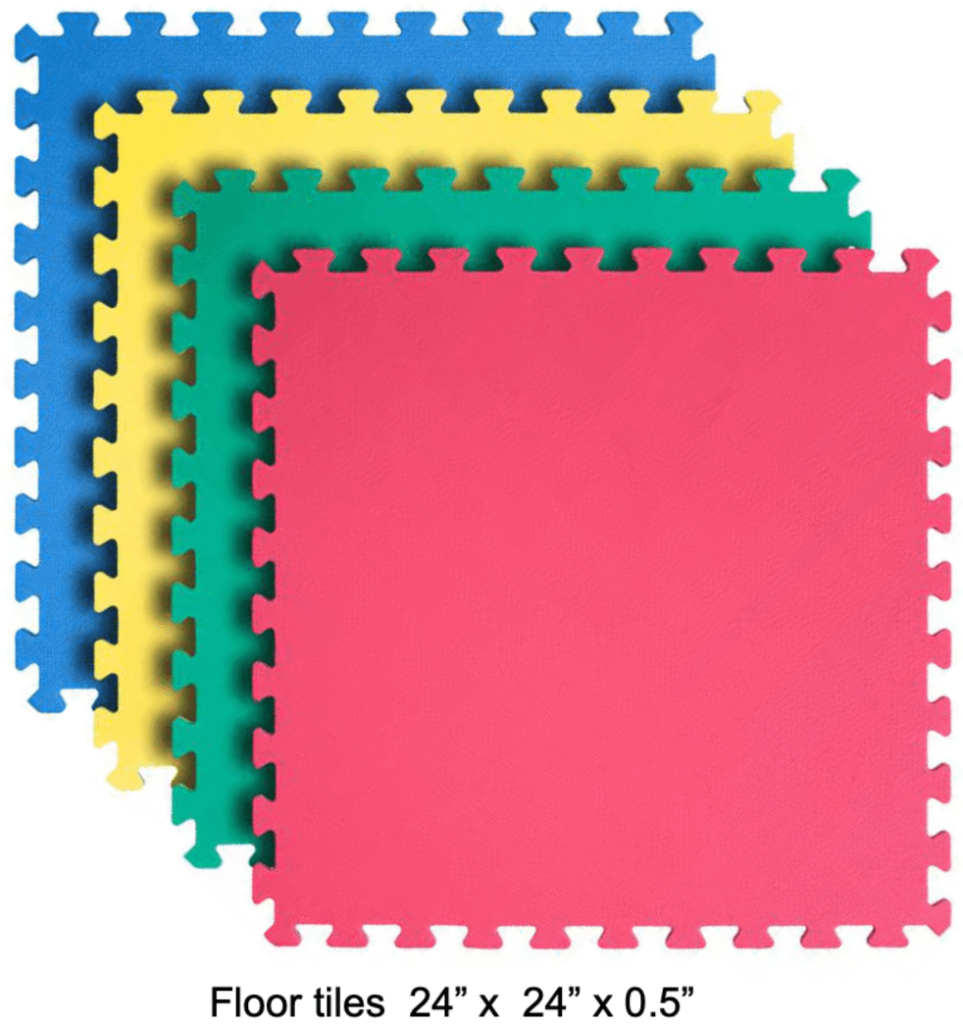
I then bought a package of 4 colorful 24” x 24” x 0.5” rubber floor tiles in Home Depot. Link: https://www.homedepot.com/p/TrafficMaster-Primary-Pastel-24-in-W-x-24-in-L-x-0-5-in-Thick-Foam-Exercise-Gym-Flooring-Tiles-4-Tiles-Case-16-s-ft-24121HDUS/301152503. See photo below.
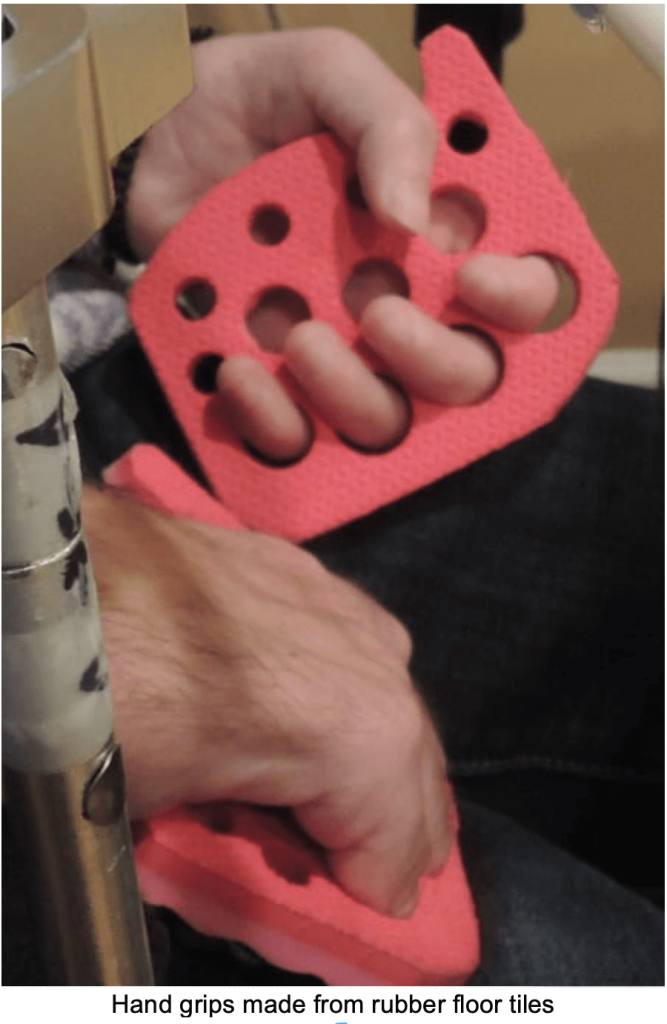
I designed and cut out a pair of grips that I custom-fitted to our son’s hands. The photo below shows the grips on his hands. I was able to make the holes larger than what were in the sponges above. The non-finger holes were for air circulation. They were very comfortable, easy to put on and take off. They were washable (they were floor tiles, not sponges, so they could not absorb water). Each grip had 4 slightly elongated finger holes and a notch for his thumb. They didn’t fall off his hands. They kept his hands more or less open and dry. He would have preferred his fingers to be kept straighter, but that’s all I could do in my basement workshop. He easily kept them on all day and night. He would have liked beveled edges around the four finger holes, but I had no way to bevel them. He also asked for the 4 finger holes to be angled for more comfort, but I couldn’t do that.
As his symptoms worsened, his hand comfort needs changed. He also needed wrist support because his wrists hurt as his hands hung off the ends of his wheelchair armrests. He needed a long version of the grips.
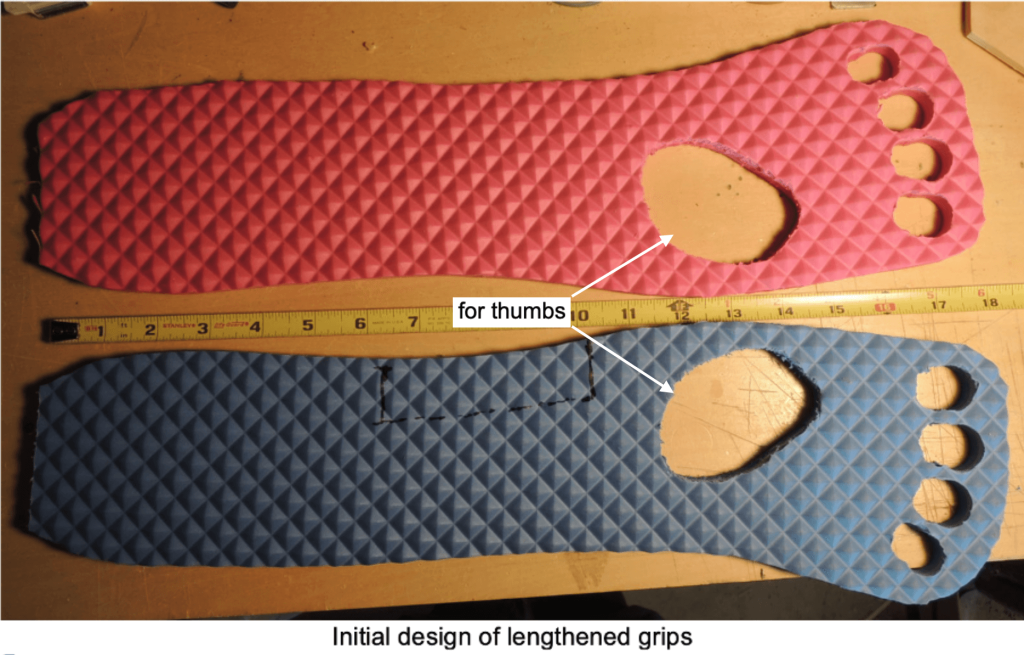
Back to the drawing board. I used the small grips (shown above) as templates for a newly designed pair of elongated grips that kept our son’s hands open, allowed his thumbs to hang freely and prevented his hands from drooping. They were long enough so his entire forearms could rest on them. The first pair I built fit him well (see photo below). I included a tape measure in the photo so you can get an idea of length. Note: I use both the word “grips” and the word “supports” to describe these, because they both allow gripping and provide support.
Because our son’s power chair had two differently shaped armrests (one was flat and one was a curved valley): I had to cut out parts of the two grips so they could lay properly on the armrests. See photo below.

The two different colors were only because I didn’t have big enough pieces to make two of the same color. The different colors allowed us to put the correct one on the correct hand and arm. The elongated grips were flexible, so his hands hung down in gentle curves. See photo below. The bumpy, but soft, texture prevented his arms from laying flush against the rubber surfaces and sweating. I added ventilation holes along the entire grip later on.
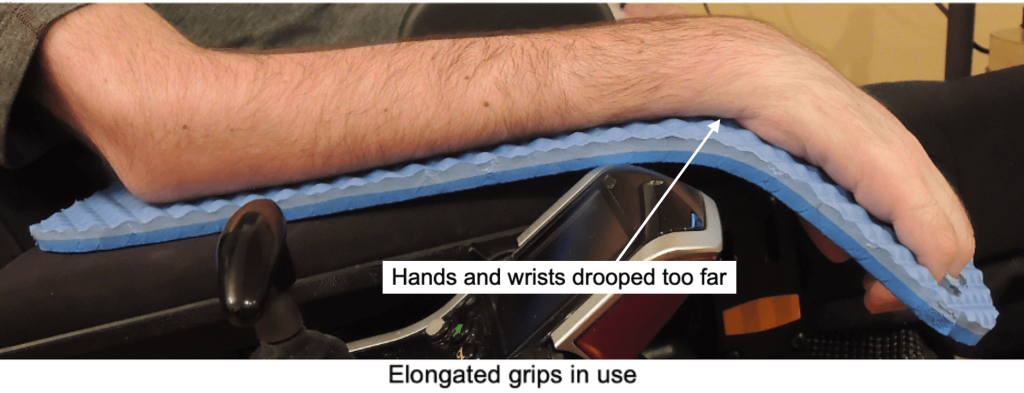
After using the elongated supports in the photo above for a while, our son told me his wrists hurt because they drooped downward too far. I initially tried to lengthen the wheelchair’s armrests with extensions to support his hands, but that was difficult.
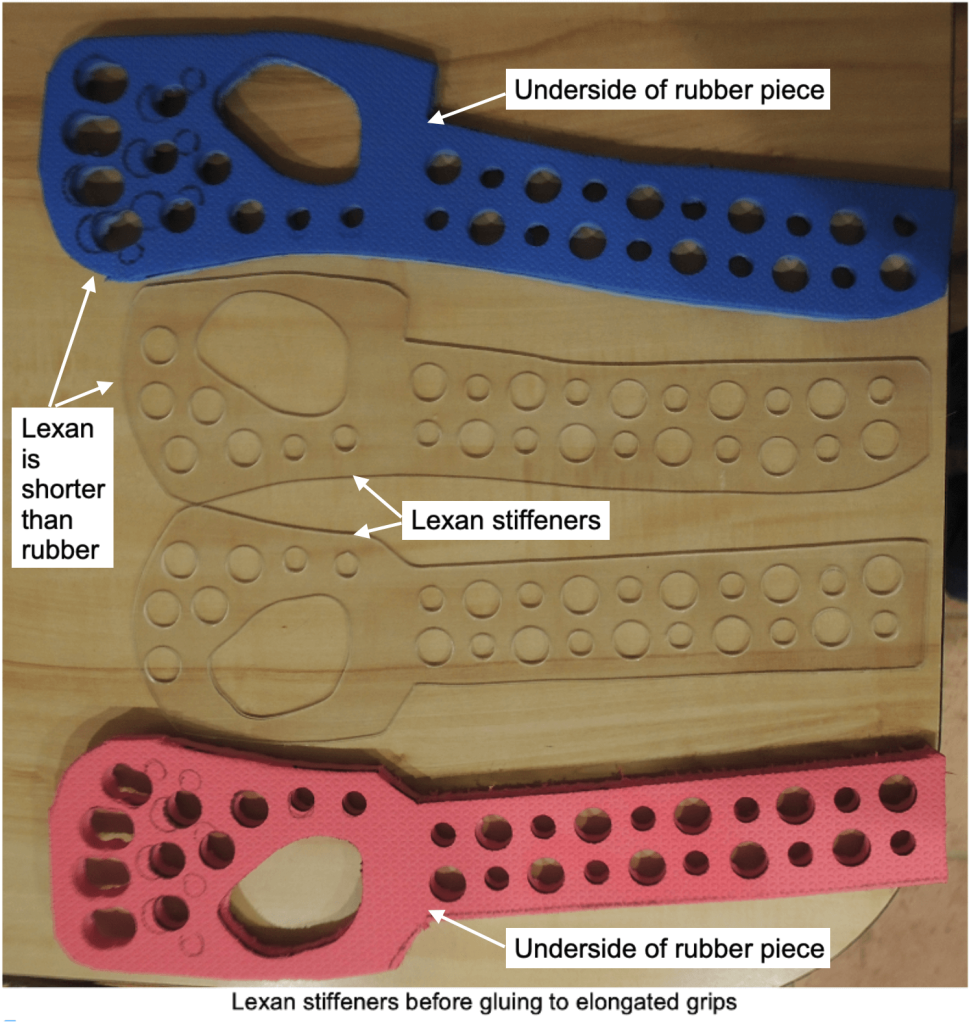
Eventually I solved this problem by first narrowing the forearm area on the blue grip. Then I bought two pieces of Lexan (a tough plastic and far superior to Plexiglas) from Home Depot. I used the two rubber supports as templates, traced the contours and holes onto the Lexan, and cut out the shapes you see in the photo below. I attached them to the undersides of both grips with contact cement. The Lexan pieces served as stiffeners, better support and a little bounciness. I also added the ventilation holes along the entire grip. The Lexan finger-hole area is shorter than the corresponding rubber area because I didn’t want my son’s fingers to rub on the Lexan support. See the series of photos below.
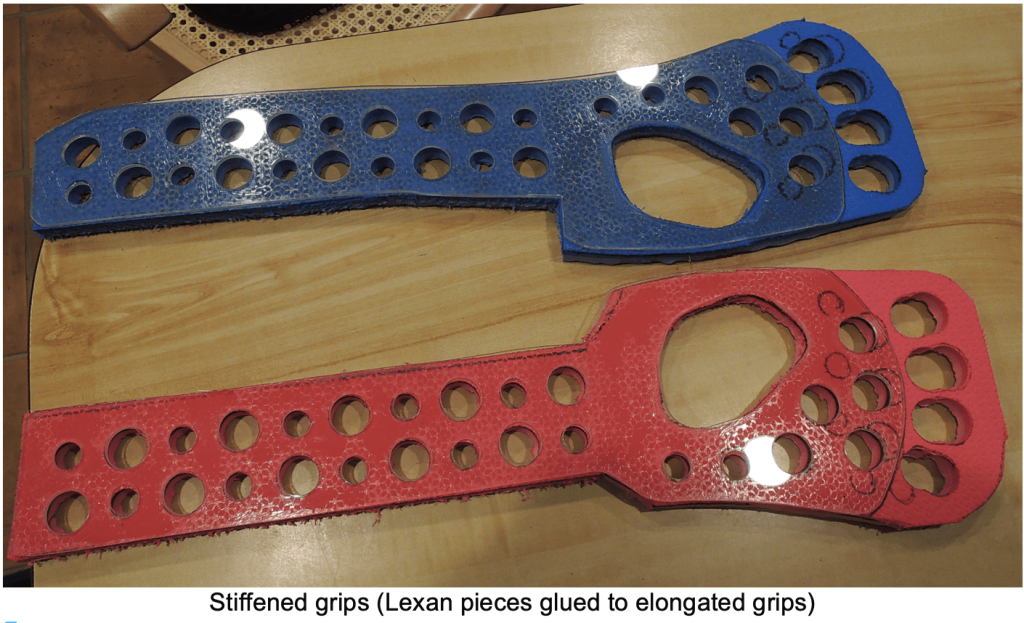
These two supports were perfectly flat. Our son tried the stiffened grips for a while, but he then told me his wrists hurt because his wrists could not hang down at a comfortable angle.
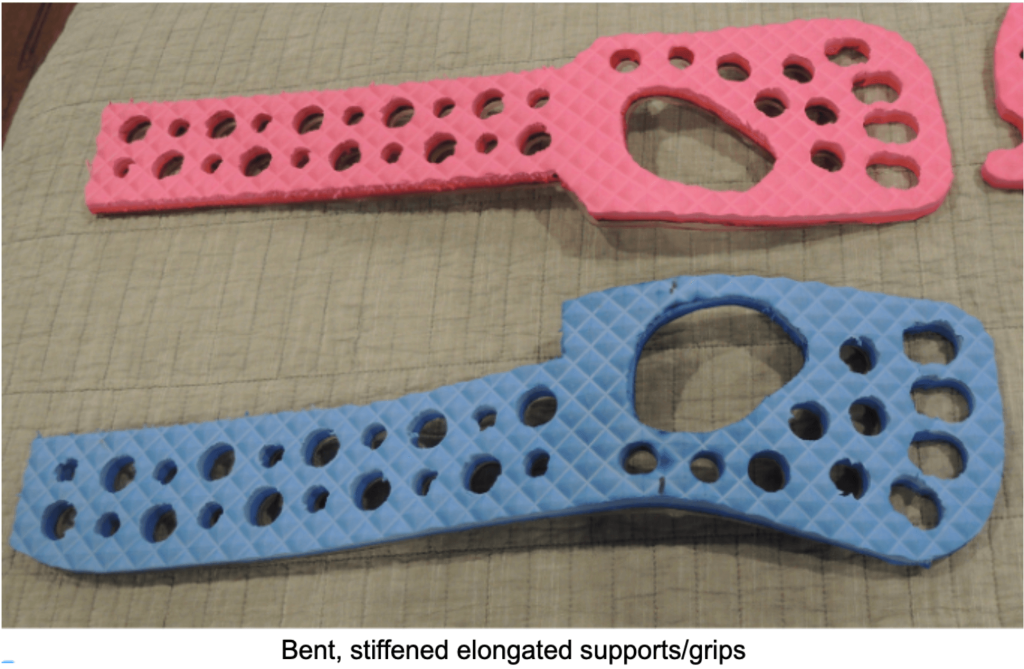
I then bent both supports downwards by softening the Lexan with a heat gun/paint stripper (much hotter than a hair dryer) (see photo below). These grips were much more comfortable. Eventually, his skin became more and more touch sensitive, so we had to tuck lamb’s wool under his forearms. He even slept with the grips on to keep his hands and wrists comfortable.
Devices to keep the arms in place
As our son’s ALS worsened, his requirements for comfort and stability of his arms in his power chair changed. His power chair initially had two flat, cushioned, narrow (maybe 3” wide) armrests. As his muscles weakened, his arms became lifeless; they would not stay on the armrests; they just fell off the sides and hung down, so we were always placing them back on the rests. When his arms fell off the rests, they hit the tires quite hard and sometimes got stuck between the tires and the frame. Also, whenever he had a yawning episode, his arms would lift off the arm rests and cross his chest tightly until the episode ended, then they would go limp and fall onto his lap.
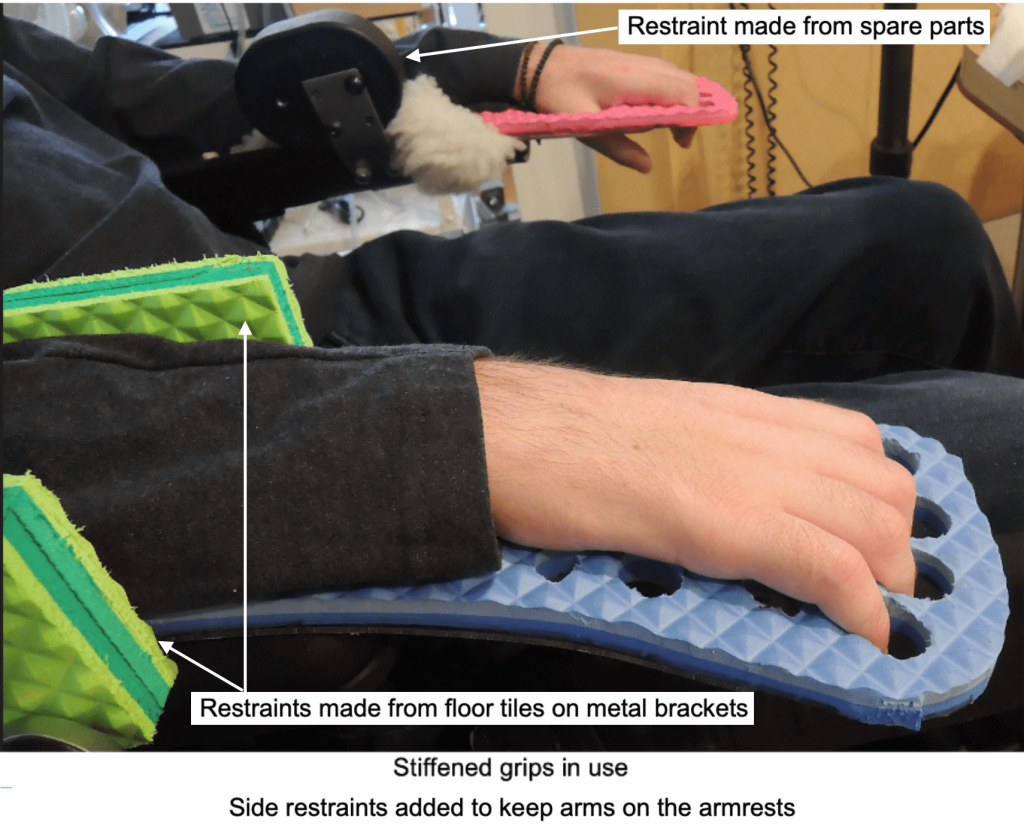
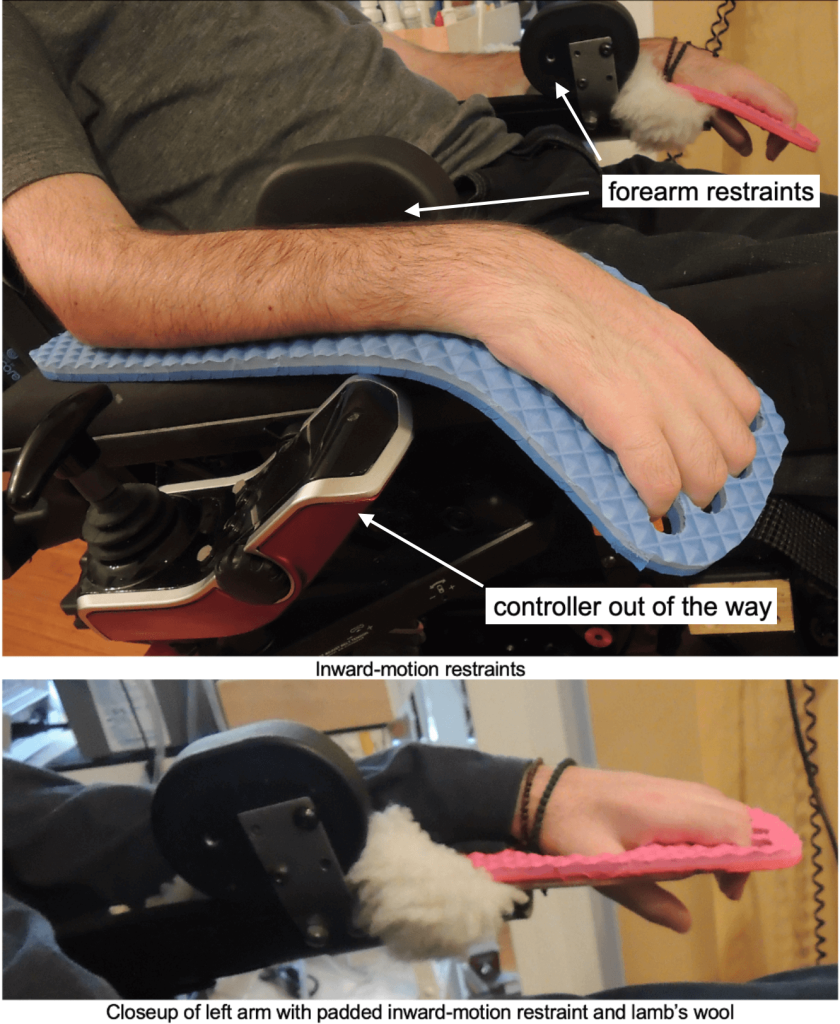
National Seating and Mobility (https://www.nsm-seating.com) of Whippany, NJ serviced his power chair whenever it was necessary. They replaced the left armrest with a rounded-valley-shaped one to try and keep his left arm nestled in place, but the valley wasn’t deep enough to keep his arm in place. I don’t remember why we did not have the right armrest replaced with the same valley-shaped one, but we may have been concerned that the more confining shape would have interfered with our son’s ability to use the joystick controller to drive his chair. I built the side restraints you see in the photo above. They were necessary add-ons to both armrests because the armrests did not keep our son’s arms in place; they kept falling off so his hands were always crashing into the tires. He was not able to bring his arms back up onto the armrests. They also prevented our son from crossing his arms across his chest during his yawning episodes. Since the valley-shaped arm rests were much wider than the original armrest, they always collided with the backrest when we had to pivot the armrests upwards to get our son out of his wheelchair.
The joystick controller was mounted on a bracket that was designed to be swung outwards and folded back against the armrest when not in use (see photo below). (Note, this photo was taken before I stiffened the homemade elongated grips). However, every time our son’s right arm slipped off of the right armrest while the controller was pushed to the side, his arm and hand became stuck between the armrest and the controller, so we were constantly placing his arm back on the armrest. The photo also shows the padded forearm restraints I had initially installed along the inside edges of both left and right armrests to prevent our son’s arms from moving inwards. The drawback to these pads was that the pads were unnecessarily thick, so they limited the space for our son’s arms on the armrests. By the time this picture was taken, our son had also developed heightened skin sensitivity, so we had to use a lot of lamb’s wool as cushioning (his left forearm is resting on some wool).
Our son obviously needed outward-motion restraints, too. I replaced the padded restraint on the right armrest with two homemade ones, one for each side of his arm. I had many spare metal brackets for the power chair on hand, and used more of the floor tiles to build the restraints you see in the photo below. (Note: The photo below was taken way before I had made the elongated grips).
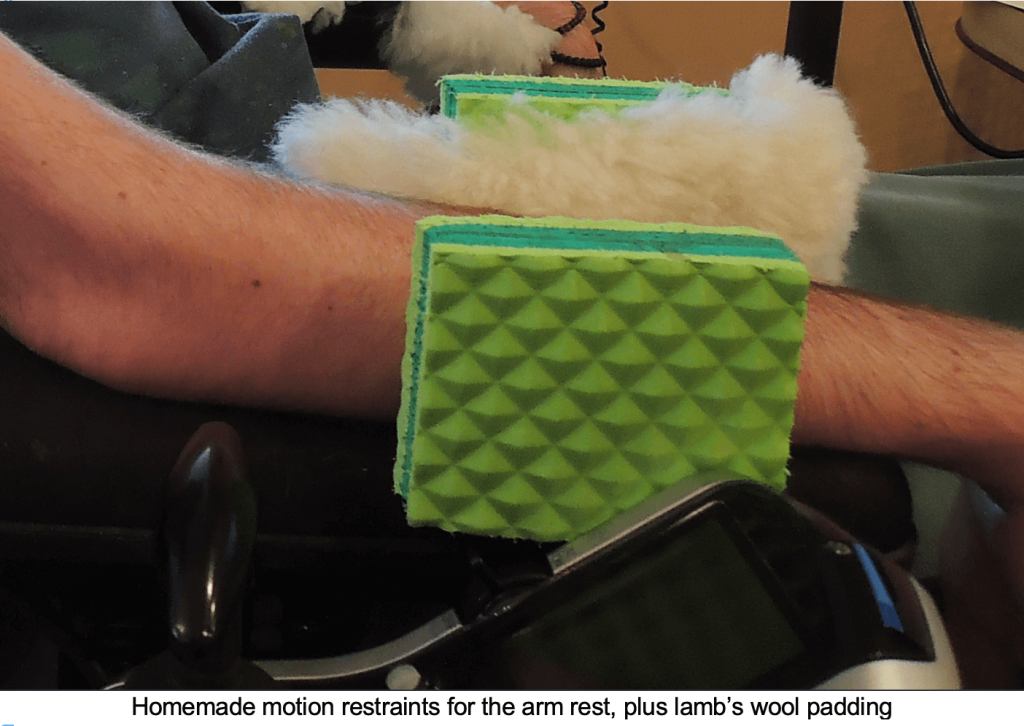
These homemade armrests weren’t as comfortable, but they were flatter than the black ones, and prevented our son’s hands from falling off of the armrests in either direction.
