
Introduction
OUR 41-YEAR-OLD SON was diagnosed with ALS in January 2018. By the fall of that year, Jeremy couldn’t eat, drink, or take medicines by mouth. We didn’t know he was starving and malnourished. He had lost 30 to 35 pounds (he was down to 100 pounds), but it happened so slowly that we didn’t see it until he was emaciated.
He needed a feeding tube, but we had trouble even scheduling an appointment to have feeding tube surgery (gastrostomy) because of the long waiting list. (He described this nonsense in his book, Never Say Invisible.)
Then a nurse friend told him to go to the ER and claim he was suffering from a “failure to thrive.” That put the ER into high gear, and he had a feeding tube within a day. Lesson: make the system work for you, not against you.
Note: In contrast to the alarm bells that went off when my son used the expression “failure to thrive,” an online New York Times article dated 5/13/2024 titled “‘Failure to Thrive,’ or a Failure to Investigate?” claims that “failure to thrive” is an outdated medical term that often masks treatable illnesses and is a common diagnosis for both infants and older adults.
It usually means the doctors can’t figure out why the patient is sick. One doctor claimed the expression “is not a diagnosis at all.” The expression can also function as an unhelpful catchall diagnosis. A pediatrician was quoted as saying, “It’s a wastebasket of things we put children into when we don’t understand what the specific cause of their problems is.” To this doctor, “failure to thrive” is a way for doctors to avoid admitting that they don’t have the answer.
My takeaway: Using the expression “failure to thrive” may not trigger any action if the patient is very young or very old, or if the medical facility has heard it too many times from its doctors to indicate urgency.
In our son’s case, “failure to thrive” got him a feeding tube very quickly, so the urgency of the expression worked for him, maybe because the doctor knew he had ALS. I would recommend using the expression to get the attention the ALS patient needs.
I’ve seen many posts by both caregivers and ALS victims on the FaceBook group “ALS – Patient and Caregiver tips for every day living” stating that the ALS victim has trouble eating, swallowing and drinking but refuses to get a feeding tube.
The caregivers and ALS patients ask what can be expected, and sometimes the same people ask, “How much time does the ALS victim have left?”
The answer is simple: the patients will die of malnutrition. They will starve to death. In that case, please get the person’s affairs in order. I do have one friend whose mother refused a feeding tube and starved herself to death. Here’s a link to my article on this website entitled “Get Your Affairs in Order! (GYAIO)“
Nutrition, fat, and muscles
Weight loss due to ALS and weight loss due to dieting and exercise are different: Diet and exercise help lose fat (and build muscle). ALS victims lose weight due to both destruction of muscle mass from the disease itself and also due to poor eating (until a feeding tube is used).
No amount of exercise and ice cream and other high calorie foods will put back muscle that’s lost to ALS. Weight gain in ALS victims is probably only due to increase in fat.
This isn’t necessarily a bad thing, because when our son lost weight prior to getting his feeding tube, he had no “padding” left on his butt, so it hurt even just sitting in his padded seat on his power chair. His arms had no muscle tissue left, so they looked like loose skin draped over a skeleton.
After our son got a feeding tube, he quickly gained weight. His arms became “meatier,” his butt came back, and he mostly put weight on around his waist, which I’m sure was fat.
Kinds of feeding tubes
Feeding tubes are not just for ALS victims. There are even Facebook groups for “tubies” (people with feeding tubes). Numerous types are available:
- NasoGastric tubes (NG): through the nose and ends in the stomach
- NasoJejunal tubes (NJT): through the nose and ends in the jejunem (part of the small intestine)
- Jejunostomy tubes (J tube: JEJ, PEJ, or RIJ): through the abdomen and ends in the small intestine
- Radiologically Inserted Gastrostomy tubes (RIG): X-ray is used to position and insert through the abdomen into the stomach. For those with breathing problems or who must wear ventilator or BiPAP masks, RIG allows the patient to keep the mask in place.
- Percutaneous Endoscopic Gastrostomy tubes (PEG or G tube): a light probe is inserted down the esophagus into the stomach to determine where a stoma is to be cut for placement of the PEG tube. Since the surgeon goes in through the mouth, the patient cannot wear a ventilator or BiPAP mask.
Please note: I am not familiar with the body’s ability to digest food that bypasses the stomach and goes directly into the small intestine. The patient might not be able to accept real food that has simply been blended. The patient might have to accept nutrients that are already broken down, such as the cartonized formulas discussed below.
The tubes are implanted or inserted into the body in various places, depending on the needs of the patient. Here, I will discuss only the two feeding tubes that our son had.
Both were PEG (enteral) tubes but had different designs. “Enteral” means the tube goes through a hole (“stoma”) in the stomach.
The procedure: A long light probe is inserted into the patient’s mouth and down the throat into the stomach. The tip is pressed up against the inside of the stomach so the doctor can see the glow in the operating room right through the patient’s stomach. A stoma or hole is made at that point, and the feeding tube port is inserted.
Our son’s first PEG tube had a nonremovable 10- to 12-inch tube that was a pain in the neck (discussed below). Fortunately, that was replaced three months later with a different PEG tube (we had the Avanos brand). It came in a kit with two extension tubes, a syringe, and a booklet.
If and when the ALS patient gets a feeding tube, please read the directions in the booklet. It says to avoid getting petroleum distillates (the generic term for Vaseline) on the PEG tube. They can soak into the PEG tube and weaken it. Some caregivers have written that they use bacitracin ointment and zinc oxide around the stoma to prevent infection or soreness. Be aware that both of those substances contain petroleum products.
Enteral feeding tubes are for those who:
- Must have liquid food go directly into the stomach or small bowel
- Have functioning stomach and intestines
- Have swallowing, eating, and drinking problems
- Might aspirate food and fluid (the two might go into the lungs)
You can’t have or use a feeding tube if a blockage is in the bowel or if you have diarrhea or an illness.
All the feeding tubes and associated equipment we used had “catheter” connections, as shown the pictures below. They were conical and stayed in place by friction alone. If either or both of the female or male connections were greasy, they wouldn’t stay together.
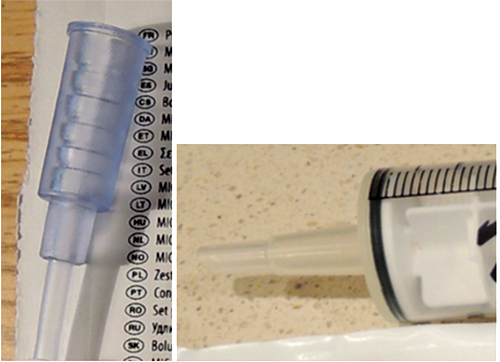
Left: female catheter connection; right: male catheter connection.
The feeding tube manufacturers are switching to or have switched to EnFit connectors for all these feeding tubes and associated equipment due to safety concerns. The old, friction-based connectors, like I used for our son’s needs, are now called “legacy connectors”. The new connectors are supposed to prevent anyone from accidentally connecting, let’s say, a food source to an intravenous port. (You don’t want foods going into someone’s vein, and you don’t want to feed an IV med, or even blood into someone’s feeding tube!) Also, the Enfit prevents disconnections.
One-piece PEG tube (pain in the neck!)
Our first feeding tube had a one-piece design: the long extension tube could NOT be removed from the PEG. This design can be seen in the photo of the box cover below.
Note the female catheter connection at the top. The round object at the bottom of the long tube is a deflated balloon that is inserted through a hole (stoma) made in the stomach. Once inside, the balloon is inflated by injecting water with the syringe provided into the left of the three ports at the top of the tube (see drawing).
Then the four-finned object you see halfway up the tube is slipped down against the outside of the stomach to keep the balloon inside snug. The middle port at the top is for food and the right port at the top is for medicines. The two ports have plugs and flaps.
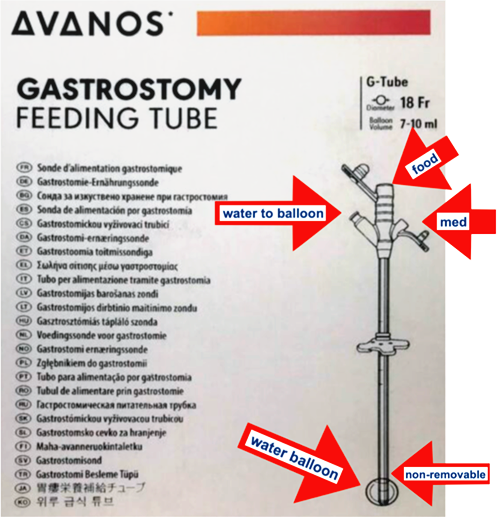
One-piece PEG tube.
Doctors almost always put in the one-piece PEG tube shown above. I’ve heard that the surgical procedure is easier that the two-piece PEG tube.
Regardless, the one-piece tube is stupidly designed. We constantly had to deal with a long piece of tubing dangling from his stomach. It ended up in his underwear and his pants, and it got snagged on things. We would accidentally pull it, and it dangled into the toilet (didn’t quite reach the water).
When it wasn’t in use, we had to pin it upwards to the inside of his shirt or we taped it to his stomach. Some people tuck the end into a wearable pouch.
These were all nuisances. It could not be removed and cleaned easily. A serious problem occurred a couple of times because the tube became plugged with food and medicines. If the plug can’t be cleared it out, the patient can’t get any meds or food, period. You will have to go to the ER.
Kits are available to help unclog the feeding tube. But I had an easy solution, described below.
Two-piece PEG tube
Jeremy had the one-piece tube for only three months, at which time the flap’s plug almost tore off in the hole from frequent use. The flap and plug are just flimsy rubber and will deteriorate over time.
The doctor replaced it with the two-piece low-profile Mic-Key Gastrostomy Feeding Tube shown below. It was called a “low profile” feeding tube.
The great thing about this design is that the extension tube is removable for cleaning. Our son’s doctor said he had patients who had their tubes last for years, but I found the tubes were too delicate and broke easily.
The manufacturer recommended to have it changed every three to six months. We changed it every six months. The Mic-Key Tube came in a kit with both straight and angled removable extension tubes.
The “French” number is printed on the box and also stamped on the actual Mic-Key tube. It is the diameter of the tube. This number is important to remember when you’re getting a new one.
Ours was “20 Fr”. We used only the straight extension (shown three pictures below). If it was plugged, we simply removed it, emptied it, cleaned it, and put it back. Or replaced it. The minor drawback to this design is that it stuck straight out from our son’s stomach when in use.

Box cover from Mic-Key tube kit.
Available at Vitality Medical
Nothing dangled from our son’s stomach anymore. The kit had a 10 ml syringe for filling the balloon with water. In the photo below, the white opening stamped with “20 Fr” and “1.7 CM” is where the extension tube is inserted.
To connect the two, we needed to line up the black mark on this piece (pointing to the right in the picture) with the black mark on the removable tube. After inserting the removable tube, we turned it clockwise until it stopped, securing it. Note: the PEG tube itself should be rotated 180 degrees every day on the patient’s stomach.
Important: Inside the opening was a “bayonet” valve. It opened when the extension tube was inserted. It was supposed to be self-closing and remain closed when the extension tube wasn’t in place. But we found that the bayonet valves sometimes leaked, due to either a piece of food preventing it from closing or a worn bayonet valve (it was just plastic).
The white part on the right-hand side of the Mic-Key (with the letters “EA”) is the port used for injecting water (10 mls maximum) to inflate the balloon and also for checking the water level periodically.
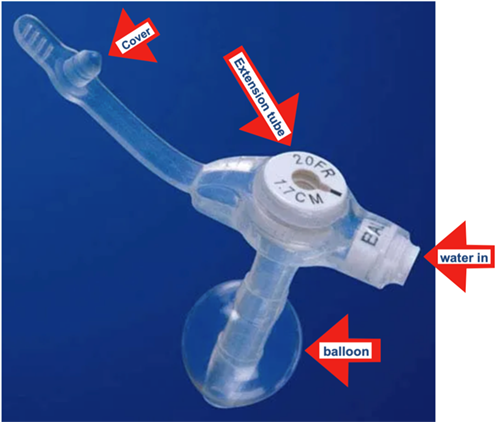
Mic-Key tube.
Lumps, called granulomas, formed on our son’s stomach behind the Mic-Key tube “flange” around the stoma. We easily eliminated them with prescription-based silver nitrate applicator sticks. The medicine made the area very dark, but the granulomas and color eventually disappeared.
Three different designs of removable extension tubes are shown below. We never used the ones with the right-angle connectors because the internal diameter of the connector was smaller than the straight one. We never used the one with the two ports on the top. Note the female catheter connection at the left in the photo below.
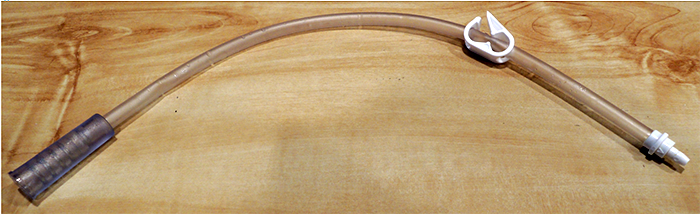
The straight Mic-Key extension tube with pinch clamp.
We also had but never used the Mic-Key bolus extension tubes with the angled connectors and single or dual ports, shown in the photos below, because the white connector was skinnier. Note the female catheter connection at the left below.

Removable Mic-Key extension tube with angled connector, single port.
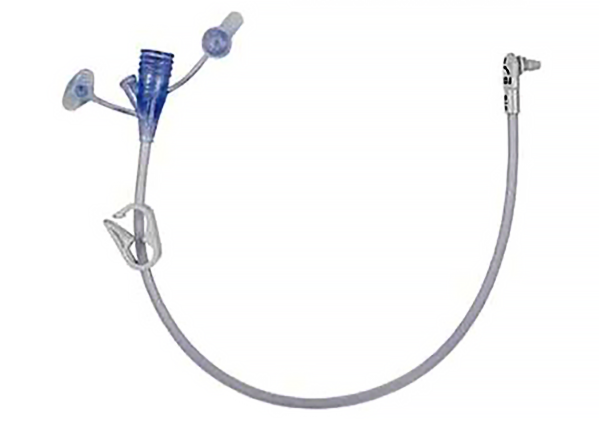
Removable Mic-Key extension tube with angled connector, dual port.
The flap on the Mic-Key port was flimsy. Made of rubber, it tended to tear off from frequent use. Some of the pinch clamps on the Mic-Key extension tubes could not be fully squeezed shut, so sometimes food held above our son for gravity feeding leaked past the pinch clamp into his stomach, and sometimes food leaked out of our son’s stomach if the extension tube was dangling.
Avanos, the manufacturer, recommended in their instruction manual to replace the actual Mic-Key tube every three months, but it was difficult to get our son to the hospital. The doctor showed me how to replace it myself, but our son passed away before I had a chance to do it.
Avanos told me some people change the feeding tubes by themselves at home. I did see a YouTube video of a young girl changing her own feeding tube.
One contributor to the Facebook group mentioned the MiniONE, a competing brand. See photo below. Her husband’s tube was placed by Interventional Radiology (IR) under conscious sedation. She also said that a number of neurologists seem to be unaware that this is an alternative to the usual way of placing a feeding tube.
She wrote that IR is more likely used with a low-profile appliance (in her husband’s case, the MiniONE) and tube, so she didn’t have to switch from the PEG tube with the nonremovable tube months later as we had to. She also said that you have to plan with the IR team to have tubing size options on-hand (their office needs to be well-stocked).
She said the Mic-Key is more popular but less comfortable, but did not say why. My note: the MiniONE and Mic-Key look almost identical.

AMT MiniONE balloon button low profile G-Tube.
Syringes
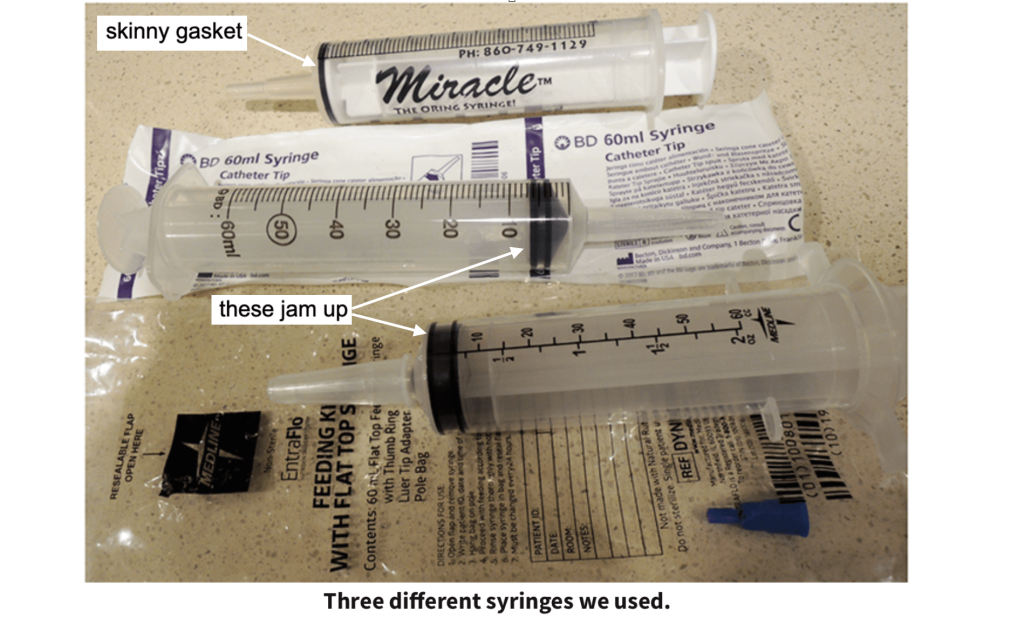
The syringes sent to us through insurance for enteral feeding were all like the middle and bottom ones in the photo below: they all had large rubber tips on the plungers. Note that they both had catheter tips. When our son first got a feeding tube (also with a catheter tip), they sent us a month’s supply of syringes with the large rubber tips. We only knew bolus feeding at the time (to be explained below), because the medical establishment had no interest in teaching us about other methods of feeding.
So we had to feed our son by dipping the syringes directly into pureed foods and filling them. It was a mess. The food oils soaked into the rubber tips and made them swell. The plungers would not move easily after they swelled. We were supposed to use one syringe a day and then throw it out. Some of them malfunctioned after one meal. One even malfunctioned during a feeding.
Our son searched on the web and found the Miracle O-Ring syringe (see the top syringe in the photo below), which was the best syringe brand of all. (Other similar O-ring syringes made by other manufacturers are available).
We couldn’t get them through insurance, but I didn’t care because some of them lasted for many months. (I once removed the “O-ring” from an old Miracle O-Ring syringe out of curiosity and discovered that it was not an O-ring. That rubber piece was actually a large flat rubber washer with a small hole.)
Something even better than the Miracle O-Ring syringe, but difficult to buy!!!
During my 40 years of employment as a chemist in the chemical industry, I used 50 ml syringes, which in retrospect, I now see were superior even to the Miracle O-Ring syringe shown above. The 50 ml syringes that I used had NO rubber parts at all; they consisted ONLY of a polypropylene plunger and a polypropylene syringe barrel, period. (See the photo below of the actual syringe I used).
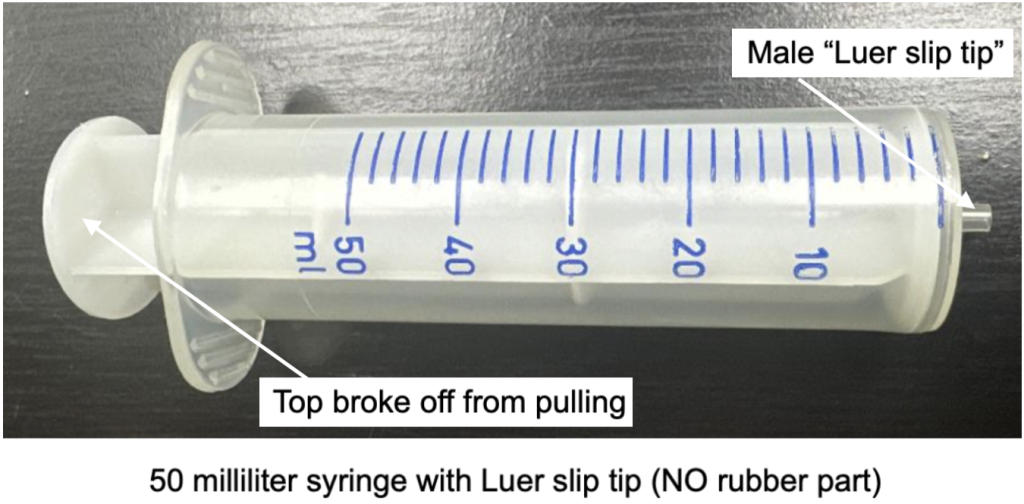
These syringes worked perfectly for years; they had no rubber parts that could swell up and get stuck. They never leaked. From my own experience, this kind of syringe only had to be discarded when the top of the plunger broke off after years of strenuous use, and only because of repeated pulling up on the plunger to draw liquids up into the syringe.
This syringe design had what’s called a male “Luer slip tip” at the lower end of the barrel, meaning that the syringe needle’s female end (the top end of the needle) was attached to the syringe barrel’s male “Luer slip tip” simply by jamming the needle on the Luer slip tip. Friction held the needle on the tip. I never had a problem; the needles never came off.
While I was employed in the chemical industry up until December 2018, I used to buy in bulk the syringes, which you see in the photo above, from Aldrich Chemical Company, which became Sigma-Aldrich, which became Millipore-Sigma. This supplier only sells to companies or institutions, so unless you know someone who works for a company or institution, you can’t buy them anyway, because they won’t ship to a home address. I’m not even sure they’re available from that supplier anymore because I cannot find them at the Millipore-Sigma website.
Here are two links on which you can probably still buy this syringe. You’ll notice that both links state that the syringes are 50 ml, but if you look at the syringes in the photos, they’re 60 mls. Go figure.
(has a legacy, or friction connection, like I used to use)
(see the right-hand product in the link: part # AML50; it has a Luer-lock connection; see photo below)
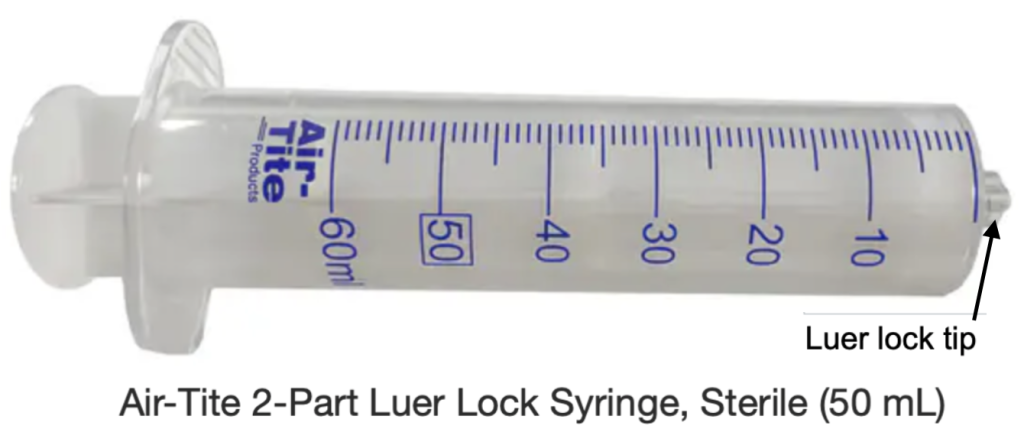
Note: There are now numerous syringe tips available for research, medical, enteral feeding, plus other uses, and some of them are color-coded to prevent accidental or unintended connections. I don’t know if the ENFIT connections used for enteral feeding will connect to Luer Lock connections. Except for the catheter connection that we used for our son, the bottlenecks in all these syringes and associated equipment are caused by the tiny neck diameters. These connections are discussed further down in this article.
Preparing medications
At each meal, our son took many OTC and prescription powders, caplets, pills, capsules, and tablets. I used only water to suspend the meds. See the video below that shows how to give medicines (not foods) through a feeding tube. (Note: this video was made before our son got a feeding pump, so this video only shows gravity feeding, which had drawbacks.) If you follow the procedure in this video, you won’t have any obstructions in the feeding tube. Note: there was no enteral food given to our son in the following video.
Versions of liquid nutrients
Cartonized liquid chemicals
After our son got his feeding tube, his nutritionist prescribed three different versions of the cartonized white or colored watery chemical concoctions that insurance companies preferred, like Nutren, because they were cheaper than doctor-prescribed pureed food.
The cartonized substances looked just like the oral supermarket liquid meals, such as Ensure brand. The supermarket stuff had sweeteners, fats, flavors, chemicals, and water, whereas the prescribed stuff had no sweeteners, flavors, or colors. It looked like paint.
Our son felt nauseous right after all three supermarket versions, and all three prescription versions that he tried gave him stomach trouble.
Many ALS sufferers are fed supermarket formulas. Here is a quote regarding these so-called nutritional supplements (New York Times Feb 5, 2023, article “Why Grandma’s Nutrition Drink Is So Hard to Disrupt”): “After water, the first two ingredients [in Ensure] were corn maltodextrin and sugar.”
Real Food Blends
We went back to his nutritionist, who had to document Jeremy’s problems with the first three versions of these so-called meals before the insurance company would agree to cover real pureed meals. The pureed meals used to be supplied from a website named: RealFoodBlends.com, but that website is no longer active. The same pureed meals can still be obtained from one of the following (please compare prices):
Different methods of enteral feeding
There are three ways to give medicines, liquid nutrients, or pureed food enterally: bolus feeding, gravity feeding, and pump feeding.
Bolus feeding
Adding liquids to the stomach via a syringe.
Bolus feeding is a tedious, time-consuming, messy way to feed, especially if you try to get meds into the syringe and then into the ALS patient. See photo below.
In the beginning of our son’s feeding tube experience, large boxes of 60 ml syringes were supplied to us monthly. We dipped the syringe tip into pureed food or liquid nutrient and pulled back the plunger on the syringe to suck in the liquid. Then we pointed the syringe upward and slowly pushed the plunger in to expel any air (just like in the movies).
Next, we connected the syringe tip to the feeding tube, opened the pinch clamp, and pushed the contents in, repeating the process again and again. This was a total mess, because RealFoodBlends, which is made from real food, was very thick and contained food oils, so it was greasy and difficult to work with.
A lot of air also got into our son’s stomach, which caused other problems. This tedious procedure had to be repeated until the entire meal was finished. Crushed meds in water were gritty and messy and difficult to add by syringe. Unacceptable.

Bolus feeding versus gravity feeding.
Gravity feeding
Adding liquids to the stomach by holding the food above the patient.
With gravity feeding, you add liquids to the stomach by holding the food above the patient. A gravity feed (according to the instructions) meant we had to pour the food blend and suspended meds into a syringe barrel, a feeding bag, or a funnel, and hope it would completely drain through the tubing into our son’s stomach.
We tried this method in the beginning with cartonized “foods.” Because we couldn’t control the gravity-feed rate, the food and meds just zipped in quickly. Our son kept getting nauseous from the rapid flow. This is called the “dumping” syndrome (feeding too rapidly).
We tried pinching the tube slightly closed with the pinch clamps that came on the feeding tubes, but that didn’t work. We also tried adding laboratory screw clamps to slow the feeding rate, but the feed rate was always erratic. Crushed meds in water didn’t drain well from a bag. Unacceptable.
Also, the food bags were messy, so I rigged up the equipment in the photo below for gravity feeding and adding meds. I attached a half-inch-diameter pole to our son’s wheelchair frame and put the clamp with the red jaws on the top of the pole. I connected the syringe barrel to the female end of the Mic-Key tube and added a funnel to the top of the barrel.
We simply opened the pinch clamp toward the bottom of the feeding tube, poured some enteral food or medicine mixture into the funnel (being careful that we didn’t overfill the barrel), waited for it to drain, and repeated until everything was in. We rinsed everything down with some water at the end. This method was easy and neat, but we couldn’t control the speed well, so our son didn’t like it.
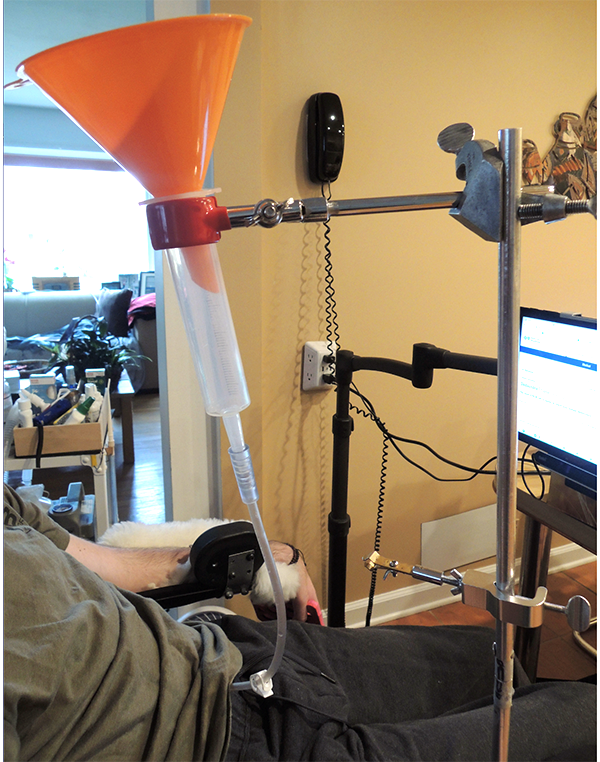
Home setup for gravity feeding.
Pump feeding
Delivering the food and or meds to the stomach via a motorized pump.
Our next step was to get a prescription-based programmable feeding pump (EnteraLite Infinity brand) with lots of bells and whistles that was supposed to control the flow of food from a complicated prescription-supplied feed bag at a preset rate.
The pump was a “peristaltic” pump, meaning a set of rollers simply squeezed the tubing and moved the food along, sort of like how you get toothpaste out of a tube or how you swallow food. We could set the pump for a certain amount of food so it would know when to shut off (otherwise air would be pumped into the patient).
It would know if there was air in the feed line and shut itself off. We tried the prescription pump for a short while, but the fastest speed of the pump was so slow that it would have taken around an hour and a half for a simple meal. We also had to get monthly shipments of 30 or so feeding bags with all the complicated tubing. The tubing itself was very skinny, so any particles would have definitely plugged the lines. There’s no way we could have gotten crushed meds through that. Unacceptable.
I returned the pump, hunted on Google, and found a simpler peristaltic pump from Simply Pumps. (See photo below). No bells and whistles, just one knob (on the back: off/on/feed rate regulation).
We just had to watch during the feeding to make sure everything was working. A number of times we turned on the pump, but forgot to open the pinch clamp, so pressure built up, the hose popped off, and pureed food shot to the ceiling! Once or twice, the food shot 10 feet across the kitchen and hit our fridge! At the end of our son’s meal, we had to remember to turn it off so we didn’t pump in air.
In the photo below, the long metal straw on the table under the pump head was connected to the inlet side of the pump. It stood in the pureed food in a one-quart measuring cup. The weight of the metal straw guaranteed it wouldn’t float to the top. It could also be used to stir the food. The plastic connector on the table was connected to the outlet side of the pump and to our son’s Mic-Key extension tube.
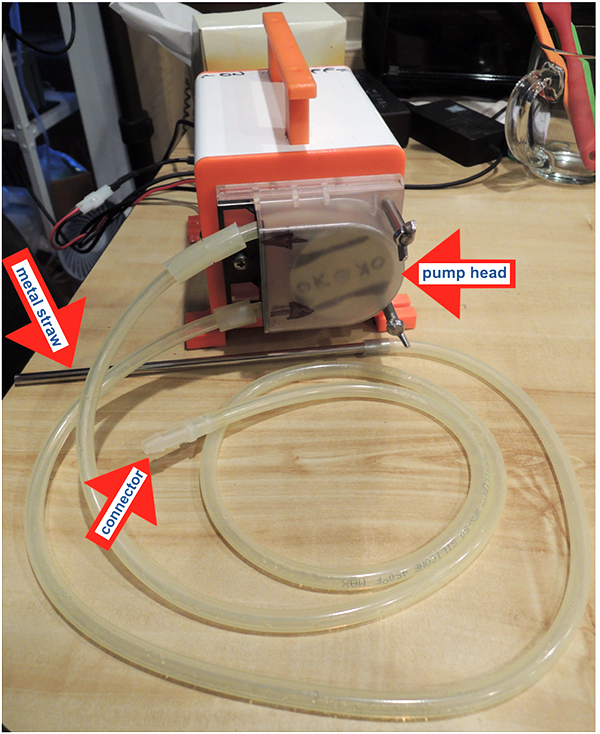
Peristaltic pump, hoses, tube, and connector for enteral feeding.
Many people have posted on the Facebook caregiver’s site asking about giving enteral food through a feeding tube. The following video shows how to give meds PLUS enteral food through a feeding tube using a feeding pump. (Note: This video was made after our son had gotten a feeding pump, so the delivery in the video below is very different from the previous video earlier in this article). For more information on enteral feeding, please click on the following link in this Guide: “Preparing and tracking medications”.
Blockages in feeding tubes
The most important thing about feeding tubes is making sure no pieces or particles in the food and meds go into the tubes. Blockage is a very serious problem, especially if you have a PEG tube with the non-removable extension tube.
If the nonremovable feeding tube does become blocked, do NOT try to remove the blockage by using the syringe to force the blockage into the stomach. That will only compact the blockage. Don’t try to pour or push any liquid into the plugged tube. I’ve seen Facebook users recommend putting soda into the feeding tube! Don’t do this!
As an analogy: if traffic is stopped in a tunnel due to an accident in the tunnel, you can’t use a bulldozer to push everything out the exit. The bulldozer will just pack the cars into a huge compacted pile against the accident. You have to begin backing the cars out the way they entered.
If you Google something like “how to unblock a feeding tube,” you will get intelligent instructions. Here are my instructions, which are similar to many of those on the web (see picture below).
To free a feeding tube blockage:
- Use an empty syringe, push the plunger all the way in, and connect it to the feeding tube.
- Release the pinch clamp on the feeding tube (you can even slide the pinch clamp away from the blockage and rotate it).
- Massage or squeeze the blocked area to break up the blockage.
- Pull the plunger outward slowly.
This will pull the clog back out, not compact it in further. Additionally, any air or stomach contents may come out and help free the blockage. You could probably also try putting your mouth over the end of the just extension tube and sucking out the blockage. Note that the male-female connectors are both the catheter type.
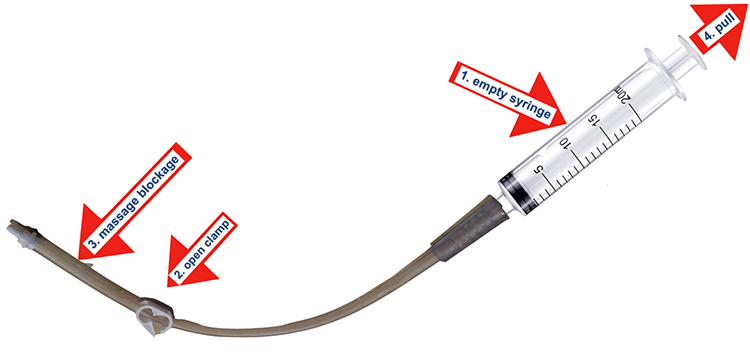
How to unblock a feeding tube.
One Facebook post asked if vomit could be withdrawn from the stomach through the patient’s Mic-Key button so the patient didn’t have to throw it up. The Mic-Key port in not mounted at the bottom of the stomach, like a drain in a bathtub.
Removing stomach contents is not possible because the feeding tube is probably mounted higher up on the stomach, like the overflow opening at the top of a bathtub, not low down, so the level of stomach contents might not even come up to where the port is.
Mic-Key problems
Leaking around the stoma
Occasionally stomach contents leaked from our son’s stoma (not from the Mic-Key tube itself). Leaking might mean that the Mic-Key isn’t sealing to the stoma area. We put small split absorbent pads against Jeremy’s stomach and behind the Mic-Key to soak up any leaking.
The balloon inside the stomach might have lost some water. It should be inflated to about 10 mls with water. A caregiver should measure the volume every so often and add water if necessary.
This is easy to do: The Mic-Key has a side port. Simply connect the 10 ml syringe that came with the Mic-Key to the side port, withdraw all the water and measure it right in the syringe.
IMPORTANT: if the balloon is completely deflated, you don’t want to pull it out, so gently hold it in place. If the balloon needs more water, add enough to get 10 mls max.
Leaking due to faulty pinch clamps
Many of the pinch clamps on our son’s extension tubes leaked, no matter how hard we squeezed them. The upper jaw of the pinch clamp didn’t meet the lower jaw, but instead, overlapped the bottom jaw (see photo below).
The enteral feeds and meds leaked into our son’s stomach when we held the feeds up high for gravity feeding. We also sometimes saw his stomach contents leak out when we lowered the feeds below the Mic-Key, even though the clamps were supposedly closed.
The kinks in the tubing caused by the pinch clamps sometimes allowed accumulation of particles and eventually blockages (like a speed bump slowing you down). I had to slide the pinch clamps up and down slightly and rotate them to avoid permanent kinking in one spot. We eventually began replacing the removable tubes every week.
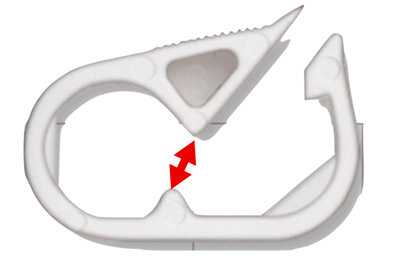
The upper and lower jaws of the pinch clamp don’t meet.
Staining
A couple of the OTC nutraceuticals our son wanted contained turmeric or curcumin. The Real Food Blends meals also had colors. So both the Mic-Key tube itself and the extension tube quickly stained yellow. This didn’t affect performance, but the tubing looked dirty.
Leaking due to worn bayonet valves
Our son’s original PEG (with the nonremovable extension tube) was installed by a GI doctor. About three months later, his nurse replaced it with a Mic-Key tube. I don’t remember why we had the first one changed after only three months. Our son’s first Mic-Key was in place for about one and a half years.
Eventually it began leaking whenever we uncapped it (by pulling the tab). His doctor wasn’t at all concerned about the leak. He told us the feeding tubes developed leaks over time and that some of his patients had the Mic-Key tubes in for years.
I called Avanos, the manufacturer, and a nurse told me the bayonet valve inside the Mic-Key wore out from usage. She also said the Mic-Key tube itself should be replaced frequently, even every three months. She was surprised that our son’s had lasted about a year and a half.
The Avanos nurse also said that the stoma should be measured by the doctor to make sure that he had the correctly sized Mic-Key tube. The only way to stop the leaking until we had the Mic-Key replaced: I inserted an extension set into the Mic-Key tube, closed the pinch clamp, and also plugged the female end.
Tearing of the rubber plug and flap
Regarding our son’s Mic-Key tube that was in for about a year and a half: we panicked when we discovered that the tiny, round plug under the pull tab (labeled “cover” in the blue photo several photos above) tore almost completely away from the pull tab.
I had to use needle-nose pliers to pull the plug out of the Mic-Key tube hole because there wasn’t enough of the plug still attached to the pull tab to survive another pull.
If the tiny plug had torn off or if I hadn’t been able to remove it, we would have had to go to the ER. On one or two other Mic-Key tubes, the end of the flap tore off from frequent use, so we had to unplug the Mic-Key carefully by getting our fingernails under the remaining piece of the flap and lifting the plug out of the hole. Then we made an appointment to have it replaced.
Defective extension tube
We had two problems with a newly opened extension tube:
- We didn’t discover that the white plastic male end of the tube was not completely attached to its own tubing.
- We didn’t know that the pinch clamp wouldn’t squeeze completely.
So not only did the feed leak past the pinch clamp, but the feed then leaked out the side of the extension tube where the male tip had separated from the tubing. It was essentially a hole in the side of the tube.
It is important when giving food or medicine through the tube to try to expel air before connecting to the patient. Also, the elevation of the feeding tube depends on how you’re feeding. If you are gravity feeding and the liquid feed is too runny, the feed will rush downhill into the stomach and the air it is displacing might come out of the stomach and up through the feed. You might have a geyser.
If you are pump feeding, we always had the feed go uphill into the stomach whenever possible. If there is a low spot or valley in the tube, any particles will accumulate there and cause a blockage, especially at the kink. Try to avoid getting any foamy food into the stomach—otherwise the air will cause bloating.
The Real Food Blends salmon meal had more particles than the other five entrees, so sometimes the tubing plugged up. Gently squeezing the feeding tube usually liberated the plug. If that failed, we simply disconnected the extension tube and washed it out at the sink.
When you’re finished with the meds or food, clean everything well with dishwashing detergent. We used a very skinny bottle brush to clean out the extension tube.
Because we used only Real Food Blends meals for our son (obtained after a fight with the insurance company) and they’re made with real blended foods, the vegetable oils and meat fats greased up the equipment. It was very important to use soap and clean and rinse thoroughly.
To confirm that the extension tube was clean, I always held the equipment up to the light to inspect it. If I saw ANY greasy droplets, I recleaned. If you don’t clean the equipment well, your loved one will end up with grease and soap from the previous meal. You wouldn’t want to be served on a dirty plate, right? Likewise, your loved one would not want to eat through a dirty tube.
Burping or stomach gas
If the patient has stomach gas, simply attach the Mic-Key extension tube and an empty syringe barrel (no plunger), hold it upright, and open the pinch clamp. See drawing below.
The syringe barrel is helpful because if and when stomach contents launch up the feeding tube, they will just fill up the empty barrel and then run back down into the stomach.
Without the empty barrel, there’s a good chance that food with spray everywhere. Since our son had stomach gas even during the night, I hung this setup from an IV drip stand so he could “burp” all night long.
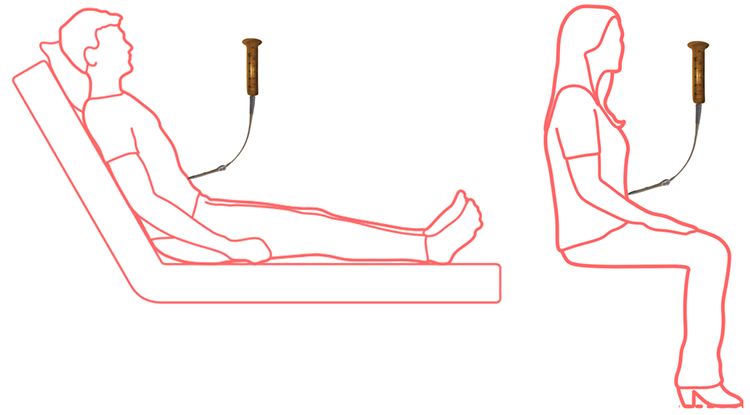
Relieving stomach gas while lying and sitting.
(Drawings adapted from Dimensions.)
Note: The Farrell valve is a device that can be used to relieve stomach gas buildup and discomfort. Our son never used one, but here are two links for those who are interested:
https://www.medicaleshop.com/farrell-valve-for-all-enteral-feeding-devices-96-ml-30case
Diluting pureed foods
The Real Food Blends meals were too thick for bolus, gravity, and pump feeding, so we diluted them. We used prune juice, kefir, Gatorade, tomato juice, pineapple juice, coffee, and almond milk and tried to get the same volumes for each meal.
Sometimes, we just added a heaping teaspoon of instant coffee to the mix because our son needed a boost in the morning. Also, we added a half teaspoon of salt into the breakfast meal because some salt was needed in the diet and none of the Real Food Blends meals had any. Sometimes the pouches contained food pieces, so we also used a Cuisinart hand held blender to homogenize everything.
Because the Cuisinart blender whipped air into the food, the meal had air bubbles. I was concerned about the air getting into our son’s stomach and causing bloating, so I bought a great device from PrepSealer. They sell vacuum containers and battery-operated hand-held vacuum wands.
We prepared the blends in one of their large vacuum containers, closed the lid, stood the vacuum wand on top of the lid, and let it suck out the air. With a little swirling, all the air bubbles rose to the top of the blend (you can watch them) and burst. End of air bubbles.
The vacuum containers came with manual vacuum wands (I had to pump them up and down, like a bike pump). I also paid extra for the rechargeable vacuum wand, but three of these failed after a short while. The manual ones don’t fail.
IMPORTANT: DO NOT microwave anything in the container, even though the instructions say you can! I destroyed one of the containers microwaving food. Thousands of tiny cracks formed in the container (take my word on this).
If you get any food on the removable gasket in the lid, simply remove the gasket and wash it. If the gasket or lip of the container has any dried food, you won’t be able to seal the lid under vacuum.
Connectors
Numerous kinds of connections and connectors are available. The whole medical industry is switching to the Enfit connections and connectors for safety—for instance, so enteral food can’t be fed into an intravenous tube in a patient’s arm.
The picture below shows the old-style connector on the left, called a catheter connection, Kangaroo connection, or legacy connection. We had either a smooth conical connection or a stepped conical connection on everything. We only had the Enfit connections on the 10 ml syringe that we used to add water to the balloon in our son’s Mic-Key tube.
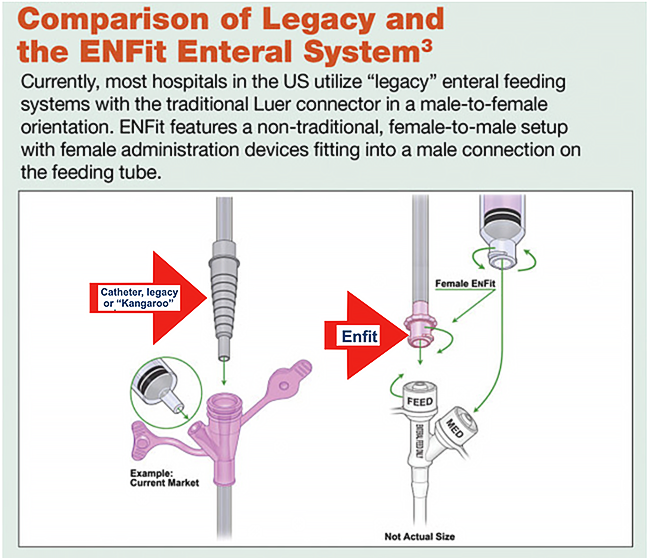
Adapted from Pharmacy Purchasing & Products.
Below is another comparison of various connectors from the same reference.
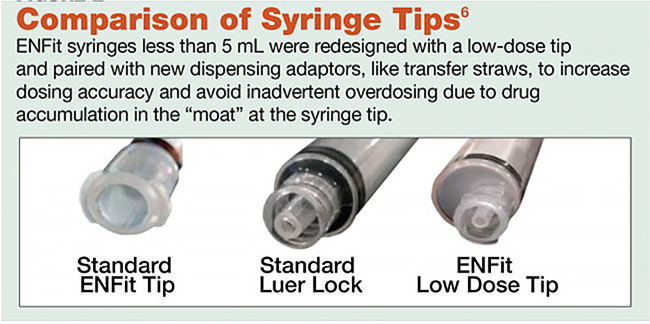
Here’s a small device that will allow you to connect your catheter/legacy/Kangaroo equipment to an ENFit connector:
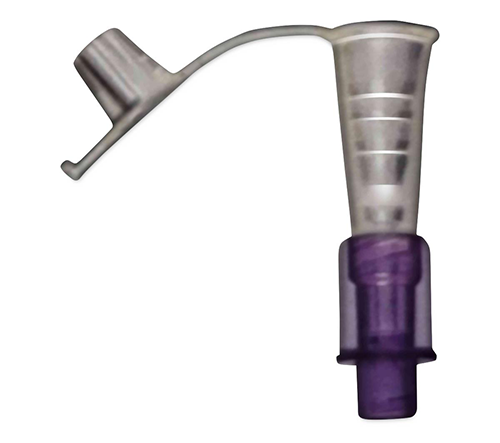
Connector between the male ends of catheter/legacy/Kangaroo equipment and ENFit equipment. Available at Medline.
The following chart shows four different connections being replaced with the Enfit:
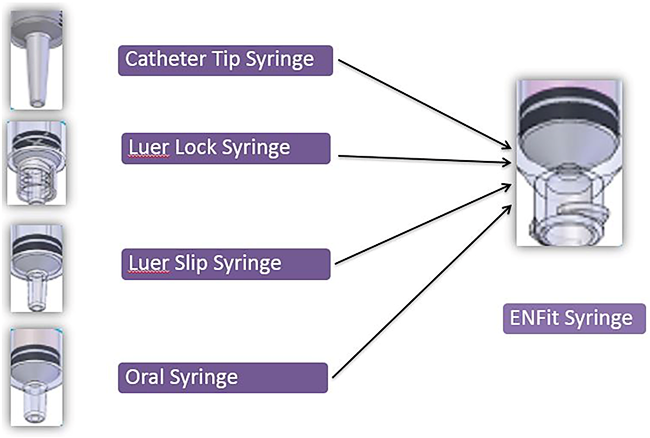
Various connections all being replaced with the Enfit connection.
From Shield HealthCare.
Feeding machines
Feeding machines are available for those who can’t lift a fork or spoon to their mouths. For a devastating, progressive disease like ALS, that expensive device would only be useful for the short time beginning when patients first lose use of their hands but can still eat by mouth and ending when they start choking on food, water, and medicines and can no longer swallow anything.
It would be better to get a feeding tube ASAP. The photos below show the feeding machine from Obi. This website claims it is useful for ALS sufferers.

Feeding machine from Obi.
