Floor-based lifts
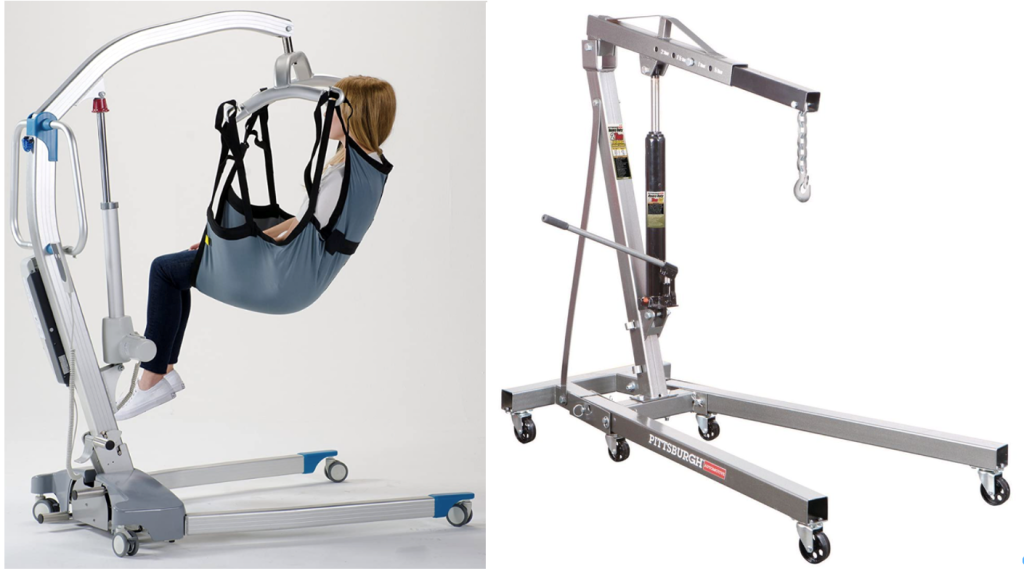
A floor-based patient lift (left photo below) is just a light-duty shiny version of an engine hoist (right photo), which is used in auto shops to lift engines out of cars for repair. A number of companies manufacture floor-based patient lifts, but everyone we’ve encountered has called the floor lifts “Hoyer lifts” even if they were not made by Hoyer (the same way many call a tissue a Kleenex even if it isn’t that brand).
Left: Floor-based patient lift. Available here.
Right: Engine hoist. Available on Amazon.
Lifts are manually operated (the cheaper versions that insurance may cover) or electrically operated (more expensive, so insurance probably won’t cover them). The ALS Loan Closet sent us a brand-new electrically operated floor lift from a nearby supplier, and the two men who delivered it assembled it on the spot. Ours had a rechargeable battery pack so it could be used without the need of a nearby receptacle.
The legs on a typical floor-based lift can be kept parallel or spread out for stability and for fitting around or under objects. The two legs on the unit we had were low enough to the ground so they could roll under our son’s powerchair when we had to lift or place him.
The sling in the left-hand photo has four straps (more about this later) and only two hooks per overhead bracket for holding four-strap slings. Some lifts have three hooks per bracket for six-strap slings. The sling in the left photo offers no head support (bad news for those with head drop). Our floor-based lift had six hooks, so it could use both four- and six-strap slings.
Slings
Most people we talked to were familiar with, or have used, floor-based lifts with slings to transfer patients. Not many have used ceiling lifts because they are much more expensive and have limited range of movement. Ceiling lifts will be discussed later. There are pros and cons to both kinds.
Note: The people in the photos below are models used to demonstrate the products. I wish these vendors had used real patients with real disabilities so potential buyers could see obvious difficulties in lifting and handling.
Slings are available in various shapes and designs.
Half-body slings
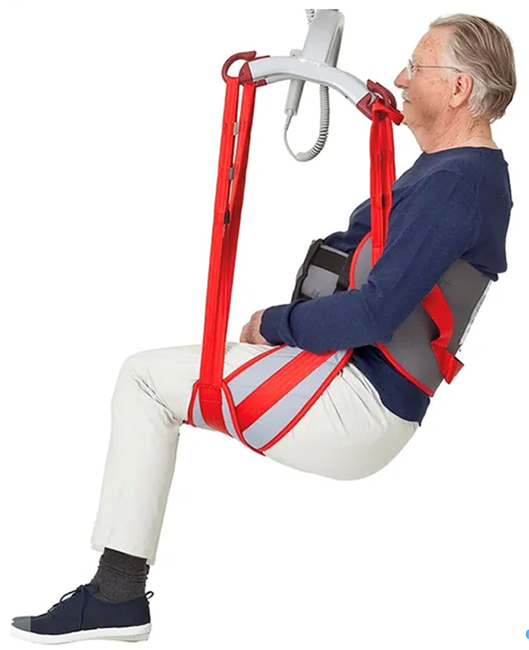
A half-body sling supports only the lower half of the torso. See photo below. This is also known as a U-sling. The lift bracket has two sets of hooks (front and rear). The model in the photo has a good chance of hitting his face on the brackets. He obviously doesn’t have head drop.
Half-body sling. Available at Etac.
Full-body slings
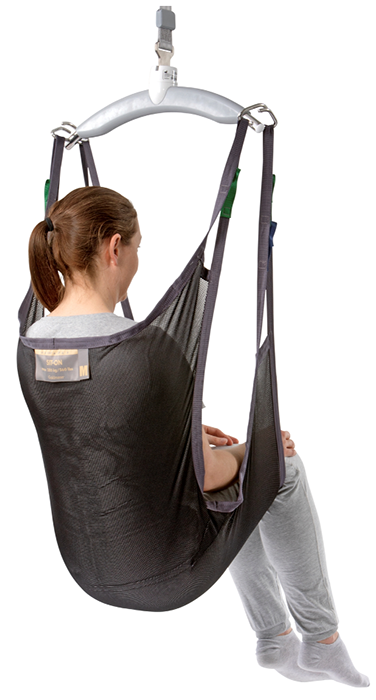
Even though the head isn’t supported, it is called full-body. See photo below. It is very confining. Notice that the four straps are on only two hooks. The model can’t hit her face on the bracket (it’s above her). She obviously doesn’t have head drop.
Full-body sling. Available at Guldmann.
U-Slings
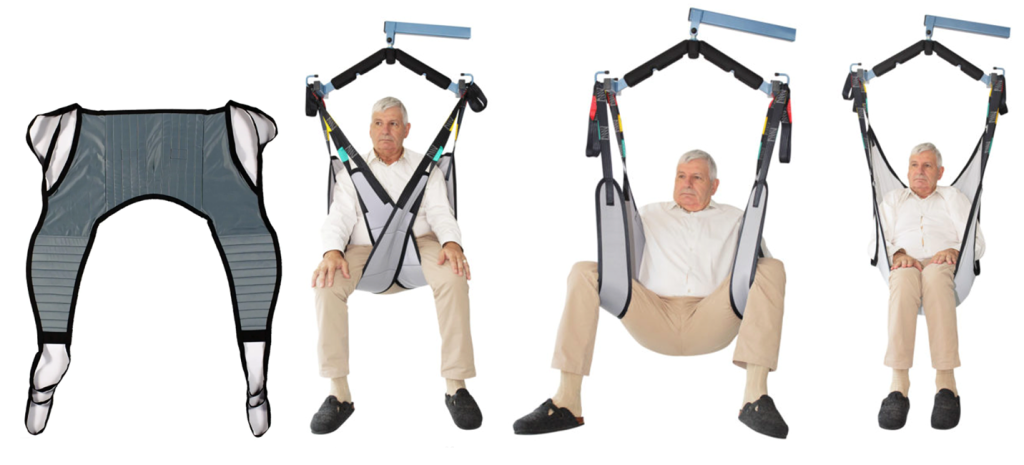
Examples of U-slings are shown below. Note: the U-sling on the left is not the one the man is sitting in).
You can see that all three configurations of the leg straps can be uncomfortable, especially the one in the middle. The middle configuration is also unsafe because the man could fall out of the sling. This sling offers no head support. The “patient” obviously does not have head drop.
Design features
Slings come in a variety of materials, shapes, sizes and features. I discuss a number of them below.
Hard or soft back
We tried a hard-back sling (heavy, stiff padding) on our son, but it was very difficult to position it behind and under him while he was sitting in his wheelchair because we had to lean him forward, slip it behind him, sit him back up, and then get it under his legs. Forget trying to get him in or out of in bed because he could not lie down at all and we couldn’t get it under him at all.
Four or six straps
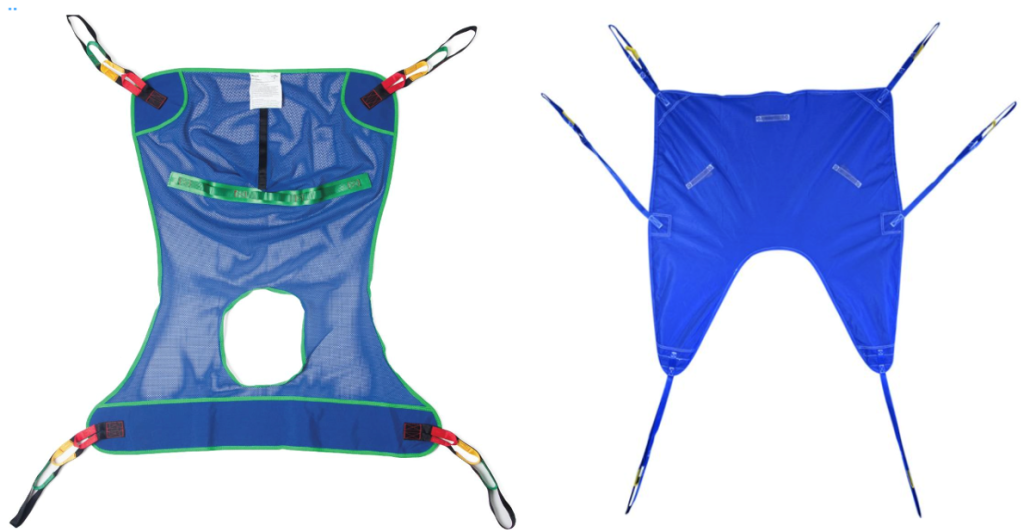
In the photo below, the left sling has four straps with multi-colored loops, along with a commode opening. The colors make it easy to know that you’re using the same loop on the left as on the right of the patient so the sling hangs straight. You can tilt the patient forward or backward by choosing the correct loops on each strap. You don’t have to use the same color loops on upper straps and lower straps.
The right-hand sling has six straps and is a U-sling. The tilt of the patient will be determined by which loops you choose.
Kind of material
Open weave is cooler on the patient and allows air circulation.Commode opening or not
See left photo above. The commode opening in our son’s sling was so big that he almost fell through it and onto the floor one day. We stopped using it after that. I have no idea how a patient could remain in a sling while toileting and not soil it, or even just wet it if a bidet is used. I also have no idea how a caregiver could clean the patient after toileting without wetting or soiling the sling, especially if a bidet is used.Washable or disposable
Self-explanatory.Head support
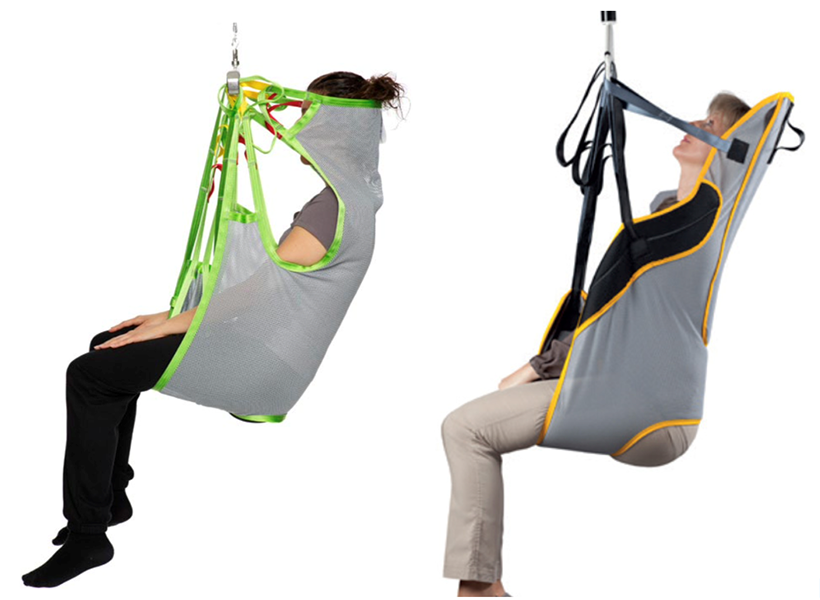
See the photo below. The left sling has a soft head support, and the head tilt will depend on the strap adjustment. This might be good for head drop because the head cannot be moved side to side. The right sling has a hard head support, and the head tilt will depend on the strap adjustment. The head could roll side to side, so it might not be good for head drop. Notice the potty opening on the right sling (not big enough for toileting and cleaning).
Left: Soft head-support sling. Available here.
Right: Hard head-support sling. Available here.
Weight-rated
Make sure the rating will hold the patient.Compatibility with the lift brand
Not all slings will fit on all lift brands. Our son had to sleep with the top half of his mechanical bed tilted up quite steeply because he could not breathe otherwise. This caused him to slide downward during the night, no matter what we tried. We began putting him into bed with his full-body sling already spread out on the mattress so when he wanted us to reposition him, we just had to connect the sling’s straps to his floor lift, lift him off the bed, reposition him, and then put him back down. But the sling was polyester, so he kept sliding all night. We finally gave up on that idea. One of the major problems we kept having with the sling was figuring out the correct selections of the colored loops on each strap. We wanted our son in a sitting position, but depending on the selection and his position, he tilted back too far. It was always a struggle. There was no consistency in positioning because his tilt also depended on where he was positioned on the sling when we got it under him.From the FDA
Here is the description of floor-based lifts from the FDA website (posted in 2018): “Patient lifts are designed to lift and transfer patients from one place to another (e.g., from bed to bath, chair to stretcher). These should not be confused with stairway chair lifts or elevators. Patient lifts may be operated using a power source or manually. The powered models generally require the use of a rechargeable battery and the manual models are operated using hydraulics. While the design of patient lifts will vary based on the manufacturer, basic components may include a mast (the vertical bar that fits into the base), a boom (a bar that extends over the patient), a spreader bar (which hangs from the boom), a sling (attached to the spreader bar, designed to hold the patient), and a number of clips or latches (which secure the sling). “These medical devices provide many benefits, including reduced risk of injury to patients and caregivers when properly used. However, improper use of patient lifts can pose significant public health risks. Patient falls from these devices have resulted in severe patient injuries including head traumas, fractures, and deaths.” The FDA link cited above has compiled a list of best practices that can help mitigate the risks associated with patient lifts. Users of patient lifts should do the following:- Receive training and understand how to operate the lift.
- Match the sling to the specific lift and the weight of the patient. A sling must be approved for use by the patient lift manufacturer. No sling is suitable for use with all patient lifts.
- Inspect the sling fabric and straps to make sure they are not frayed or stressed at the seams or otherwise damaged. If there are signs of wear, do not use it.
- Keep all clips, latches, and hanger bars securely fastened during operation.
- Keep the base (legs) of the patient lift in the maximum open position and situate the lift to provide stability.
- Position the patient’s arms inside the sling straps.
- Make sure that the patient is not restless or agitated.
- Lock the wheels on any device that will receive the patient such as a wheelchair, stretcher, bed, or chair.
- Make sure that the weight limitations for the lift and sling are not exceeded.
- Follow the instructions for washing and maintaining the sling.
- Create and follow a maintenance safety inspection checklist to detect worn or damaged parts that need immediate replacement.
Ceiling lifts
We had a SureHands ceiling lift (left-hand photo below) with a patient frame (center photo below; not a sling) installed in the new accessible wing of our house built for our son. The SureHands metal frame can be used with SureHands’ own rolling floor lift (right-hand photo below) instead of the ceiling lift. The SureHands photos are from that website, but I’ve added some important warning notes in the three red boxes. This lift is one of several other ceiling lift brands.
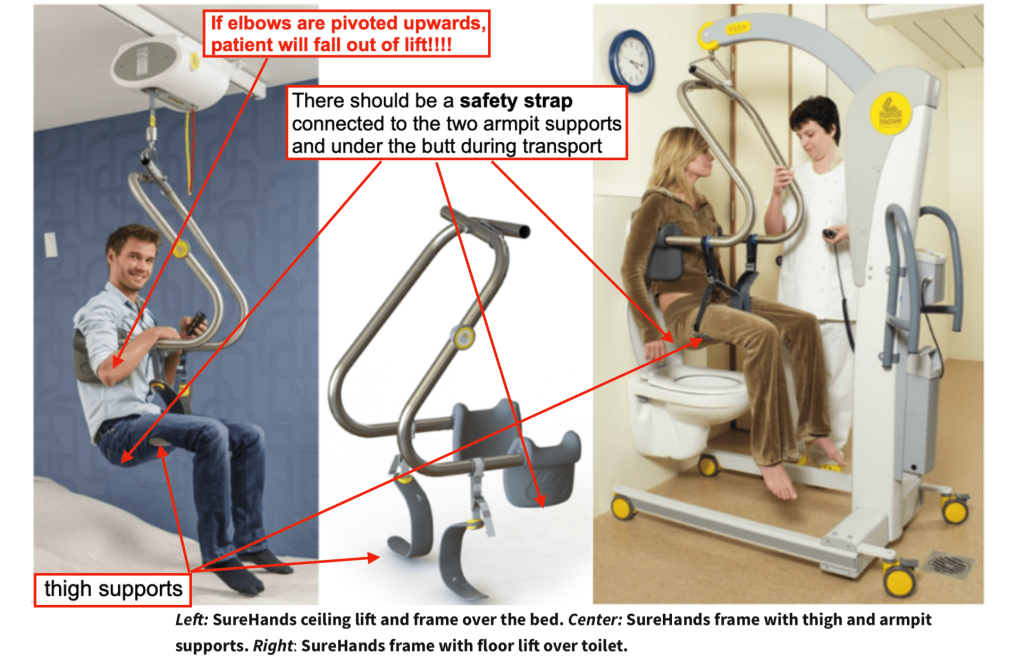
There are pros and cons to a ceiling lift versus a floor lift:
Ceiling lift: how do you get through a doorway? (See the photos from our own house further down in this section.) The ceiling lift has a limited traveling distance because it needs ceiling tracks everywhere it has to go.
Rolling floor version: can the large 4-wheeled “fork” fit under or around a toilet, the powerchair, the bed, or over a threshold?
We also had to jury-rig this equipment later on with an extra strap to deal with our son’s head drop because neither the SureHands metal frame, nor the SureHands sling (which we tried as a demo) would support his head.
Think about the fake model in the right-hand photo above: Her pants are currently “up.” It would be very difficult to pull them down below her knees while she’s suspended because the thigh supports are in the way. Pulling her pants down only until her pants hit the thigh supports aren’t far down enough to prevent soiling her pants.
That’s why placement on the toilet was complicated. When our son needed the toilet, we had to complete a number of steps: while suspended over the toilet, we had to lower his pants down to the thigh supports, then lower him onto the toilet, remove both thigh supports, and then slide his pants farther down his legs. Pulling his pants down caused him to slide forward slightly on the toilet seat and be out of range of the bidet washing stream, so we had to put the thigh supports back on him, lift him off the seat, drop his pants farther (if needed), reposition him, and lower him again. All the steps would have to be repeated in reverse afterward.
The SureHands system also comes as a motorized traveling version so the patient can travel on the ceiling track alone by operating the hand-held remote as in the left-hand photo above. (And what if you are alone and drop the remote?) However, our son had no use of his hands, so our system didn’t have a traveling motor; it required a caregiver to push it along, which was luckily very easy.
The biggest disadvantage to the metal patient frame for our son was the following: Early in his diagnosis, he was able to sit upright in the frame so we could see daylight under his armpits. All his weight was on the thigh supports (the curved pieces in the middle photo above, and they were NOT comfortable). The thigh supports come in different sizes, depending on the user weight and height, and they were expensive.
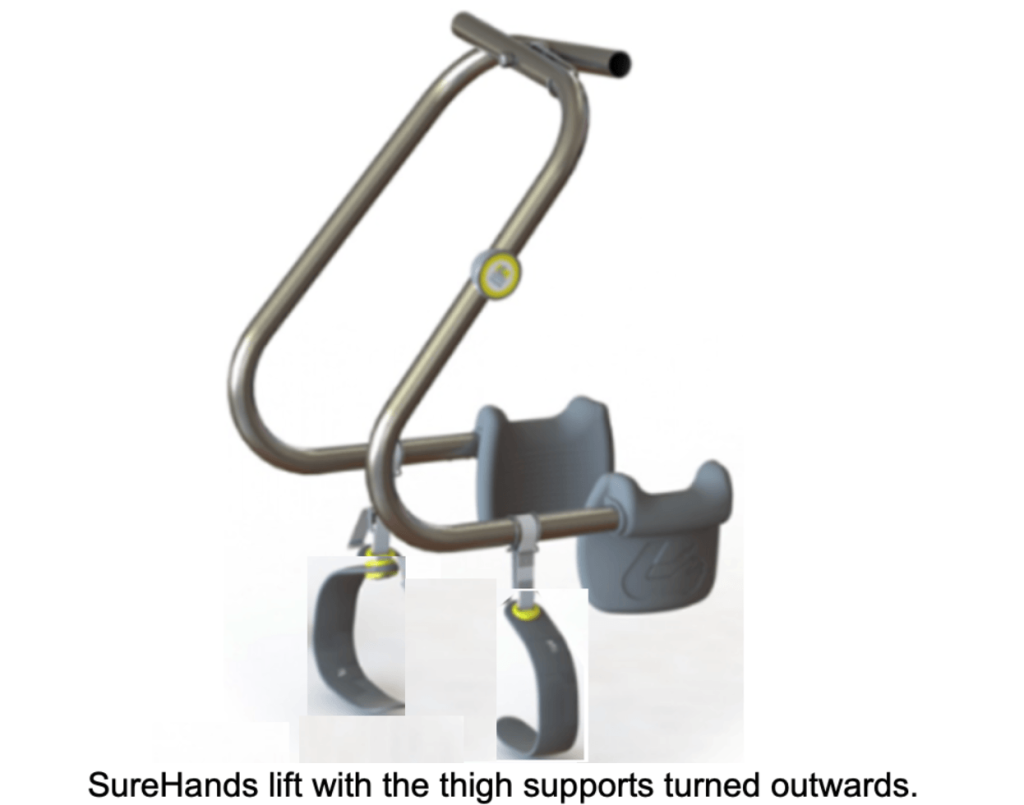
SureHands recommends the two thigh supports be positioned between the patient’s legs, as shown in the middle photo above, but we tried that and I think the supports were pinching our son’s privates, so we rotated them so they were on the outside of his thighs as in the photo below. (Pardon my artwork.) I think we also chose this configuration because the supports were easier to remove outwards from his legs once we got him on the toilet. Caution: Numerous times when we were positioning the lift around our son to raise him off his powerchair, we accidentally slipped the free ends of the thigh supports under the metal support plate of the powerchair that the cushion rested on and began to lift the powerchair off the floor!!!
As our son weakened even further and could not sit upright, he sagged considerably. All his weight was now in his armpits, and his butt hung way down (worse than the fake patient in SureHands’ left-hand picture above; forget the smiling). The sagging caused the thigh supports to slide forward towards his “kneepits” as his butt sagged even more, so it hurt to remain suspended for even a few minutes. Whenever he had finished on the toilet, I repositioned the lift to get him up off the toilet seat, in order to clean his bottom because the bidet never did a great job because we could never position him correctly so he was “on target”. He had to remain suspended in mid-air until I had finished cleaning him, and he was very uncomfortable.
The very dangerous aspect of the metal frame: Whenever he was in the frame, I had to make sure his elbows never involuntarily pivoted outwards and upwards, because he would have fallen out of the lift and hit the floor. NO doubt. I was fully aware of this, so whenever I lifted him in the frame, I kept my hands gently on the outsides of his elbows to prevent them pivoting upwards. That’s why I added the suggestion in the SureHands photo at the top of this section that there should be a safety strap that would connect the two armpit supports and go under the patient’s butt during lifting and transport.
If you want to see the WRONG way to use this ceiling lift, look at the two photos of the fake patient below. The photos are from the video in this link: https://imgur.com/gallery/when-you-come-home-after-15h-shift-xTJ5mYl. I don’t see thigh supports in this video like we had. I don’t know if this is even a SureHands product. That fake patient’s elbows have already pivoted outwards as if she’s about to flap her wings. She can’t even level her head. Her shoulders are jammed against her neck. I pity that woman.
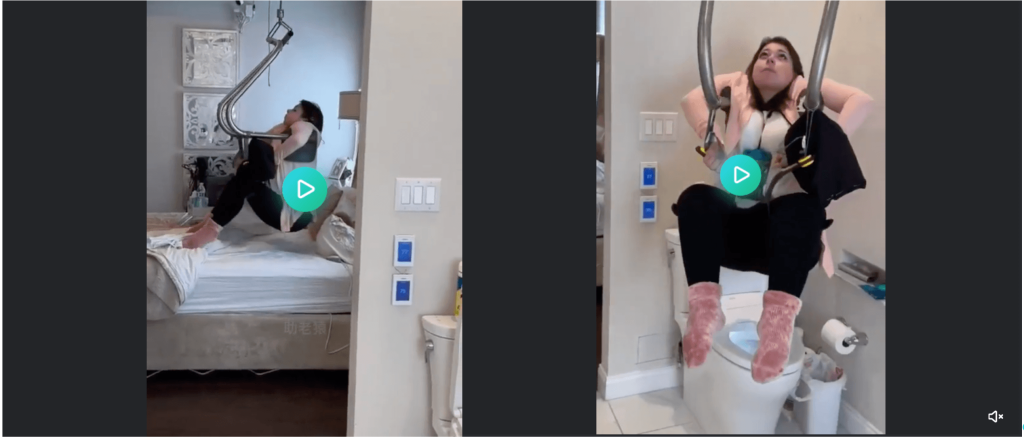
There is obviously no privacy for a patient who needs toiletting.
The photos below show the actual setup of our ceiling lift in our son’s bedroom and bathroom in our new wing.
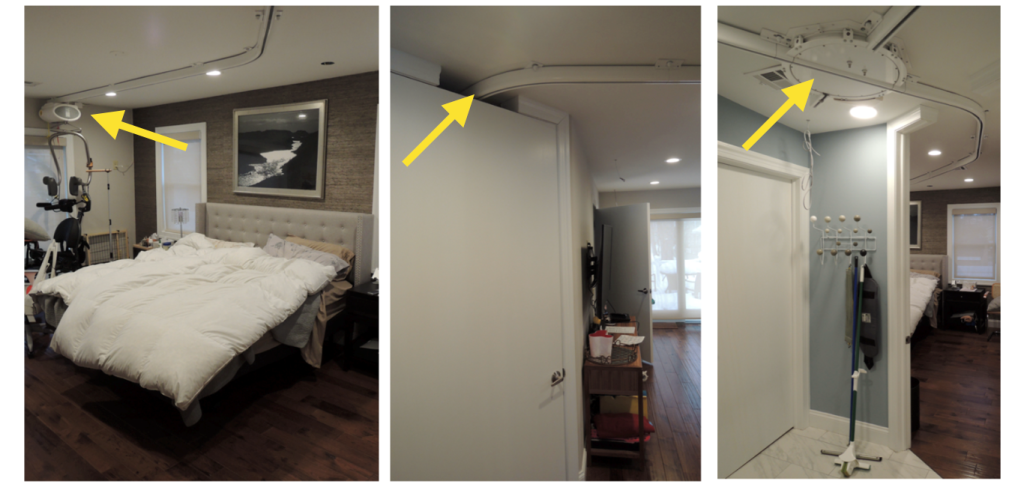
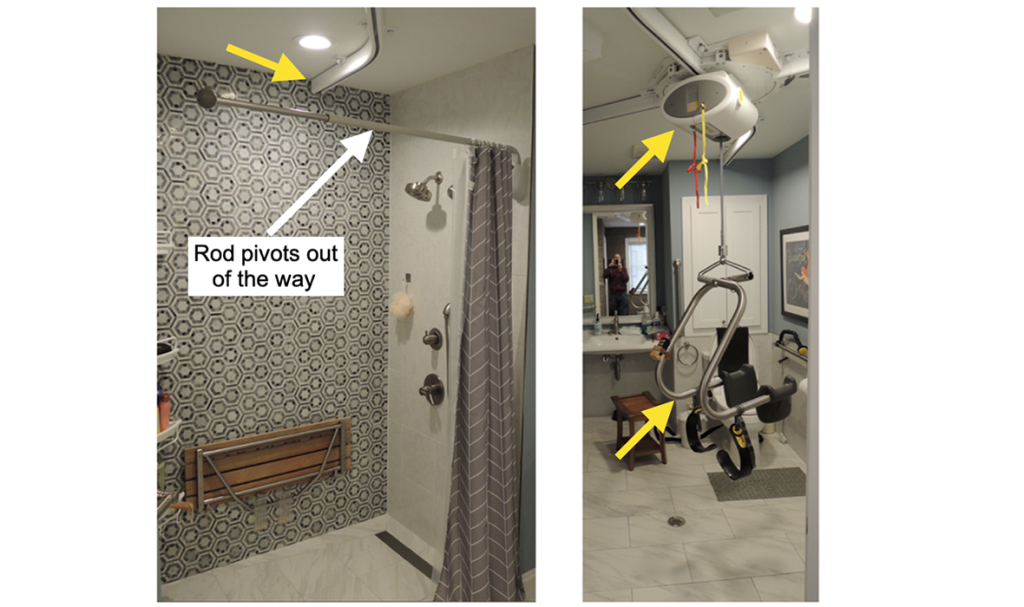
We still have the SureHands system in this bedroom, even though the system has not been used since October 2021. I had to have the large battery in the ceiling unit replaced by SureHands in 2025 because it wouldn’t charge well anymore. I keep it in working condition for any “eventualities”. I have noticed that the two thigh supports have become sticky over time, because the plastic coatings on the two metal thigh supports are decomposing. For those interested in this product, you should bring this issue up with the vendor.
Head drop issues
When we first got the SureHands lift, we really liked it, but as our son worsened, it became more and more difficult to use. When our son was able to sit up in bed fairly easily, we just inserted the armpit supports, put the thigh supports under his legs and lifted. Ideally, we could even see daylight through his armpits, so we knew almost all his weight was on the thigh supports.
Eventually he couldn’t sit up at all. He slouched terribly and sagged way down in the lift, so almost all his weight was in his armpits. We developed a very complicated, very difficult procedure for getting him up and out of the bed and also back into bed. Three people were needed, but two could do it with supreme effort.
If I could have foreseen the difficulty we would have, I might have wanted a different device, but there probably wasn’t any. Our son found SureHands on the web. If SureHands were to have some field rep come to our house and try to get our son in AND out of bed, I think the rep would have looked for another line of work.
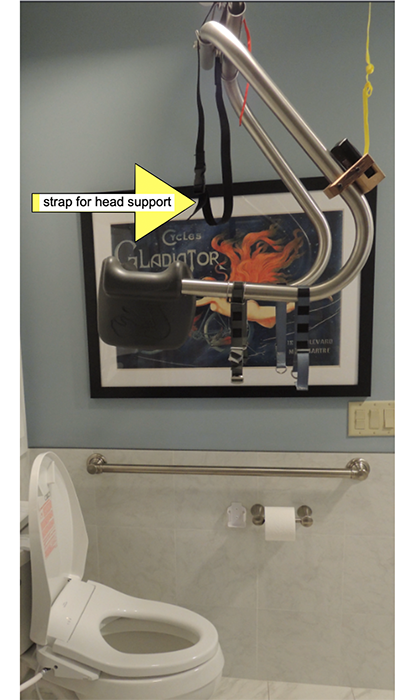
After Jeremy developed head drop, we added a head support strap to the frame as in the photo below: We used this extra strap whenever we moved him in the frame and also when he was on the toilet. After we placed him on the toilet, we disconnected and removed the thigh supports, lowered the lift, and moved the armpit supports into his armpits, but without them providing any lift, and then draped the wide buckle-type adjustable cloth strap you see in the photo over the very top of the metal frame, connected it under his chin, and tightened it just enough to hold his head up.
It was so comfortable that he used to fall asleep on the toilet. A small benefit.
Note: I mounted a small wooden holder on the frame (on the right side of the photo) so we could store the remote when it wasn’t in use. I think the newer version has a magnetic holder.
Frame with chin support strap, before lowering into place
Pros and cons
As opposed to commode-type slings, there is no “potty opening” on the frame to worry about. We used the ceiling lift to reposition our son many times during the night because the inclined headrest of the bed caused him to slide downward. As he slid, it forced his head to tip forward.
Yes, we had our son elevated almost as high as the ceiling lift could go because we could not have gotten him into bed otherwise (unless I shortened the bed’s legs). After the ceiling track was installed in the new addition to the house, the foundation settled a little so there was an uneven gap where two pieces of track met near his bed and this made it difficult for us to roll the motor along the track.
One of the advantages of the metal frame support was its completely open back and buttock areas. Our son had open pressure sores and very distressed skin along his spine about halfway up his back. Although it took time and he was uncomfortable, we were able to clean and dress the open wounds without having to roll him over to his side in bed or tilt him forward in his wheelchair (he couldn’t breathe in either position).
Instead, we raised up his shirt or removed it while he was on the toilet and then lifted him into the air, giving us clear access to his back. The other great advantage to the frame was complete access to his butt for cleaning. Even though he had a bidet, it never cleaned him well because he could not position himself in the water stream.
For cleaning, we lifted him off the toilet, placed a garbage pail under him, donned gloves and used baby wipes to clean, dry, and dress him. We tried lowering him onto a backless bench to alleviate the pain of keeping him elevated while we cleaned and dressed his pressure sores, but he tilted backward. This added new complications while we tried to work on his back.
Sit-to-stand lifts
The sit-to-stand class of lifts help a person stand up from a sitting position. The lifts I described in the previous sections allow the patient to be lifted high, transferred, and placed somewhere else. We placed our son in his bed with the ceiling lift.
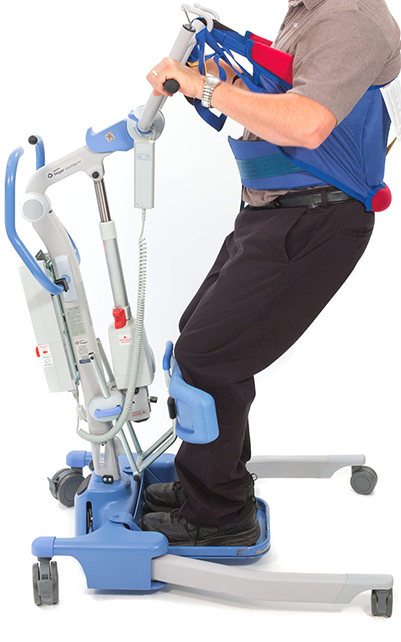
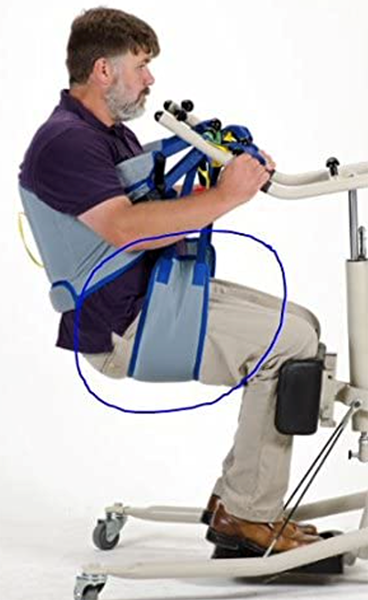
The sit-to-stand lifts like those in the photos below only help the person stand up. Period. They don’t lift the person off the floor, so I don’t see how they could be used to place someone in a bed unless the bed is very low. Patients could be wheeled backward to a bed and then they could be seated, the slings could be removed, and then their legs could be pivoted onto the bed while the caregiver helps them lie down.
The sit-to-stand could be used to place someone on a toilet or shower bench. They have various ways of lifting: back slings (like the first photo below), butt-only slings (not shown), combos of the two (second photo below). These sit-to-stands are for transferring only. They are not for lengthy standing like our son wanted. There’s no table or tray in front of them. I can’t imagine standing in a contraption like those with nothing to do.
Be aware that these sit-to-stand devices put a lot of pressure on the person’s shins or knees and also the lower back and even the butt. I don’t know how these could be used if the person has pressure sores in those areas.
Sit-to-stand lift. Available on Amazon.
Sit-to-stand lift with butt sling. Available on Amazon.
Standing frames (Standers)
Our son had an Evolv standing frame (or stander), like the one in the photo below.
Instead of a sling, it had a chair that raised the person to a standing position. It also has a tray large enough for a plate of food or laptop or tablet. At least this photo shows a real patient and not a model.
Again, there is a lot of pressure on the knees. The photo shows no provision for head drop, but you can get add-on parts, although our son was miserable in the head support.
We were advised to be monitoring our son’s blood pressure while he was using the Evolv Standing Frame.